When: After Lesson 27 | Time: Three 2-hour sessions: plan and prove each part, join them up, then test and demonstrate | Result: Competent / Not Yet Competent
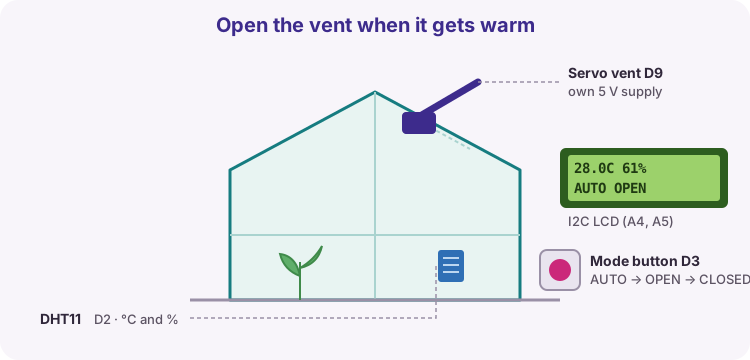
A small greenhouse needs an automatic roof vent. A servo opens the vent when it gets too warm and closes it when it cools down. The grower wants to see the temperature and humidity on an LCD and to take over with a button. You do not start from nothing: the Capstone 1 environment monitor already reads the DHT11 and drives the LCD. You add the vent and the button.
What your system must do
Start from the Capstone 1 sketch in Lesson 27: keep the DHT11 on D2 and the I2C LCD; leave out the LDR and buzzer
Servo vent on D9, powered from its own 5 V supply with a common GND: CLOSED at 0°, OPEN at 90°
AUTO mode: open at 28 °C or warmer, close at 26 °C or cooler
Mode button on D3 (to GND, INPUT_PULLUP) steps AUTO → OPEN → CLOSED → AUTO. One press = one change: reuse the button code from Task A
A failed DHT11 reading keeps the last good values, shows ERR on the LCD and never moves the vent
LCD row 1 shows temperature and humidity (for example 27.0C 61%); row 2 shows the mode and the vent (for example AUTO OPEN)
Use the loop() layout on this brief, so the button always answers straight away
Conditions
Individual work. Show your plan sheet before you wire, and prove each part on its own before you join them.
Course notes, lesson sketches and Code Along may be used. You must be able to explain your own sketch.
The demonstration ends with the assessor unplugging the DHT11 data wire.
Kit
Uno, breadboard, DHT11, I2C 16x2 LCD, hobby servo, separate 5 V supply, push button and jumper wires.
loop() layout you may copy
The button is checked on every pass, so it always answers. The slow work happens once every 2 s, timed with millis() as in Capstone 1. You write the four functions.
unsigned long lastRead = 0;              // with your other variables

void loop() {
  checkButton();                         // every pass: the button code from Task A
                                         // on a press: next mode, updateVent(), showLcd()
  if (millis() - lastRead >= 2000) {     // every 2 s, no delay()
    lastRead = millis();
    readDHT();                           // read, or keep the last values if it fails
    updateVent();                        // decide OPEN or CLOSED and move the servo
    showLcd();                           // both rows, padded with spaces
  }
}
Evidence to submit
The plan sheet on this brief (pins, power and modes), initialled before wiring
The subsystem log on this brief, initialled
Your sketch (.ino)
The test table on this brief, filled in
A fault you found and fixed
Plan sheet: pins and power
Fill in before you wire. The assessor initials it.
Part
Uno pin
Powered from
DHT11 data
LCD SDA
LCD SCL
Servo signal
Mode button
Plan sheet: modes
Fill in before you write the code.
Mode
What the vent does
LCD row 2 shows
AUTO
OPEN
CLOSED
Subsystem log
Prove each part with its own short test sketch before you join them. The assessor initials each row they see working.
Part
Test sketch shows
Date
Works?
Assessor
DHT11
°C and % on Serial every 2 s
LCD
Text on both rows
Servo
Moves to 0° and 90° on its own supply
Mode button
One press = one change on Serial
Test table
Run every test on the finished controller. Warm the DHT11 with your hand.
#
Test
Expected
Observed
Pass?
1
AUTO, room temperature
Vent CLOSED; LCD shows °C and %
2
AUTO, warm the DHT11 to 28 °C
Vent OPEN
3
Let it cool to 26 °C
Vent CLOSED
4
Press the mode button
OPEN mode, vent opens
5
Press again
CLOSED mode, vent closes
6
Press again
Back to AUTO
7
Unplug the DHT11 data wire
ERR shown, vent does not move
8
Press the button while the servo moves
Mode changes straight away
A fault I found
Something that did not work at first, and how you found and fixed it.
What went wrong
What I checked
How I fixed it
Assessment criteria
Tick one box per criterion. ★ marks a critical criterion.
#
Criterion
Competent when
Not yet competent if
C
NYC
1
Plan and parts proven
Plan sheet shown before wiring; the subsystem log shows the DHT11, LCD, servo and button each working on its own.
Plan sheet missing, or parts joined without being proven first.
2
★ Safe servo power
Servo on its own 5 V supply with a common GND; the Uno does not reset when the servo moves.
Servo powered from the Uno 5 V pin, no common GND, resets, or unsafe wiring.
3
★ Vent and modes
In AUTO the vent opens at 28 °C and closes at 26 °C; OPEN and CLOSED modes work; every vent row of the test table passes.
Any rule or mode behaves differently from the brief.
4
Failed reading
Unplugging the DHT11 shows ERR and the vent does not move.
A failed read moves the vent or shows a false temperature with no ERR.
5
LCD and button
Both LCD rows clean and updating; the button changes the mode straight away, even while the servo moves.
Garbled or stale text, or the button is ignored at times.
6
Testing and explanation
Every row of the test table filled in with what really happened, one fault written up, and can walk through the sketch from the reading to the vent moving.
Rows missing or copied, no fault written up, or cannot explain the sketch.
How the result is decided
Each criterion is marked Competent (C) or Not Yet Competent (NYC) on the evidence seen. There are no partial marks.
The overall result is Competent only when every criterion is Competent.
Critical criteria (marked ★) cover safety and the core purpose of the task. They cannot be made up by strong work elsewhere.
A Not Yet Competent result lists the criteria still to meet, written feedback and a reassessment date.
One reassessment is offered, normally in the next buffer session. Only the criteria marked NYC are reassessed.
Assessor guidance
Ask for the subsystem log before the demonstration starts.
Unplug the DHT11 data wire yourself and check the vent does not move.
Press the mode button while the servo is moving to check it still answers.