
Servos & Position
Attach a servo, send it to an angle, sweep it with a loop, steer it from a knob and a button, and sweep it without blocking the sketch.
Telling a servo where to go
An LED takes a brightness and a motor takes a speed. A hobby servo takes a position. You say arm.write(90) and the servo's own electronics drive its motor until the horn is at 90°, then hold it there.
Two lines get you going:
#include <Servo.h>at the top, andServo arm;abovesetup()- note there are no brackets after the namearm.attach(9);insetup()- this claims the pin and starts the pulses
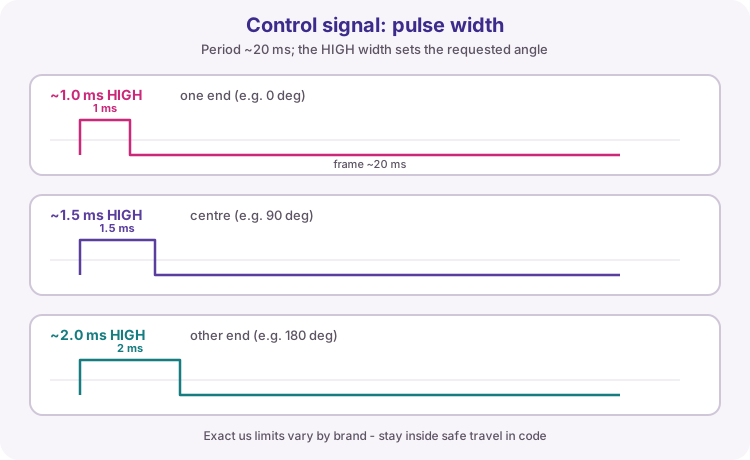
After that, arm.write(angle) asks for an angle from 0 to 180. Underneath, the library is sending a pulse about every 20 ms; a pulse near 1 ms means one end of the travel, about 1.5 ms means the middle, and about 2 ms means the other end. The board shows you both the angle and the pulse width while the sketch runs.
What the simulator does not model. It shows the angle your sketch *asked for*, the instant you ask for it. A real horn takes roughly 0.2 s to swing 60°, it can be pushed off position by a load, and it draws far more current while it is moving. That is why real sketches wait between steps - and why the servo gets its own power supply.
End to end and back
Press Run and watch the dial. Notice that attached appears as soon as attach() runs, before any angle is written.
0 degrees
180 degrees
0 degrees
Servo arm;has no brackets.armis the name you chose -gate,ventorsteeringwork just as well.- On the bench the horn is still travelling when
write()returns. Thedelay(800)is what gives it time to arrive.
Attach and centre
The shortest useful servo sketch. In setup(), attach the servo to pin 9 and send it to 90° - the middle of its travel. loop() stays empty.
Three positions, over and over
Step the horn through 0° → 90° → 180°, waiting 500 ms at each one, for ever.
The wait is not decoration. Without it the servo would be given a new angle before it has reached the last one.
Sweep it smoothly
Three positions is a jump. A sweep is a slide.
Use a for loop to go from 0 to 180 in steps of 2, with a 15 ms wait after each write(). When it reaches the end, loop() starts it again from 0.
Safe limits
write(0) and write(180) are the ends of what the *library* will ask for. They are not necessarily the ends of what your servo can reach. Push a horn into its own mechanical end stop and the motor stalls: it buzzes, gets hot, draws a lot of current and can strip its gear train.
So real sketches keep away from the ends. The lesson uses 10° to 170°; the next exercise uses 20° to 160°, which is a sensible starting point for a servo you have not calibrated yet. Once the mechanism is built you find the real limits by hand, slowly, with the load disconnected.
map() does the scaling for you, and it is happy to map straight into a limited range.
The knob steers the servo
Read the potentiometer on A0 (0-1023) and use it to set the servo's angle - but only within the safe range 20° to 160°. Wait 15 ms after each write so the servo can keep up.
Turn the slider while it runs. The test turns it for you: right to the bottom, the middle, then right to the top.
A button opens and closes the vent
A vent flap has two positions: CLOSED at 0° and OPEN at 90°. Each new press of the button on D2 swaps between them, and prints the new position once.
Start closed. The output for three presses is Vent: OPEN, Vent: CLOSED, Vent: OPEN.
Vent: OPEN
Vent: CLOSED
Vent: OPEN
Sweep without blocking
All those delay(15) calls mean the sketch can do nothing else for the whole sweep. Here the onboard LED must keep blinking every 500 ms, and its timer is already written.
Sweep pin 9 with a millis() timer instead: every 15 ms add step to angle and write it. At 180 turn round and come back; at 0 turn round again. No delay().
Try it on a real Uno
Three things the simulator cannot warn you about, and all three bite on the bench:
- Power. A servo is a motor. Running it from the Uno's 5 V pin browns the board out and resets it, usually just as you press the button. Give it a regulated 5-6 V supply of its own.
- Common ground. The supply GND and the Uno GND must be joined, or the pulse has nothing to be measured against and the servo twitches or ignores you.
- Pins 9 and 10.
Servo.huses the same timer as PWM on those two pins, soanalogWrite()on 9 or 10 stops working once any servo is attached. Put LEDs on 3, 5, 6 or 11 instead. The simulator warns you if you try it.
Wire the servo signal to D9, upload Sweep it smoothly, and watch how far behind the commands the horn actually runs. Then add the potentiometer from Lesson 14 and upload The knob steers the servo. This is the actuator the greenhouse vent in Lesson 27 is built around, so the sweep and the safe limits are worth getting into your fingers now.