
E05. GPIO, PWM, ADC and UART on ESP32
Use the Uno skills you already have on the ESP32: a pot sets an LED's brightness, and Serial shows it as a percentage.
Learning outcomes
- Use digitalWrite, analogRead, analogWrite and Serial on the ESP32
- Use map() to turn a 0-4095 reading into a 0-255 brightness
- Show brightness as a percentage on Serial
- Choose pins that can do the job (inputs vs outputs)
Parts and preparation
ESP32 DevKit, LED, 220-330 ohm series resistor, 10 k ohm potentiometer, breadboard, jumper wires.
Before power: inspect wiring, confirm supply voltage and ensure all connected circuits share GND.
What you will do
Build a dimmer: turn the pot and the LED gets brighter or dimmer.
Sketch 1 connects the pot to the LED brightness. Sketch 2 also prints the brightness as a percentage, which is easier to read. In ESP32 Lesson 09 you will switch the same LED from a phone.

Skills you already have
digitalWrite, analogWrite, analogRead and Serial all work on the ESP32. Only the pin numbers, the reading range and the Serial speed change.
| On the Uno | On the ESP32 |
|---|---|
| digitalWrite(8, HIGH) | digitalWrite(2, HIGH) - use the GPIO number |
| analogWrite only on ~ pins | analogWrite works on most output pins |
| analogRead gives 0-1023 | analogRead gives 0-4095 |
| Serial often at 9600 | Serial at 115200 |
Pins for this lesson
GPIO 34 can only be an input - good for the pot, no good for the LED. The LED goes on GPIO 2.
| Pin | This lesson |
|---|---|
| GPIO 34 | Pot middle leg (input) |
| GPIO 2 | LED (output) |
| 3V3 / GND | Pot outer legs |
Dimming with analogWrite
analogWrite(pin, brightness) switches the LED on and off very fast. This is called PWM. The brightness goes from 0 (off) to 255 (full).
The pot gives 0 to 4095, so map() scales it down to 0 to 255.
int reading = analogRead(34);                   // 0 to 4095
int brightness = map(reading, 0, 4095, 0, 255);  // scale to 0 to 255
analogWrite(2, brightness);                      // set the LED brightness
Serial still works
The USB cable is still your Serial connection (also called UART). Print the brightness while you turn the pot, so you can check the numbers match what you see.
Wiring and safe build sequence
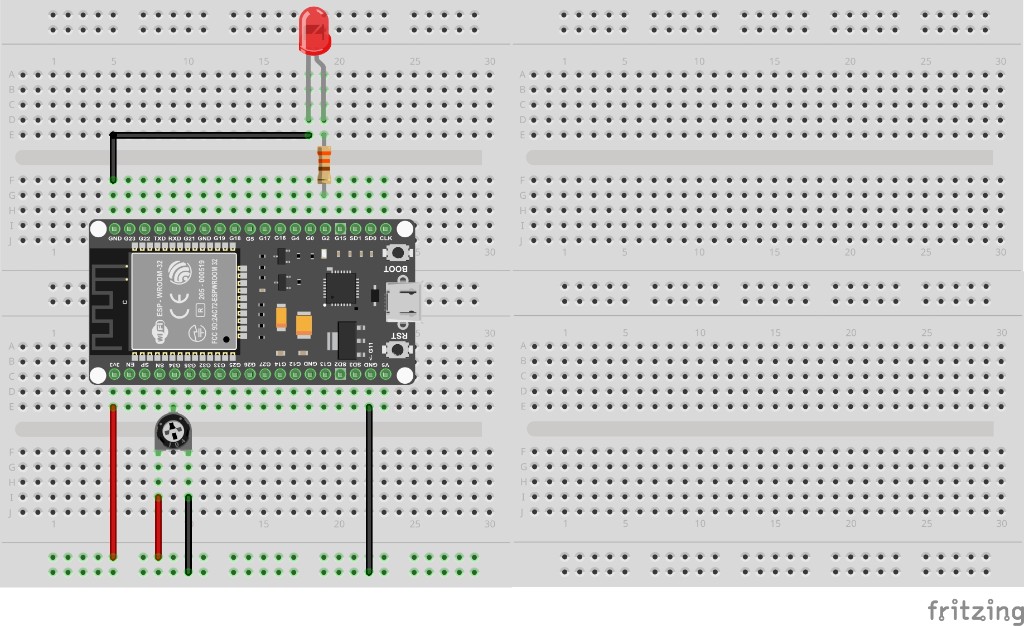
- Pot outer legs -> 3V3 and GND; middle leg -> GPIO 34
- GPIO 2 -> 220-330 ohm -> LED long leg; LED short leg -> GND (or use the on-board LED)
- Serial Monitor 115200
Worked sketch 1: Pot controls brightness
Download .inoWhat this sketch is for: Turn the pot and watch the LED. Serial shows the brightness from 0 to 255.
const int potPin = 34;                             // the pot is on GPIO 34
const int ledPin = 2;                              // the LED is on GPIO 2

void setup() {                                     // runs once
  pinMode(ledPin, OUTPUT);                         // the LED pin is an output
  Serial.begin(115200);                            // start Serial at the ESP32 speed
  analogReadResolution(12);                        // readings will be 0 to 4095
}

void loop() {                                      // runs over and over
  int reading = analogRead(potPin);                // read the pot: 0 to 4095
  int brightness = map(reading, 0, 4095, 0, 255);  // scale it to 0 to 255
  analogWrite(ledPin, brightness);                 // set the LED brightness
  Serial.println(brightness);                      // print the brightness
  delay(100);                                      // short pause
}
How the code works
- map() scales a number from one range to another: 0-4095 becomes 0-255.
- GPIO 34 cannot drive the LED - it can only be an input.
Worked sketch 2: Show brightness as a percentage
Download .inoWhat this sketch is for: Same wiring. This time the pot gives a percentage, and the percentage sets the brightness. Match the breadboard layout below before upload.
const int potPin = 34;                            // the pot is on GPIO 34
const int ledPin = 2;                             // the LED is on GPIO 2

void setup() {                                    // runs once
  pinMode(ledPin, OUTPUT);                        // the LED pin is an output
  Serial.begin(115200);                           // start Serial at the ESP32 speed
  analogReadResolution(12);                       // readings will be 0 to 4095
}

void loop() {                                     // runs over and over
  int reading = analogRead(potPin);               // read the pot: 0 to 4095
  int percent = map(reading, 0, 4095, 0, 100);    // scale it to 0 to 100
  int brightness = map(percent, 0, 100, 0, 255);  // scale percent to 0 to 255
  analogWrite(ledPin, brightness);                // set the LED brightness

  Serial.print("Brightness: ");                   // a label
  Serial.print(percent);                          // the percentage
  Serial.println("%");                            // a percent sign, then a new line
  delay(200);                                     // short pause
}
How the code works
- People understand 50% more easily than 127.
- map() is used twice: pot to percent, then percent to brightness.
- Build from the breadboard photo: pot on GPIO 34, LED on GPIO 2.
Test and record evidence
Practical evidence checklist
Common faults and checks
- LED does not dim: check the LED is on GPIO 2 with its resistor, and the long leg faces GPIO 2.
- LED always bright or always off: check the pot's middle leg is on GPIO 34 and the outer legs on 3V3 and GND.
- Numbers never go above 1023: add analogReadResolution(12) in setup().
Check your understanding
Q1. What does analogWrite(2, 255) do?
Show answer
Sets the LED on GPIO 2 to full brightness.
Q2. What does map(reading, 0, 4095, 0, 255) do?
Show answer
Scales a 0-4095 reading to 0-255.
Q3. What is the brightness range for analogWrite?
Show answer
0 (off) to 255 (full).
Q4. Can GPIO 34 drive the LED?
Show answer
No - it can only be an input.
Q5. What Serial speed do the ESP32 sketches use?
Show answer
115200.
Q6. Why print a percentage in sketch 2?
Show answer
It is easier for people to read than 0-255.
Practise in your browser
Write and test this lesson's code on a virtual board. Work through the 1 exercises in order. Press Test and each one checks itself.
ESP32 code on the virtual board
The virtual board is an Uno, not an ESP32, so there is no Wi-Fi here. You practise the code around it. A pot reading is a pretend number in a variable, like int reading = 2048;. The LED on GPIO 2 works the same; the test list calls it pin D2.
0-4095 to percent
An ESP32 reading goes from 0 to 4095. The pot is half way, so reading is 2048. Use map() to turn it into 0 to 100, store it in percent, then print percent.
50