
E04. Pinout, Strapping Pins, ADC, DAC and Touch
Learn which ESP32 pins are safe to use, then read a potentiometer with the 0-4095 ADC and turn the number into LOW, MID or HIGH.
Learning outcomes
- Pick safe pins and avoid the pins the ESP32 uses at start-up
- Read a potentiometer on GPIO 34 as a number from 0 to 4095
- Turn a reading into LOW, MID or HIGH with if / else if / else
- Know that some ESP32 pins can also sense touch
Parts and preparation
ESP32 DevKit, 10 k ohm potentiometer, breadboard, jumper wires.
Before power: inspect wiring, confirm supply voltage and ensure all connected circuits share GND.
What you will do
Find out which pins are safe to use, then read a potentiometer (pot).
Sketch 1 prints the pot reading, from 0 to 4095. Sketch 2 turns that number into a word: LOW, MID or HIGH.

Use the GPIO numbers, not Uno numbers
ESP32 pins are named by GPIO number, such as GPIO 2 or GPIO 34. Use the numbers printed on your board, not Uno names like D7 or A0.
On a classic ESP32 two groups need care. GPIO 34 to 39 can only be inputs - fine for a pot, no good for an LED. GPIO 6 to 11 are used by the board's own memory chip - never connect anything to them.
Start-up pins (strapping pins)
When the ESP32 starts, it checks a few pins to decide how to start. These are called strapping pins. Wiring a button or sensor to them can stop the board starting or uploading.
| Pin | Course advice |
|---|---|
| GPIO 0 | Used for uploading - keep buttons off it |
| GPIO 2 | Fine for an LED (often the on-board LED) |
| GPIO 5 | Fine as an output after start-up (the NeoPixel lessons use it) |
| GPIO 12 | Avoid - can stop the board starting |
| GPIO 15 | Avoid for inputs |
| GPIO 6-11 | Never use |
Reading a pot: 0 to 4095
The Uno's analogRead gives 0 to 1023. The ESP32 gives 0 to 4095, so it can tell apart smaller changes. analogReadResolution(12) makes sure you get the 0-4095 range.
Power the pot from 3V3, not 5 V. Readings near the very ends of the turn are less accurate - that is normal.
Use GPIO 32 to 39 for anything you read while Wi-Fi is on. Many other pins stop reading when Wi-Fi is running.

| Uno R3 | ESP32 course | |
|---|---|---|
| Reading range | 0-1023 | 0-4095 |
| Pot pin | A0 | GPIO 34 |
| Pot power | 5V | 3V3 |
Touch pins and true analog output
Some ESP32 pins can feel a finger: touchRead(4) gives a smaller number when you touch a wire on GPIO 4 - try it in the challenge. A classic ESP32 can also output a real voltage between 0 and 3.3 V on GPIO 25 and 26 (the DAC). The course does not need the DAC.
Wiring and safe build sequence
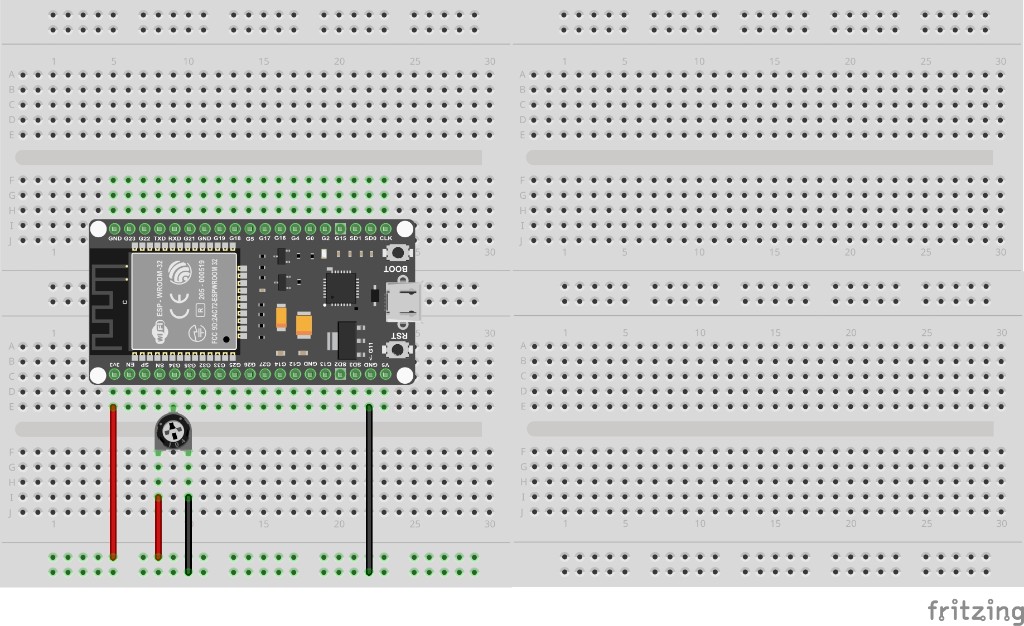
- Potentiometer outer legs -> 3V3 and GND; middle leg (wiper) -> GPIO 34
- USB to DevKit; Serial Monitor 115200
Worked sketch 1: Read the pot
Download .inoWhat this sketch is for: Turn the pot slowly from one end to the other and watch the numbers.
const int potPin = 34;                 // the pot's middle leg is on GPIO 34

void setup() {                         // runs once
  Serial.begin(115200);                // start Serial at the ESP32 speed
  analogReadResolution(12);            // readings will be 0 to 4095
}

void loop() {                          // runs over and over
  int reading = analogRead(potPin);    // read the pot
  Serial.println(reading);             // print the number
  delay(200);                          // slow the printing down
}
How the code works
- analogReadResolution(12) gives readings from 0 to 4095.
- GPIO 34 can only be an input - perfect for a pot.
- Power the pot from 3V3, not 5 V.
Worked sketch 2: LOW, MID or HIGH
Download .inoWhat this sketch is for: Split the turn of the pot into three bands and print a word for each. Match the breadboard layout below before upload.
const int potPin = 34;                 // the pot's middle leg is on GPIO 34

void setup() {                         // runs once
  Serial.begin(115200);                // start Serial at the ESP32 speed
  analogReadResolution(12);            // readings will be 0 to 4095
}

void loop() {                          // runs over and over
  int reading = analogRead(potPin);    // read the pot
  Serial.print(reading);               // print the number first

  if (reading < 1365) {                // bottom third of the turn
    Serial.println("  LOW");           // print LOW after the number
  } else if (reading < 2730) {         // middle third
    Serial.println("  MID");           // print MID
  } else {                             // top third
    Serial.println("  HIGH");          // print HIGH
  }

  delay(250);                          // slow the printing down
}
How the code works
- 1365 and 2730 are about one third and two thirds of 4095.
- if / else if / else checks the tests in order and runs only the first one that is true.
- Build from the breadboard photo: 3V3 and GND to the pot ends; middle leg to GPIO 34.
Test and record evidence
Practical evidence checklist
Common faults and checks
- Number never changes: check the middle leg is on GPIO 34 and the outer legs are on 3V3 and GND.
- Never goes above 1023: add analogReadResolution(12) in setup().
- Number jumps around a little: normal - the ESP32 reading is a bit noisy.
Check your understanding
Q1. What range does analogRead give on the ESP32 in this lesson?
Show answer
0 to 4095.
Q2. Why is the pot on GPIO 34?
Show answer
It is an input pin that still reads while Wi-Fi is on.
Q3. Can GPIO 34 light an LED?
Show answer
No - GPIO 34 to 39 can only be inputs.
Q4. Which pins must you never use on a classic ESP32?
Show answer
GPIO 6 to 11.
Q5. What is a strapping pin?
Show answer
A pin the ESP32 checks at start-up to decide how to start.
Q6. Should you power the pot from 5 V?
Show answer
No - use 3V3.
Q7. In sketch 2, what is printed for a reading of 3000?
Show answer
HIGH (it is 2730 or more).
Practise in your browser
Write and test this lesson's code on a virtual board. Work through the 1 exercises in order. Press Test and each one checks itself.
ESP32 code on the virtual board
The virtual board is an Uno, not an ESP32, so there is no Wi-Fi here. You practise the code around it. A pot reading is a pretend number in a variable, like int reading = 2048;. The LED on GPIO 2 works the same; the test list calls it pin D2.
LOW, MID or HIGH
The loop gives you three pretend readings, one at a time. For each one print:
LOWif it is below 1365MIDif it is below 2730HIGHotherwise
LOW
MID
HIGH