
E09. Local Web Server: Control from a Browser
Make the ESP32 serve a web page, then add ON and OFF links that switch an LED from your phone.
Learning outcomes
- Explain a browser request and the ESP32's reply
- Serve a web page with WebServer
- Link each web address (path) to a function with server.on()
- Switch an LED from a phone on the same Wi-Fi
Parts and preparation
ESP32 DevKit, USB, LED + 220-330 ohm on GPIO 2 (or the on-board LED), a phone or PC on the same Wi-Fi.
Before power: inspect wiring, confirm supply voltage and ensure all connected circuits share GND.
Libraries for this lesson
In Arduino IDE 2 open Tools → Manage Libraries…. Search by the Library Manager name and install the package by the exact author below. Similar names from other authors can use different APIs and will break the example.
| Include | Library Manager name | Author | Install note |
|---|---|---|---|
WiFi.h | WiFi | Espressif | Built into the esp32 Arduino core. |
WebServer.h | WebServer | Espressif | Built into the esp32 Arduino core. |
What you will do
Your ESP32 becomes a tiny website on your Wi-Fi.
Sketch 1 shows a Hello page when you type the ESP32's address into a browser. Sketch 2 adds ON and OFF links that switch the LED on GPIO 2.

Request and reply
When you type http://192.168.1.42/on into a browser, the browser asks the ESP32 for the path /on. server.on("/on", handleOn) tells the ESP32 to run your function handleOn when that path is asked for. Your function does the job (LED on), then server.send() replies with a page.
200 in server.send(200, ...) is the code for 'OK, here is your page'.
| Path | Function | What it does |
|---|---|---|
| / | sendPage | Shows the page |
| /on | handleOn | LED on, then shows the page |
| /off | handleOff | LED off, then shows the page |
Keep loop() free
loop() calls server.handleClient() over and over - that is how the ESP32 notices a browser asking. Do not put a long delay() in loop(), or the page stops loading.
Writing the page
The page is HTML, written as text. <h1> makes big text and <a href='/on'> makes a link to /on. Single quotes inside the HTML keep the double quotes free for the Arduino text. page += adds more text to the end of the page.
Wiring and safe build sequence
- GPIO 2 -> 220-330 ohm -> LED long leg; LED short leg -> GND (or use the on-board LED)
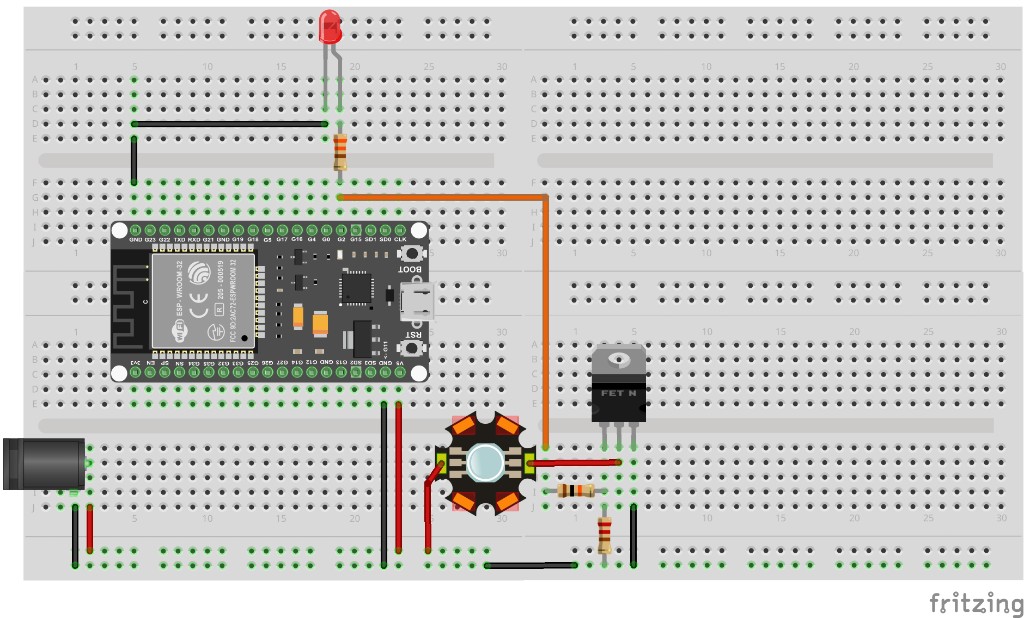
- Optional (sketch 2 photo): GPIO 2 -> gate resistor -> N-MOSFET gate (pull-down to GND) switching a 5 V high-power LED; common GND
- Phone or PC on the same Wi-Fi network
Worked sketch 1: A Hello page
Download .inoWhat this sketch is for: Upload, copy the address from Serial (for example http://192.168.1.42) and open it in a browser on the same Wi-Fi.
#include <WiFi.h>                         // the Wi-Fi commands
#include <WebServer.h>                    // the web server commands

String ssid = "YOUR_WIFI_SSID";           // your Wi-Fi network name
String password = "YOUR_WIFI_PASSWORD";   // your Wi-Fi password

WebServer server(80);                     // a web server on port 80 (the normal web port)

void sendPage() {                         // runs when a browser asks for /
  server.send(200, "text/html", "<h1>Hello from the ESP32</h1>"); // 200 = OK, then the page
}

void setup() {                            // runs once
  Serial.begin(115200);                   // start Serial at the ESP32 speed

  WiFi.begin(ssid, password);             // start joining the network
  Serial.print("Connecting");             // tell the user we are trying
  while (WiFi.status() != WL_CONNECTED) { // repeat until we have joined
    delay(500);                           // wait half a second
    Serial.print(".");                    // print a dot each time
  }
  Serial.println(" connected");           // we are on the network

  Serial.print("Open http://");           // tell the user what to type
  Serial.println(WiFi.localIP());         // the ESP32's address

  server.on("/", sendPage);               // path / runs sendPage
  server.begin();                         // start the web server
}

void loop() {                             // runs over and over
  server.handleClient();                  // answer any browser that is asking
}
How the code works
- server.on("/", sendPage) - note there are no brackets after sendPage. You are naming the function, not running it.
- The phone or PC must be on the same Wi-Fi as the ESP32.
Worked sketch 2: ON and OFF links
Download .inoWhat this sketch is for: Tap ON or OFF in the browser to switch the LED. Match the breadboard layout below before upload - a plain LED and resistor on GPIO 2 works too.
#include <WiFi.h>                         // the Wi-Fi commands
#include <WebServer.h>                    // the web server commands

String ssid = "YOUR_WIFI_SSID";           // your Wi-Fi network name
String password = "YOUR_WIFI_PASSWORD";   // your Wi-Fi password
const int ledPin = 2;                     // the LED is on GPIO 2

WebServer server(80);                     // a web server on port 80

void sendPage() {                         // sends the page with two links
  String page = "<h1>ESP32 lamp</h1>";    // a heading
  page += "<h1><a href='/on'>ON</a></h1>";   // a big link to /on
  page += "<h1><a href='/off'>OFF</a></h1>"; // a big link to /off
  server.send(200, "text/html", page);    // send the page to the browser
}

void handleOn() {                         // runs when a browser asks for /on
  digitalWrite(ledPin, HIGH);             // LED on
  sendPage();                             // show the page again
}

void handleOff() {                        // runs when a browser asks for /off
  digitalWrite(ledPin, LOW);              // LED off
  sendPage();                             // show the page again
}

void setup() {                            // runs once
  Serial.begin(115200);                   // start Serial at the ESP32 speed
  pinMode(ledPin, OUTPUT);                // the LED pin is an output

  WiFi.begin(ssid, password);             // start joining the network
  Serial.print("Connecting");             // tell the user we are trying
  while (WiFi.status() != WL_CONNECTED) { // repeat until we have joined
    delay(500);                           // wait half a second
    Serial.print(".");                    // print a dot each time
  }
  Serial.println(" connected");           // we are on the network

  Serial.print("Open http://");           // tell the user what to type
  Serial.println(WiFi.localIP());         // the ESP32's address

  server.on("/", sendPage);               // path / shows the page
  server.on("/on", handleOn);             // path /on switches the LED on
  server.on("/off", handleOff);           // path /off switches the LED off
  server.begin();                         // start the web server
}

void loop() {                             // runs over and over
  server.handleClient();                  // answer any browser that is asking
}
How the code works
- Each path has its own small function, and each function does one job.
- handleOn and handleOff both call sendPage, so the page is written only once.
- Build from the breadboard photo: the lamp is on GPIO 2 (plain LED or MOSFET stage).
Test and record evidence
Practical evidence checklist
Common faults and checks
- Page never loads: the phone must be on the same Wi-Fi (not a guest network), and the address must match Serial exactly, starting with http://.
- Page stops responding: make sure loop() has no long delay().
- LED does not change: check the LED is on GPIO 2 with its resistor (or the MOSFET stage and shared GND).
Check your understanding
Q1. What does server.on("/on", handleOn) do?
Show answer
Runs handleOn when a browser asks for the path /on.
Q2. Why must loop() call server.handleClient()?
Show answer
So the ESP32 notices and answers browsers.
Q3. What does the 200 in server.send(200, ...) mean?
Show answer
OK - here is your page.
Q4. Does the phone need to be on the same Wi-Fi?
Show answer
Yes - otherwise it cannot reach the ESP32's address.
Q5. What happens if loop() has delay(10000)?
Show answer
The page takes up to 10 seconds to respond, or times out.
Q6. What does <a href='/off'>OFF</a> make?
Show answer
A link with the word OFF that asks for the path /off.
Q7. Which Wi-Fi mode does this lesson use?
Show answer
Station - the ESP32 joins your network.
Practise in your browser
Write and test this lesson's code on a virtual board. Work through the 1 exercises in order. Press Test and each one checks itself.
ESP32 code on the virtual board
The virtual board is an Uno, not an ESP32, so there is no Wi-Fi here. You practise the code around it. A pot reading is a pretend number in a variable, like int reading = 2048;. The LED on GPIO 2 works the same; the test list calls it pin D2.
Build a web page as text
A web server sends its page as one long String. page += adds text to the end. Add <p>LED is ON</p> when ledOn is true, or <p>LED is OFF</p> when it is false.
<h1>ESP32 lamp</h1><p>LED is ON</p>
Want more? Code Along chapter 23 has a Deeper exercise that goes further than this lesson. It is optional.
A brightness slider with a password
This sketch joins sketch 2 and the analogWrite lesson from Part 1. The page shows a slider from 0 to 255. When you let go of it, the LED changes to that brightness.
It is also locked. Anyone else on your Wi-Fi could open sketch 2 and switch your lamp. This page asks for a name and password first, so only you can use it.
Before you upload, change CHANGE_ME to your own password. Do not reuse a real password from another account. If you forget, the sketch will not start the web server and Serial tells you what to fix.
To test: open the address from Serial. The browser asks for a name and password: type lamp and your password. Drag the slider and let go. Look at the address bar: it now ends in /?brightness=128 (or whatever you chose). That is how the slider sends its value.
#include <WiFi.h>                         // the Wi-Fi commands
#include <WebServer.h>                    // the web server commands

String ssid = "YOUR_WIFI_SSID";           // your Wi-Fi network name
String password = "YOUR_WIFI_PASSWORD";   // your Wi-Fi password
String webUser = "lamp";                  // the name the page asks for
String webPassword = "CHANGE_ME";         // the page password - pick your own
const int ledPin = 2;                     // the LED is on GPIO 2

WebServer server(80);                     // a web server on port 80
int brightness = 0;                       // the LED brightness: 0 (off) to 255 (full)

void handlePage() {                       // runs when a browser asks for /
  if (server.authenticate(webUser.c_str(), webPassword.c_str())) { // right name and password?
    if (server.hasArg("brightness")) {    // did the slider send a value?
      int newValue = server.arg("brightness").toInt(); // turn the text into a number (junk gives 0)
      brightness = constrain(newValue, 0, 255);        // keep it between 0 and 255
      analogWrite(ledPin, brightness);    // set the LED brightness
    }
    String page = "<meta name='viewport' content='width=device-width'>"; // fit a phone screen
    page += "<h1>ESP32 dimmer</h1>";      // a heading
    page += "<form action='/'>";          // a form that sends to /
    page += "<input type='range' name='brightness' min='0' max='255'"; // the slider
    page += " value='" + String(brightness) + "'"; // start it where the LED is now
    page += " onchange='this.form.submit()'>";     // send as soon as you let go
    page += "</form>";                    // end of the form
    page += "<p>Brightness: " + String(brightness) + "</p>"; // show the number
    server.send(200, "text/html", page);  // send the page to the browser
  } else {                                // no password yet, or the wrong one
    server.requestAuthentication();       // ask the browser for the name and password
  }
}

void setup() {                            // runs once
  Serial.begin(115200);                   // start Serial at the ESP32 speed
  pinMode(ledPin, OUTPUT);                // the LED pin is an output
  analogWrite(ledPin, brightness);        // start with the LED off

  WiFi.begin(ssid, password);             // start joining the network
  Serial.print("Connecting");             // tell the user we are trying
  while (WiFi.status() != WL_CONNECTED) { // repeat until we have joined
    delay(500);                           // wait half a second
    Serial.print(".");                    // print a dot each time
  }
  Serial.println(" connected");           // we are on the network

  if (webPassword == "CHANGE_ME") {       // still the example password?
    Serial.println("Change webPassword at the top of the sketch, then upload again."); // refuse to start
  } else {                                // a password of your own
    Serial.print("Open http://");         // tell the user what to type
    Serial.println(WiFi.localIP());       // the ESP32's address
    server.on("/", handlePage);           // path / shows the slider page
    server.begin();                       // start the web server
  }
}

void loop() {                             // runs over and over
  server.handleClient();                  // answer any browser that is asking
}
How the slider sketch stays safe
The slider is a form, like a search box. When you let go, onchange='this.form.submit()' sends it straight away, so you do not need a button. The browser asks for /?brightness=128, and server.arg("brightness") reads the 128.
server.authenticate() checks the name and password. If they are missing or wrong, server.requestAuthentication() makes the browser show a sign-in box. The browser remembers them until you close it, so you sign in once.
Never trust what arrives from a browser. Anyone can type /?brightness=9999 or /?brightness=abc into the address bar. toInt() turns text that is not a number into 0, and constrain() keeps the number between 0 and 255.
| Risk | What the sketch does |
|---|---|
| Someone else on your Wi-Fi opens the page | Asks for a name and password first |
| Everyone knows the example password | Will not start the web server until you change CHANGE_ME |
| A strange value such as 9999 or abc | toInt() and constrain() keep it between 0 and 255 |
| The password shows up somewhere | Never prints it to Serial or puts it on the page |
What this lock does not do
The page uses http, not https, so nothing is scrambled. Someone on the same Wi-Fi with the right tools could still read the password as it travels. That is fine for a lamp at home, but it is why you should never reuse a real password here.
Keep the ESP32 on your home network only. Never set up your router to let the internet reach it. Real products use https and better logins, and that is beyond this course.