
E16. Over-the-Air Updates
Upload once over USB, then send the next version of the sketch over Wi-Fi with no cable.
Learning outcomes
- Explain why installed gadgets need over-the-air (OTA) updates
- Add ArduinoOTA to a sketch so it can receive updates over Wi-Fi
- Upload a new version through the network port in the IDE
- Keep loop() calling ArduinoOTA.handle()
Parts and preparation
ESP32 DevKit on the same Wi-Fi as your PC, USB for the first upload, LED on GPIO 2 (or the on-board LED).
Before power: inspect wiring, confirm supply voltage and ensure all connected circuits share GND.
Libraries for this lesson
In Arduino IDE 2 open Tools → Manage Libraries…. Search by the Library Manager name and install the package by the exact author below. Similar names from other authors can use different APIs and will break the example.
| Include | Library Manager name | Author | Install note |
|---|---|---|---|
WiFi.h | WiFi | Espressif | Built into the esp32 Arduino core. |
ArduinoOTA.h | ArduinoOTA | Espressif / Arduino | Built into the esp32 Arduino core. |
What you will do
Imagine the ESP32 is already fixed inside a ceiling. You want to change its sketch without a ladder and a USB cable.
Sketch 1 is version 1.0: LED off. Upload it over USB. Sketch 2 is version 1.1: LED on. Upload it over Wi-Fi. When the LED comes on, the update worked.

The steps
The first upload must be over USB, because the board does not know how to receive updates yet.
| Step | What you do |
|---|---|
| 1 | Upload sketch 1 over USB, as normal |
| 2 | Wait for 'Version 1.0 ready' on Serial |
| 3 | Tools -> Port: choose esp32-yourname under Network ports |
| 4 | Open sketch 2 and press Upload |
| 5 | The LED comes on: version 1.1 arrived over Wi-Fi |
Keep handle() running
ArduinoOTA.handle() in loop() checks whether the IDE is sending an update. If loop() is stuck in a long delay(), the update fails. Every new version must include the OTA lines too - otherwise the next update has to go over USB again.
Safety
Give each board its own name, so you never update a classmate's board by mistake. On any network you do not control, add ArduinoOTA.setPassword("something") before ArduinoOTA.begin(). Keep a USB cable handy - if an update fails, upload over USB again.
Wiring and safe build sequence
- First upload: USB data cable
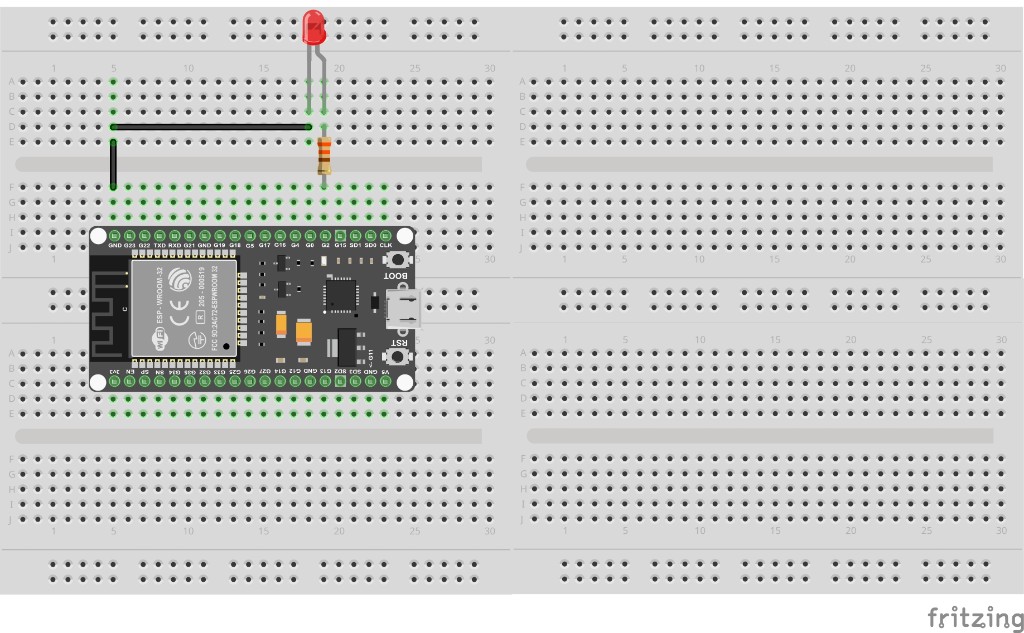
- LED on GPIO 2 (or the on-board LED) shows the version
- PC and ESP32 on the same Wi-Fi
Worked sketch 1: Version 1.0 (upload over USB)
Download .inoWhat this sketch is for: Change yourname, upload over USB, and check Serial says Version 1.0 ready. The LED stays off.
#include <WiFi.h>                         // the Wi-Fi commands
#include <ArduinoOTA.h>                   // the over-the-air update commands

String ssid = "YOUR_WIFI_SSID";           // your Wi-Fi network name
String password = "YOUR_WIFI_PASSWORD";   // your Wi-Fi password
const int ledPin = 2;                     // the LED is on GPIO 2

void setup() {                            // runs once
  Serial.begin(115200);                   // start Serial at the ESP32 speed
  pinMode(ledPin, OUTPUT);                // the LED pin is an output
  digitalWrite(ledPin, LOW);              // version 1.0: LED off

  WiFi.begin(ssid, password);             // start joining the network
  Serial.print("Connecting");             // tell the user we are trying
  while (WiFi.status() != WL_CONNECTED) { // repeat until we have joined
    delay(500);                           // wait half a second
    Serial.print(".");                    // print a dot each time
  }
  Serial.println(" connected");           // we are on the network

  ArduinoOTA.setHostname("esp32-yourname"); // the name shown in Tools -> Port
  ArduinoOTA.begin();                     // start listening for updates
  Serial.println("Version 1.0 ready");    // which version is running
}

void loop() {                             // runs over and over
  ArduinoOTA.handle();                    // check for an update from the IDE
}
How the code works
- Use your own name in setHostname so your board is easy to find in the Port menu.
- loop() only calls ArduinoOTA.handle(), so updates are always noticed.
Worked sketch 2: Version 1.1 (upload over Wi-Fi)
Download .inoWhat this sketch is for: Only two lines differ from sketch 1. Choose the esp32-yourname network port, then upload this one. Match the breadboard layout below, or use the on-board LED.
#include <WiFi.h>                         // the Wi-Fi commands
#include <ArduinoOTA.h>                   // the over-the-air update commands

String ssid = "YOUR_WIFI_SSID";           // your Wi-Fi network name
String password = "YOUR_WIFI_PASSWORD";   // your Wi-Fi password
const int ledPin = 2;                     // the LED is on GPIO 2

void setup() {                            // runs once
  Serial.begin(115200);                   // start Serial at the ESP32 speed
  pinMode(ledPin, OUTPUT);                // the LED pin is an output
  digitalWrite(ledPin, HIGH);             // version 1.1: LED on (changed)

  WiFi.begin(ssid, password);             // start joining the network
  Serial.print("Connecting");             // tell the user we are trying
  while (WiFi.status() != WL_CONNECTED) { // repeat until we have joined
    delay(500);                           // wait half a second
    Serial.print(".");                    // print a dot each time
  }
  Serial.println(" connected");           // we are on the network

  ArduinoOTA.setHostname("esp32-yourname"); // the same name as version 1.0
  ArduinoOTA.begin();                     // keep listening for the next update
  Serial.println("Version 1.1 ready");    // which version is running (changed)
}

void loop() {                             // runs over and over
  ArduinoOTA.handle();                    // check for an update from the IDE
}
How the code works
- The changed lines are marked (changed): the LED and the version message.
- Version 1.1 keeps the OTA lines, so version 1.2 can arrive over Wi-Fi too.
Test and record evidence
Practical evidence checklist
Common faults and checks
- No network port: the PC and ESP32 must be on the same Wi-Fi; close and reopen the Tools -> Port menu, or restart the IDE.
- Windows firewall asks about the IDE: allow it on private networks.
- Update fails half way: upload sketch 1 over USB again, then retry.
- Wrong board updated: give every board its own setHostname name.
Check your understanding
Q1. What does OTA stand for?
Show answer
Over the air.
Q2. Why must the first upload use USB?
Show answer
The board does not have the OTA code until you upload it.
Q3. Which line must loop() keep calling?
Show answer
ArduinoOTA.handle().
Q4. Why give each board its own hostname?
Show answer
So you update your own board, not someone else's.
Q5. How do you know version 1.1 arrived?
Show answer
The LED comes on and Serial shows Version 1.1 ready.
Q6. What happens if version 1.1 leaves out the OTA lines?
Show answer
The next update has to go over USB.
Q7. What should you add on a network you do not control?
Show answer
ArduinoOTA.setPassword(...) before ArduinoOTA.begin().