
Sketch Structure & Serial Output
Write your first sketches: setup() and loop(), messages in the Serial Monitor, an LED you switch on and blink, and reading compiler errors.
Every sketch has two parts
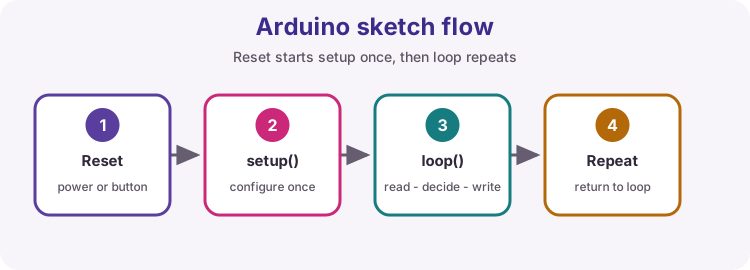
When the Uno powers up or is reset, it runs setup() once, then runs loop() over and over for as long as it has power. Code that prepares the board - pin modes, Serial.begin(9600) - goes in setup(). The work the board repeats goes in loop().
The Serial Monitor is your window into the running sketch. Serial.begin(9600) opens the connection at 9600 baud, and Serial.println(...) sends a line of text to it.
Hello, Serial Monitor
Press Run. The first two lines appear once; the loop line appears every second until you press Stop.
Hello, Uno!
setup() runs once.
loop() runs again and again...
loop() runs again and again...
Hello, Uno
Make the sketch print exactly two lines, once, when the board starts:
Hello, Uno!Ready to code.
Text must match exactly - capital letters, spaces and punctuation included.
Hello, Uno!
Ready to code.
print or println?
Serial.print stays on the same line; Serial.println finishes the line. Numbers print without quotes.
ABC
D
Total: 42
Wiring label
Print this three-line label for your breadboard, once.
Build the middle line from three Serial.print calls: the * at the start, the word WILTEQ, and * at the end - then finish the line.
**********
* WILTEQ *
**********
Reading compiler errors
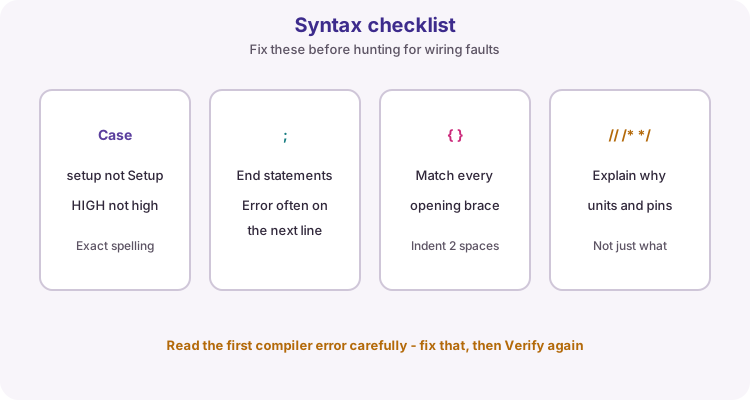
When a sketch will not compile, the Arduino IDE shows an error with a line number. Fix the first error first - later errors are often caused by it.
expected ';' before ...- a semicolon is missing, usually at the end of the line above.'Something' was not declared in this scope- a spelling or capital-letter mistake.serialandSerialare different names.expected '}' at end of input- a{was opened and never closed.
The simulator uses the same wording and adds a plain-English hint under each error.
Fix the three bugs
This sketch has three mistakes, so it does not compile. Press Run to see the first error, fix it, and repeat until the sketch prints the two lines in the sample. Do not change the text in quotes.
Fixed!
All three bugs found.
Switching a pin on and off
A digital pin is either HIGH (about 5 V) or LOW (0 V). Two functions do the work:
pinMode(pin, OUTPUT)tells the Uno that the pin will drive something. It belongs insetup().digitalWrite(pin, HIGH)ordigitalWrite(pin, LOW)switches it.
LED_BUILTIN is the LED soldered onto the board, on pin 13. delay(1000) waits one second before the next line runs.
Blink - the Lesson 03 sketch
Run it and watch the virtual LED next to the Serial Monitor.
Switch the LED on
Switch the onboard LED (LED_BUILTIN) on and leave it on. Two lines in setup(): make the pin an output, then drive it HIGH. Leave loop() empty.
Make it blink
Now blink it: one second on, one second off, forever. The pinMode line is already there - the four lines you add go in loop(), because they must repeat.
Add a Serial trace
The blink works, but you cannot see the code's state from across the bench. Print ON and OFF each time the LED changes, so the Serial Monitor follows along. Remember to start Serial in setup(). This is Serial debugging from Lesson 09.
ON
OFF
ON
OFF
Flash an S in Morse code
The letter S in Morse code is three short flashes. The first flash is written for you: 200 ms on, 200 ms off. Add the second and third flashes, then keep the LED off for a full 1 second before the pattern repeats.
The test measures the timing, so the delays must be exact.
One number, three ways
Datasheets give register values in hexadecimal and bit patterns in binary. Serial.println can show a number in another base: Serial.println(42, HEX).
Print 42 in decimal, hexadecimal and binary, then the character 'A', then the code of 'A' using DEC. Let Serial do the converting.
42
2A
101010
A
65
Try it on a real Uno
Download Add a Serial trace, upload it to your Uno and open the Serial Monitor at 9600 baud. The LED and the ON/OFF lines should stay in step. Change both delays to 250 and upload again - Serial debugging lets you confirm the timing without a stopwatch.