
Code Along - Chapter 11

Motors & the H-Bridge

Drive a DC motor through an H-bridge: direction, PWM speed, stopping safely before you reverse, and a soft start that never blocks the sketch.

Estimated time 75-100 minExercises passed 0 / 6

A pin cannot drive a motor

An Uno pin supplies about 20 mA. A small DC motor wants hundreds of milliamps when it runs and far more at the moment it starts, and it kicks back a voltage spike every time it is switched off. Connect one straight to a pin and you damage the board.

So the pin never powers the load - it controls a driver that does. The motor's current comes from its own supply, and the two share a common GND. That is the whole point of Lesson 12.
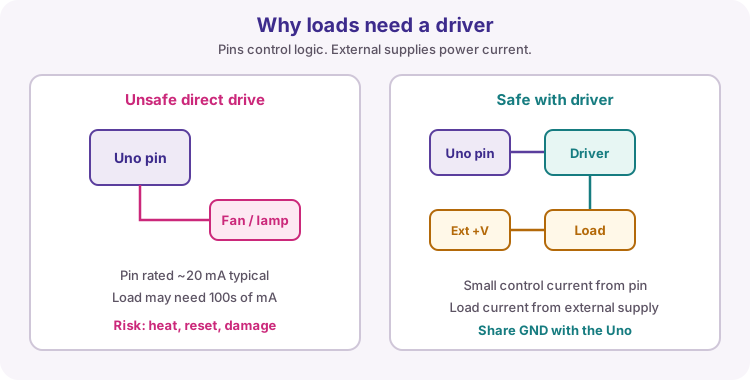
An Arduino pin controls a driver; the load current comes from a separate supply
Signal from the pin, current from the supply, GND shared.

How an H-bridge works

An H-bridge (an L298N module here) can switch the motor's supply either way round, so the motor runs forwards or backwards. Two pins choose the direction and one PWM pin sets the speed:

  • IN1 HIGH, IN2 LOW - forward
  • IN1 LOW, IN2 HIGH - reverse
  • both LOW - coast (the motor free-wheels to a stop)
  • both HIGH - brake

ENA takes analogWrite(ENA, 0..255): the duty cycle sets the average voltage, and so the speed. This chapter wires IN1 to pin 7, IN2 to pin 8 and ENA to pin 9.

H-bridge with IN1 and IN2 for direction and a PWM enable pin for speed
Logic pins pick the direction; the PWM pin sets the speed.
Worked example

Forward, then reverse

Press Run and watch the motor readout: direction and speed as a percentage.

const int IN1 = 7;
const int IN2 = 8;
const int ENA = 9;

void setup() {
  pinMode(IN1, OUTPUT);
  pinMode(IN2, OUTPUT);
  pinMode(ENA, OUTPUT);
}

void loop() {
  digitalWrite(IN1, HIGH);    // forward
  digitalWrite(IN2, LOW);
  analogWrite(ENA, 180);      // about 70 % speed
  delay(1500);

  digitalWrite(IN1, LOW);     // reverse
  digitalWrite(IN2, HIGH);
  analogWrite(ENA, 120);      // slower
  delay(1500);
}

Turn on JavaScript to edit, run and test this code in the browser.

Exercise 11.1

Drive forward

Not started

Set the motor running forward at full speed and leave it there: IN1 HIGH, IN2 LOW and the enable pin at 255.

const int IN1 = 7;
const int IN2 = 8;
const int ENA = 9;

void setup() {
  pinMode(IN1, OUTPUT);
  pinMode(IN2, OUTPUT);
  pinMode(ENA, OUTPUT);
  // Set the direction and the speed

}

void loop() {
}

Turn on JavaScript to edit, run and test this code in the browser.

Exercise 11.2

Forward, stop, reverse, stop

Not started

Make the motor run forward at 200 for 1 s, stop for 1 s, run reverse at 200 for 1 s, stop for 1 s, then repeat. The forward step is written for you.

Stop by setting the enable pin to 0 - the direction pins can stay as they are.

const int IN1 = 7;
const int IN2 = 8;
const int ENA = 9;

void setup() {
  pinMode(IN1, OUTPUT);
  pinMode(IN2, OUTPUT);
  pinMode(ENA, OUTPUT);
}

void loop() {
  digitalWrite(IN1, HIGH);     // forward
  digitalWrite(IN2, LOW);
  analogWrite(ENA, 200);
  delay(1000);

  // Stop for 1 s

  // Reverse at 200 for 1 s

  // Stop for 1 s

}

Turn on JavaScript to edit, run and test this code in the browser.

Exercise 11.3

The knob sets the speed

Not started

Keep the motor going forward, and let the potentiometer on A0 set its speed: 0 at one end, full at the other. The test turns the knob down in two steps while your sketch runs.

const int IN1 = 7;
const int IN2 = 8;
const int ENA = 9;
const int POT = A0;

void setup() {
  pinMode(IN1, OUTPUT);
  pinMode(IN2, OUTPUT);
  pinMode(ENA, OUTPUT);
  digitalWrite(IN1, HIGH);    // forward
  digitalWrite(IN2, LOW);
}

void loop() {
  // Read the knob, scale it to 0..255 and set the speed

}

Turn on JavaScript to edit, run and test this code in the browser.

Stop before you reverse

Flipping the direction pins while the motor is running at speed slams a spinning motor into reverse. The current surge is far bigger than starting from rest - hard on the driver, the supply and the gearbox, and a common cause of the Uno browning out and resetting.

The habit is simple: set the enable to 0, pause, then change direction. A tenth of a second is enough for a small motor.
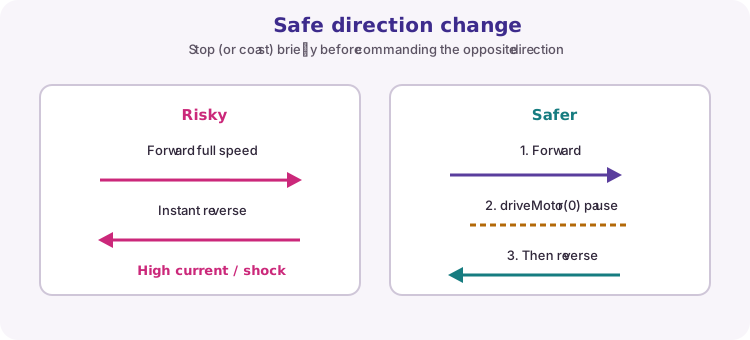
Stop the motor, pause, then apply the opposite direction
Stop, pause, then reverse.
Exercise 11.4

Safe reverse

Not started

This sketch slams from forward to reverse at full tilt. Make it safe: before each change of direction, set the enable to 0 and wait 100 ms. The motor should still run 1 s each way.

const int IN1 = 7;
const int IN2 = 8;
const int ENA = 9;

void setup() {
  pinMode(IN1, OUTPUT);
  pinMode(IN2, OUTPUT);
  pinMode(ENA, OUTPUT);
}

void loop() {
  digitalWrite(IN1, HIGH);
  digitalWrite(IN2, LOW);
  analogWrite(ENA, 200);
  delay(1000);

  digitalWrite(IN1, LOW);
  digitalWrite(IN2, HIGH);
  analogWrite(ENA, 200);
  delay(1000);
}

Turn on JavaScript to edit, run and test this code in the browser.

Exercise 11.5

A button changes direction

Not started

The motor runs at 180 the whole time. Each press of the button on pin 2 should flip its direction - one press, one change, however long it is held.

This is the edge detection from Chapter 8, driving the direction pins.

const int IN1 = 7;
const int IN2 = 8;
const int ENA = 9;
const int BUTTON = 2;

bool forward = true;
bool lastButton = HIGH;

void setup() {
  pinMode(IN1, OUTPUT);
  pinMode(IN2, OUTPUT);
  pinMode(ENA, OUTPUT);
  pinMode(BUTTON, INPUT_PULLUP);
}

void loop() {
  bool now = digitalRead(BUTTON);
  // On a new press, flip forward

  lastButton = now;

  // Write the direction pins from forward, and keep the speed at 180

}

Turn on JavaScript to edit, run and test this code in the browser.

Exercise 11.6

Soft start, instant stop

DeeperNot started

Starting a motor at full power jerks the mechanism and dips the supply. Ramp it up instead: add 5 to the speed every 20 ms until it reaches 200.

While the button on pin 2 is held, the motor must stop at once, and when released it ramps up again from 0. No delay() - the button has to stay responsive.

const int IN1 = 7;
const int IN2 = 8;
const int ENA = 9;
const int BUTTON = 2;

int speed = 0;
unsigned long lastStep = 0;

void setup() {
  pinMode(IN1, OUTPUT);
  pinMode(IN2, OUTPUT);
  pinMode(ENA, OUTPUT);
  pinMode(BUTTON, INPUT_PULLUP);
  digitalWrite(IN1, HIGH);    // forward
  digitalWrite(IN2, LOW);
}

void loop() {
  // Button held: speed 0, motor off, and the ramp starts again on release

  // Otherwise, every 20 ms: add 5 to speed, up to 200, and write it

}

Turn on JavaScript to edit, run and test this code in the browser.

Try it on a real Uno

Wire the Lesson 14 circuit: L298N IN1 and IN2 to pins 7 and 8, ENA to pin 9, the motor supply to the module (not to the Uno's 5 V pin), and GND shared between the module and the Uno. Upload Safe reverse and listen to the difference when you remove the two stop lines.

Then upload Soft start, instant stop and watch the supply voltage on a multimeter as the motor starts - the ramp is what keeps the Uno from resetting.