
04. Sketch Structure, Variables & Types
Build readable sketches: setup/loop, named pins, suitable types, scope, and clean syntax.
Learning outcomes
- Explain the roles of global declarations, setup() and loop()
- Declare const pin names and changing variables with clear names
- Choose suitable Uno data types for pins, counts, flags and decimals
- Distinguish global and local scope
- Apply case sensitivity, semicolons, braces and useful comments
Parts and preparation
Arduino Uno, USB data cable and Arduino IDE 2. Use the onboard LED - no breadboard required.
Before power: inspect wiring, confirm supply voltage and ensure all connected circuits share GND.
What a sketch is
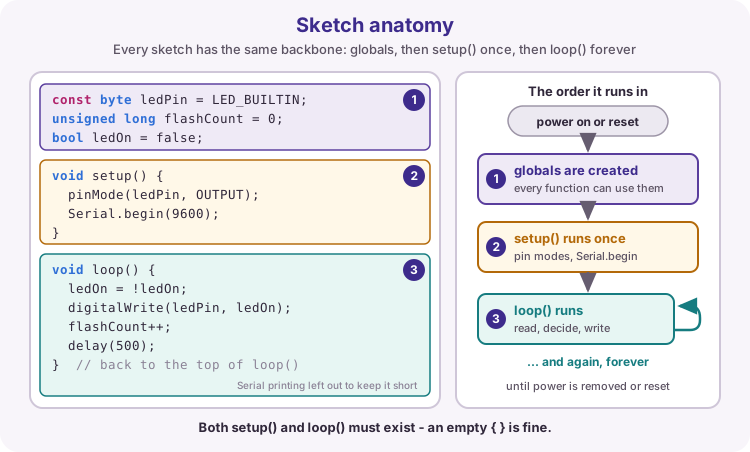
An Arduino program is called a sketch. After reset or power-up, the board runs your code from flash memory. Almost every sketch has the same backbone: optional global declarations, then setup(), then loop().
This lesson is about reading and writing that backbone clearly - before sensors and libraries pile on.
setup once, loop forever
setup() runs exactly once after reset. Use it for configuration: pinMode, Serial.begin, and one-time starts.
loop() then runs repeatedly for as long as the board is powered. Each pass typically reads inputs, makes decisions, writes outputs, then returns to the top of loop.
Both functions must exist. An empty body { } is legal if you truly have nothing to do there yet.
void setup() {
  // runs once
}

void loop() {
  // runs again and again
}
Variables store changing values
A variable is a named place in memory that holds a value your program can read and update. Declare it with a type, a name, and usually an initial value.
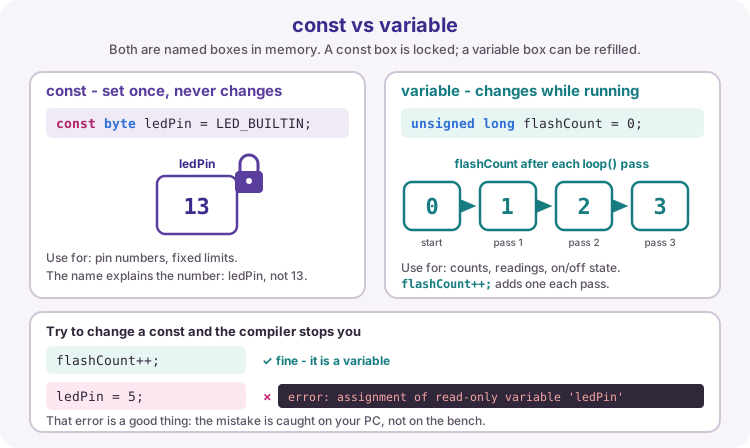
Example: unsigned long flashCount = 0; creates a counter starting at zero. Later, flashCount++; increases it.
| Part | Meaning |
|---|---|
| Type | How the bits are interpreted (byte, int, ...) |
| Name | How you refer to the value in code |
| Initial value | Starting contents (recommended) |
unsigned long flashCount = 0;  // globals: above setup()
bool ledOn = false;

void loop() {
  flashCount++;   // updates go inside a function
  ledOn = !ledOn;
}
const for pins and fixed values
Use const when a name must not change after it is set - especially pin numbers. const byte ledPin = LED_BUILTIN; documents intent and lets the compiler reject accidental reassignment.
Course style: name pins clearly (ledPin, buttonPin). Some teams prefer LED_PIN in UPPERCASE for constants - pick one style and stay consistent in a sketch.
Choosing a type on the Uno
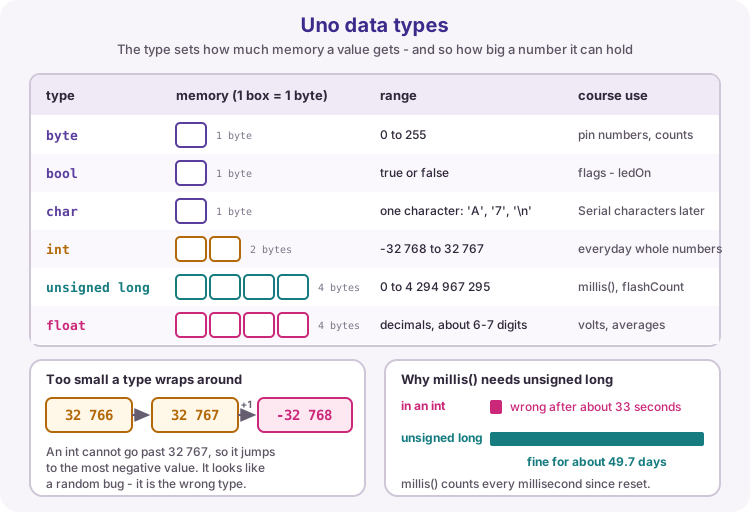
On a classic Uno (ATmega328P), common types have different ranges. Too small a type overflows - values wrap and look like random bugs.
Rules of thumb for this course: byte for pin numbers and small counts, int for everyday integers, unsigned long for millis() and long-running counters, float when you need decimals, bool for true/false flags.
| Type | Typical range / note | Course use |
|---|---|---|
| byte | 0 to 255 | Pin numbers, small indexes |
| int | About -32768 to 32767 on Uno | General integers |
| unsigned long | 0 to about 4.29 billion | millis, flash counts |
| float | Approximate decimals | Volts, averages |
| bool | true or false | Flags, LED state |
| char | One character | Serial characters later |
Global vs local scope
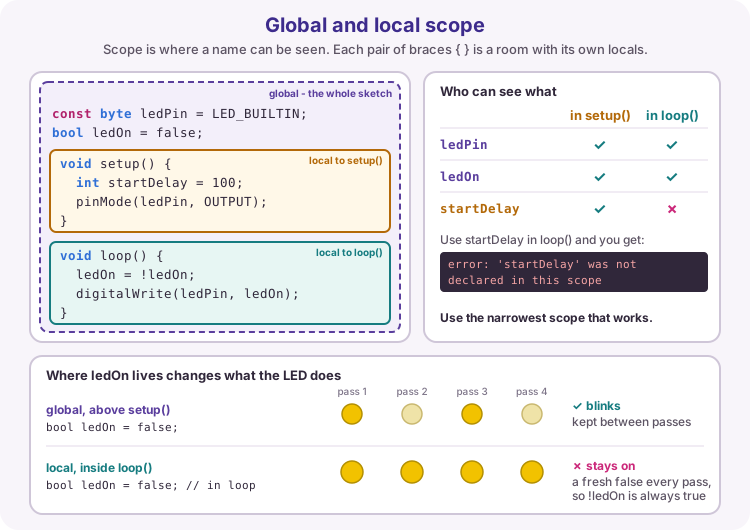
Scope is where a name is visible. A global declared above setup can be used by setup, loop and other functions. A local declared inside a function exists only in that block.
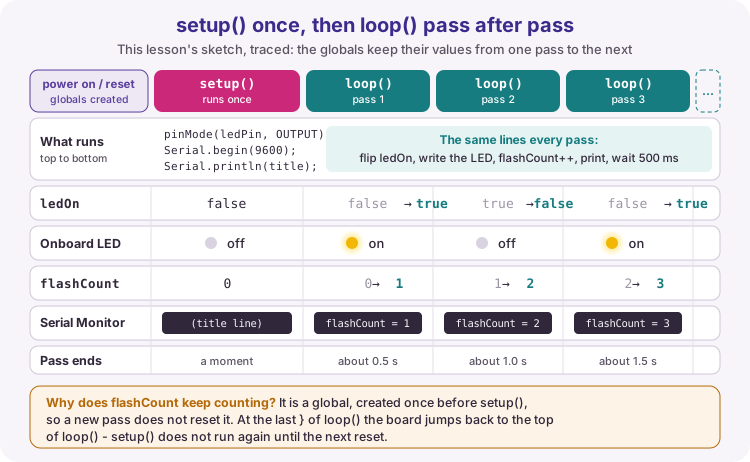
If you declare bool ledOn = false; inside loop, it is recreated every pass - fine for a temporary, bad if you expected it to remember the previous toggle. Prefer the narrowest useful scope so names do not collide.
Names people can read
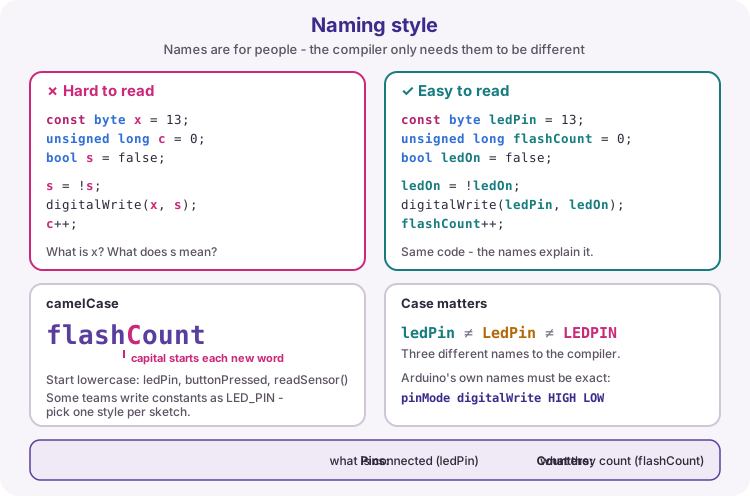
Good names beat long comments. Prefer ledPin and flashCount over x and temp2. Use camelCase for most variables and functions (buttonPressed, readSensor).
C++ is case-sensitive: setup and Setup are different. Arduino APIs use exact forms such as pinMode, digitalWrite, HIGH and LOW.
Syntax that trips beginners
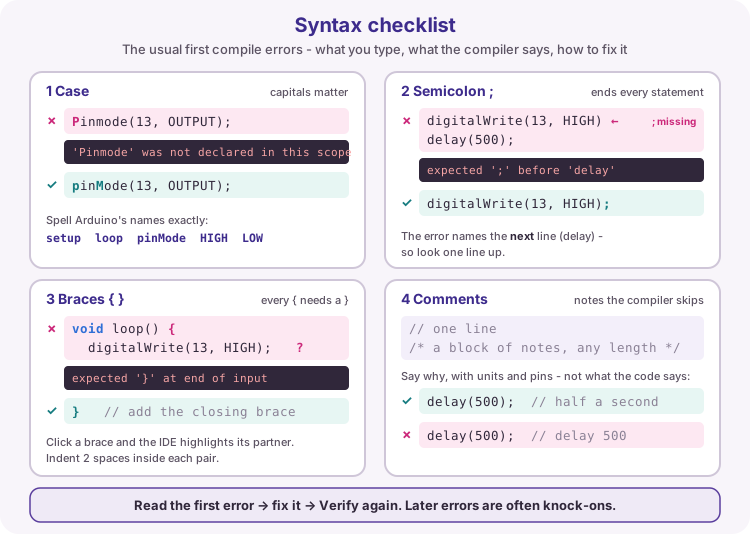
Most early red errors are punctuation or spelling, not electronics:
- Missing semicolon - the compiler often points at the next line - Mismatched { } braces - count them or use the IDE brace highlight - Wrong case - PinMode will not compile; pinMode will - Comments: // for one line, /* ... */ for a block - explain why, units and pin roles
Course style: put the opening brace on the same line as the function or if header, and indent nested blocks by 2 spaces.
void loop() {
  digitalWrite(ledPin, HIGH);  // statement ends with ;
  // this whole line is a comment
}
What the worked sketch practises
The onboard LED toggles every 500 ms. A bool remembers on/off. An unsigned long counts flashes and prints to Serial so you can watch the value grow.
delay(500) is fine for this first demo. Later lessons replace long delays with millis() when several tasks must stay responsive.
Wiring and safe build sequence
- No breadboard required - use the Uno onboard LED (LED_BUILTIN, usually pin 13)
- Connect USB data cable, select board and port, open Serial Monitor at 9600 baud
Worked sketch
Download .inoconst byte ledPin = LED_BUILTIN; // onboard LED pin
unsigned long flashCount = 0; // grows each toggle - needs a wide type
bool ledOn = false; // remembers current LED state
void setup() {
pinMode(ledPin, OUTPUT);
Serial.begin(9600);
Serial.println("Lesson 04: structure, variables, types");
}
void loop() {
ledOn = !ledOn; // flip true/false
digitalWrite(ledPin, ledOn); // bool works as HIGH/LOW here
flashCount++;
Serial.print("flashCount = ");
Serial.println(flashCount);
delay(500);
}How the code works
- const byte is enough for a pin number (0-255).
- ledOn = !ledOn; toggles a Boolean with the NOT operator.
- flashCount is unsigned long so a long run will not overflow as quickly as int.
- Serial.print labels make the Monitor easier to read than bare numbers.
Test and record evidence
Practical evidence checklist
Common faults and checks
- Check exact capitalization of setup, loop, pinMode, HIGH and LOW.
- A missing semicolon often causes an error reported on the next line.
- Blank Serial: match Monitor baud to Serial.begin(9600) and use a USB data cable.
- LED never blinks: confirm board/port, and that you uploaded this sketch (not an empty one).
- If you move ledOn inside loop without care, it may reset every pass - that is a scope lesson.
Check your understanding
Q1. What runs once after reset, and what repeats?
Show answer
setup() runs once; loop() repeats.
Q2. Why use const for a pin number?
Show answer
It documents that the value must not change and lets the compiler prevent reassignment.
Q3. Why is flashCount an unsigned long instead of byte?
Show answer
A long-running counter can exceed 255 (and even int range); unsigned long fits millis-scale counts better.
Q4. What is local scope?
Show answer
The region inside a block or function where a declared name is visible.
Q5. Why might the compiler complain about Setup()?
Show answer
C++ is case-sensitive; the required function name is setup with a lowercase s.
Practise in your browser
Write and test this lesson's code on a virtual Uno. Work through the 7 exercises in order. Press Test and each one checks itself.
What you will practise
A variable is a named box for a value. Every variable has a type (what kind of value), a name and a value. On the Uno the type also decides how big the box is - and a value that does not fit wraps around to a strange number.
In this chapter you print values to the Serial Monitor, calculate with whole numbers and decimals, and hunt down two classic type bugs. The tests run your sketch on a simulated Arduino Uno, so int really is 16-bit, exactly like the real board.
Declaring and printing variables
Each variable is declared above setup() with a type, a name and a starting value. Serial.print shows a value and stays on the same line; Serial.println ends the line. Press Run and watch the Serial Monitor.
ledPin = 13
voltage = 4.75
ready = 1
grade = A
- A
boolprints as 1 (true) or 0 (false). - A
charprints as the character itself, not a number. - A
floatprints with two decimal places unless you ask for more:Serial.println(voltage, 3);
One variable, one label
Declare an int called ledPin holding 13, then print it after the label LED pin: (note the space after the colon).
Use Serial.print for the label and Serial.println for the value.
LED pin: 13
Board passport
Now four variables. Declare them above setup():
boardName, aStringholding"Uno"pinCount, anintholding20clockMHz, abyteholding16supplyVoltage, afloatholding5.0
Then print them so the Serial Monitor shows exactly the sample output.
A String holds text. Declare it like any other variable, with the text in double quotes. boardName and its line are done for you - do the other three the same way.
Board: Uno
Pins: 20
Clock MHz: 16
Voltage: 5.00
Choosing a type on the Uno
The Uno's ATmega328P is an 8-bit chip, so its types are smaller than on a PC. Pick the smallest type that always fits the value:
| Type | Size | Range | Typical use |
|---|---|---|---|
| byte | 1 byte | 0 to 255 | pin numbers, small counts |
| int | 2 bytes | -32768 to 32767 | everyday whole numbers |
| unsigned int | 2 bytes | 0 to 65535 | counts that are never negative |
| long | 4 bytes | about -2.1 to 2.1 billion | big whole numbers |
| unsigned long | 4 bytes | 0 to 4294967295 | millis() times, long counters |
| float | 4 bytes | about 7 significant digits | volts, temperatures, averages |
| bool | 1 byte | true / false | flags such as ledOn |
| char | 1 byte | one character | letters, 'A' |
| String | grows with the text | any text, in double quotes | names and labels, "Uno" |
Counting with the right type
This is the Lesson 04 sketch. flashCount is an unsigned long because it keeps growing for as long as the board runs. Run it and watch the virtual LED and the count together.
flashCount = 1
flashCount = 2
flashCount = 3
Calculate with variables
red and blue hold two counts of parts. Print their total, their difference (red minus blue) and their product, each after its label.
+ adds, - subtracts, * multiplies; you can print a sum directly: Serial.println(red + blue);
Calculate with the variables - the tests try other numbers.
Total: 17
Difference: 7
Product: 60
Whole numbers and decimals
When both sides of / are whole numbers, C++ does integer division: the answer is a whole number and the remainder is thrown away. 7 / 2 is 3, not 3.5.
If either side is a decimal, the calculation is done with decimals: 7 / 2.0 is 3.5. Storing the result in a float afterwards is too late - the decimals were already lost.
Integer division in action
Run this and compare each line with the code that printed it.
3
3.50
1
69
69.80
Celsius to Fahrenheit
celsius holds a temperature. Declare a float called fahrenheit, calculate it with **F = C * 9 / 5 + 32**, and print one line like the sample. The tests try other temperatures, including negative ones.
21.50 C = 70.70 F
Fix the average
This sketch should print the average of a, b and c with two decimals, but it prints Average: 7.00 instead of Average: 7.67. Find out why and fix it. Keep the three variables.
Average: 7.67
Dividing with a remainder
Two operators work together on whole numbers:
/says how many whole times one number fits into another:17 / 5is3.%says what is left over:17 % 5is2.
Together they split a number into parts - 17 sweets shared between 5 children is 3 each with 2 left over. The same pair turns seconds into minutes, or milliseconds into seconds.
Share out the sweets
sweets are shared equally between children. Print how many each child gets, and how many are left over.
Each gets: 3
Left over: 2
Seconds to hours, minutes and seconds
totalSeconds holds a time. Work out the whole hours, minutes and seconds, and print one line like the sample.
There are 3600 seconds in an hour and 60 in a minute. Use / and % as in the last exercise.
The three variables and the print lines are ready. Replace each 0 with the maths.
3725 s = 1 h 2 min 5 s
Watching an int overflow
Run this and look at what happens after 32767.
32765
32766
32767
-32768
-32767
Try it on a real Uno
Download your solution to Seconds to hours, minutes and seconds with the Download .ino button, open it in the Arduino IDE and upload it. Set the Serial Monitor to 9600 baud: the output should match the simulator exactly.
Then change totalSeconds to 100000 and predict the output before you upload.
Want more? Code Along chapter 2 has 2 Deeper exercises that go further than this lesson. They are optional.