
06. UART Serial & Debugging
Watch your sketch over USB Serial, print useful labels, and accept simple commands.
Learning outcomes
- Open the Serial Monitor and set its baud and line ending
- Explain why baud rates must match on both ends
- Use Serial.print and Serial.println with clear labels
- Read characters with available and read, and ignore line endings
- Know when parseInt helps and how it can make loop() wait
- Use a few labelled debug prints to find where a fault is
Parts and preparation
Arduino Uno, USB data cable and Arduino IDE 2 Serial Monitor. Onboard LED only - no breadboard required. An oscilloscope if you want to see the signal on the wire.
Before power: inspect wiring, confirm supply voltage and ensure all connected circuits share GND.
Why Serial matters
Your sketch runs inside the chip, where you cannot see it. When the LED does not do what you expect, you need a way to ask the board what it thinks is happening. That is what Serial is for.
Serial.print sends text from the board to your PC, and the Serial Monitor in the IDE shows it. It also works the other way: you type in the Monitor, and the sketch reads what you typed with Serial.read. So Serial lets you watch your sketch and give it commands.
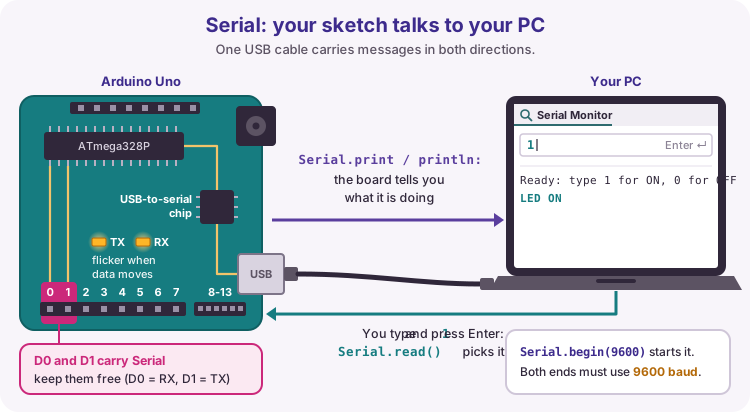
Everything travels over the same USB cable you upload with. The Uno's main chip speaks a simple serial language called UART on pins D0 (RX, receive) and D1 (TX, transmit). A small USB-to-serial chip on the board turns that into USB. The TX and RX LEDs beside the L LED flicker whenever data moves.
Because D0 and D1 carry Serial, keep them free. Anything wired to them can stop uploads and scramble your messages.
Open the Serial Monitor
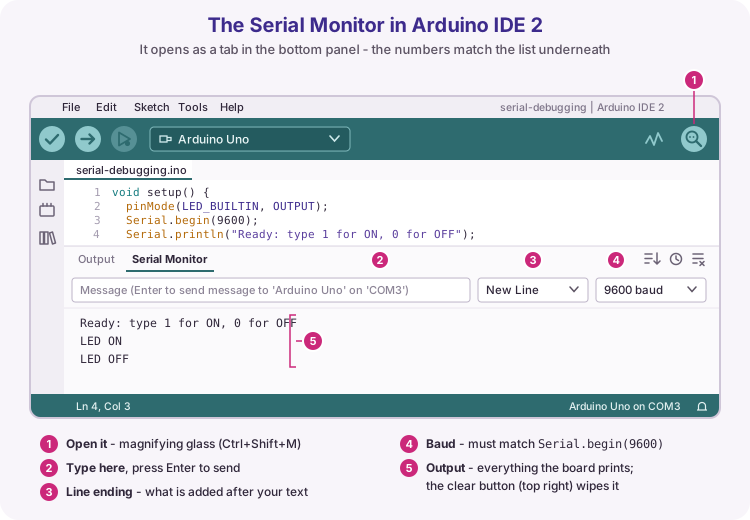
Upload your sketch first. Then click the magnifying glass at the top right of the IDE, or press Ctrl+Shift+M. The Serial Monitor opens as a tab at the bottom of the window.
Check the two drop-downs to the right of the message box. The baud drop-down must show the same number as Serial.begin in your sketch - 9600 in this course. The line-ending drop-down decides what is added after the text you send; more on that below.
To send something, type in the message box and press Enter. To wipe old output, use the clear button.
Opening the Monitor restarts the Uno, so setup() runs again and you see its first message. That is normal. If an upload fails because the port is busy, close the Monitor and upload again.
UART and baud rate
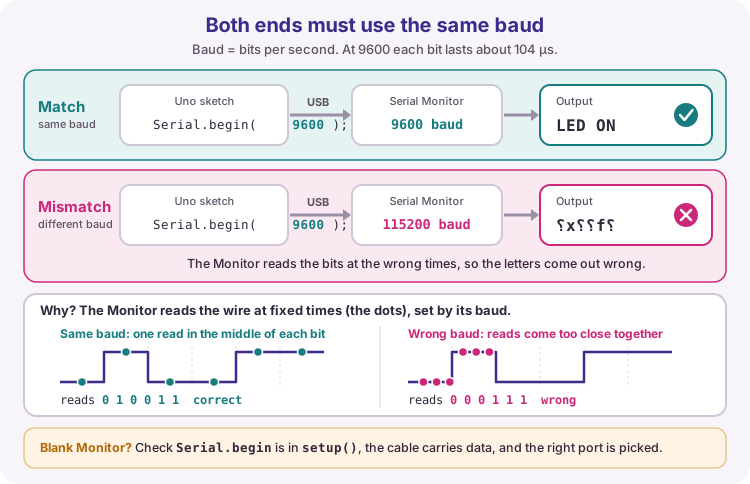
UART sends one bit at a time down a single wire, and there is no clock wire to keep time. Instead, both ends agree in advance how fast the bits go. That speed is the baud rate: the number of bits per second.
Serial.begin(9600) sets the sketch's side to 9600 bits per second, so each bit lasts about 104 µs (millionths of a second). The Monitor's baud drop-down must show 9600 too.
If the two differ, the Monitor reads the bits at the wrong moments and the letters come out as nonsense. A blank Monitor usually means something else: Serial.begin is missing, the wrong port is picked, or the cable only carries power.
9600 is the course default: slow enough to be reliable, fast enough for messages. 115200 is common in faster projects - just change both ends.
| Baud | Time per bit | Characters per second (about) |
|---|---|---|
| 9600 | 104 µs | 960 |
| 115200 | 8.7 µs | 11 500 |
What a character looks like on the wire
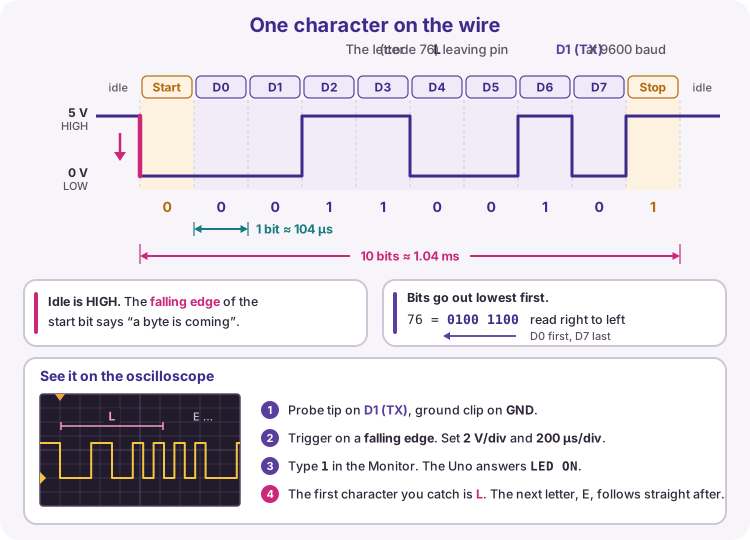
Each character travels as a small packet of 10 bits called a frame. While nothing is being sent, the TX line sits HIGH (5 V). The start bit pulls it LOW - that falling edge tells the receiver a character is coming. Then come the 8 data bits, lowest bit first, and finally a stop bit that returns the line HIGH.
The 8 data bits are the character's code number. The letter L is code 76, which is 0100 1100 in binary; read from right to left, that is the order the bits leave the pin.
At 9600 baud one frame takes about 1.04 ms, so the Uno can send roughly 960 characters a second. That limit matters when you debug - see Debugging strategy below.
To see it yourself, put the oscilloscope probe on D1 (TX) and the ground clip on GND. Set 2 V/div, 200 µs/div and a falling-edge trigger. Type 1 in the Monitor: the Uno replies LED ON, and the scope catches the L.
print versus println
Serial.print sends text and stays on the same line. Serial.println sends text and then ends the line, so the next message starts underneath.
Text goes in double quotes: Serial.print("count=") prints exactly count=. A variable without quotes prints its value: Serial.println(count) prints 7.
A screen of bare numbers is hard to read in a hurry - which number is which? Print a label with print, then the value with println, and each line tells you exactly what it is.
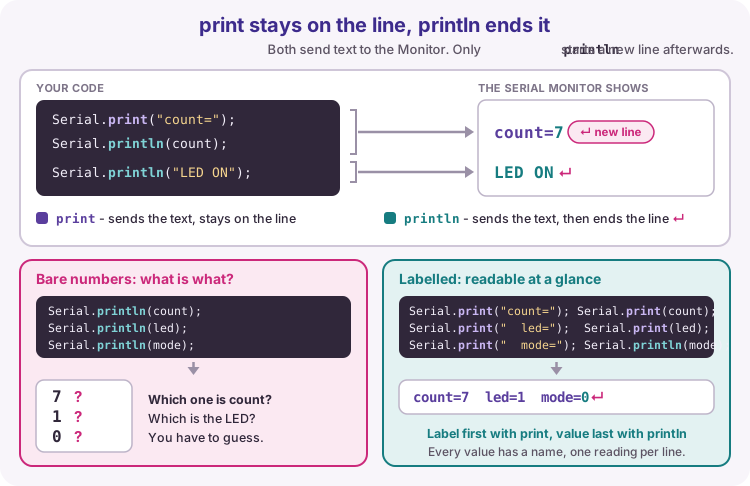
Serial.print("count=");    // label, stay on this line
Serial.println(count);     // value, then a new line
Receiving commands
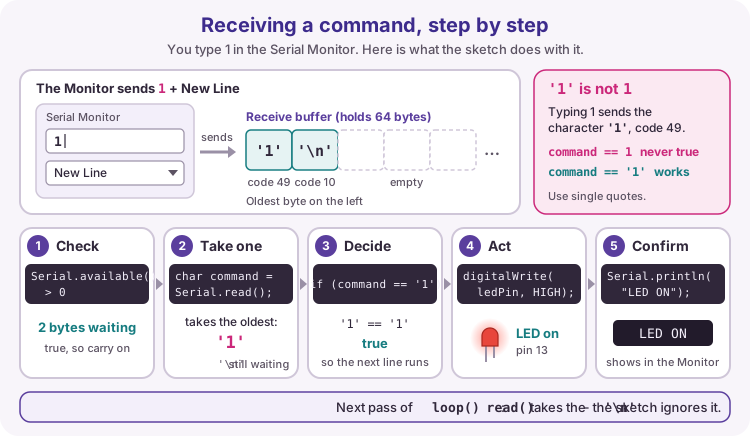
When you press Enter in the Monitor, your characters travel to the Uno and wait in the receive buffer, a small queue that holds up to 64 bytes. Your sketch takes them out when it is ready.
Serial.available() tells you how many bytes are waiting. Serial.read() takes the oldest one out and gives it to you, usually stored in a char variable. So the pattern is: if something is waiting, read one byte, decide what it means, act, and print a confirmation.
Watch the quotes. Typing 1 sends the character '1', whose code is 49 - not the number 1. Compare with '1' in single quotes: command == '1'. Written as command == 1, the test is never true.
| Call | What it does |
|---|---|
| Serial.begin(9600) | Start Serial at 9600 baud (in setup) |
| Serial.available() | How many bytes are waiting in the buffer |
| Serial.read() | Take the oldest byte out of the buffer |
| Serial.print / println | Send text or a value to the Monitor |
| Serial.parseInt() | Read a whole number (can wait - see below) |
Line endings: the invisible keys
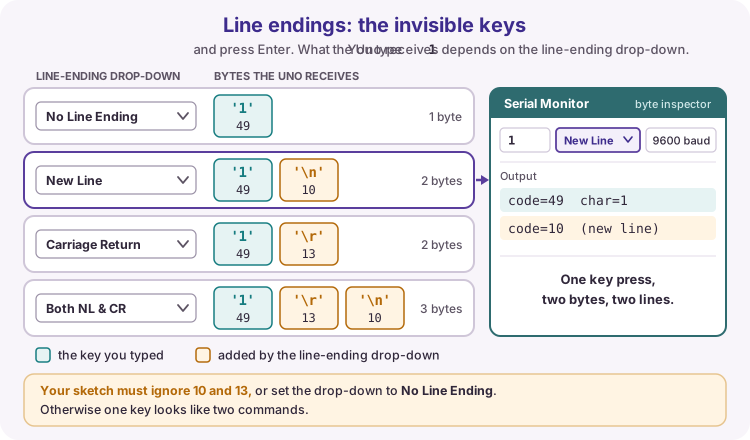
When you press Enter, the Monitor can add extra characters after your text to mark the end of the line. The line-ending drop-down chooses which: none, a new line ('\n', code 10), a carriage return ('\r', code 13), or both.
Your sketch receives these as ordinary bytes. With New Line selected, typing 1 sends two bytes, '1' and '\n', so loop() reads two commands. If your sketch replies to unknown commands, you get a reply to the invisible one too.
There are two fixes: set the drop-down to No Line Ending, or make the sketch ignore codes 10 and 13. The worked sketch does the second, so it works with any setting. The Step 2 sketch prints the code of every byte it receives, so you can see the invisible ones for yourself.
Reading numbers with parseInt
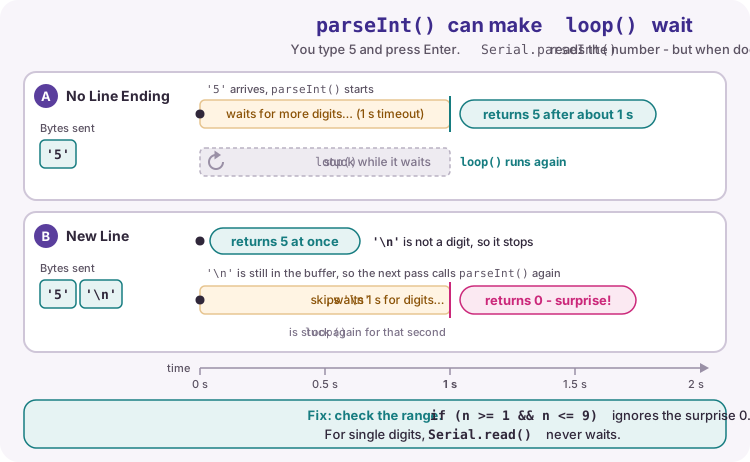
Serial.read gives you one character. To read a whole number such as 120, use Serial.parseInt(). It skips anything that is not a digit, reads digits until something else arrives, and returns the number.
The catch is that it waits. If nothing arrives after your last digit, it waits for a timeout - 1 second by default - in case more digits are coming. While it waits, loop() is stuck and nothing else in your sketch runs.
Line endings bring a second surprise. With New Line, the '\n' stops parseInt straight away, but it stays in the buffer. On the next pass available() is 1, so parseInt runs again, skips the '\n', finds no digits, waits a second and returns 0.
So check the range before you use the number, and ignore anything outside it. For single-key commands, Serial.read never waits and is the better choice.
if (Serial.available() > 0) {
  int n = Serial.parseInt();     // may wait up to 1 second
  if (n >= 1 && n <= 9) {        // ignores the surprise 0
    Serial.print("n=");
    Serial.println(n);
  }
}
Debugging strategy
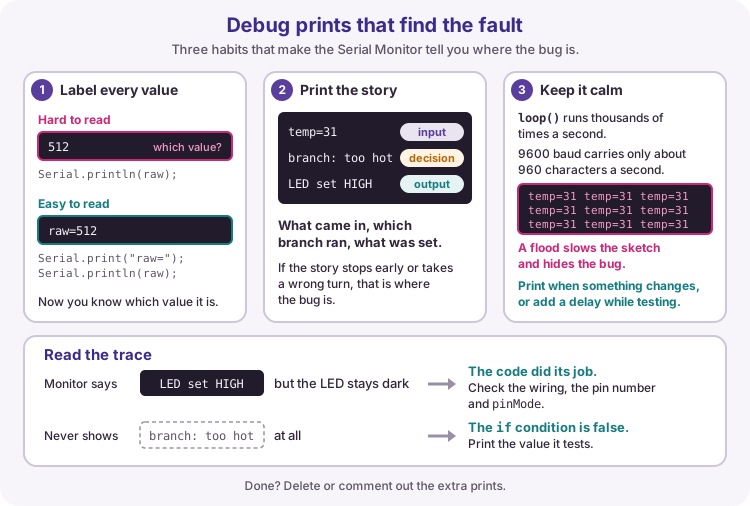
Debug prints work like a torch: point them at the few places that tell the story, not everywhere at once. For the part that misbehaves, print the input the sketch used, the decision it made and the output it set. Label every value.
Then read the trace. If the Monitor says LED set HIGH but the LED stays dark, the code did its job - check the wiring, the pin number and pinMode. If the decision line never appears, the if condition was false; print the value it tests and see why.
Keep the output calm. loop() runs thousands of times a second, but at 9600 baud only about 960 characters a second fit down the wire. Once the Uno's small send buffer is full, every print waits its turn, so a flood slows the whole sketch and buries the line you need. Print only when something changes, or add a short delay while you test.
When the bug is fixed, delete the extra prints or comment them out.
int temperature = 31;               // pretend reading for the test

Serial.print("temp=");              // input
Serial.println(temperature);
if (temperature > 30) {
  Serial.println("branch: too hot");  // decision
  digitalWrite(ledPin, HIGH);
  Serial.println("LED set HIGH");     // output
}
What the worked sketch practises
Build it in three small steps. Step 1 prints a counter once a second: if you can read it, the cable, port and baud are all right. Step 2 prints the code of every byte you send, so you see '1' arrive as 49 and the line ending as 10. The worked sketch then turns those bytes into commands: type 1 or 0 to switch the onboard LED, and it confirms each one.
The worked sketch ignores codes 10 and 13, so it works with any line-ending setting. Any other key gets an Unknown command reply - type a letter to see it.
Wiring and safe build sequence
- USB data cable from PC to Uno (a charge-only cable shows no port)
- Select the board (Arduino Uno) and its port in the IDE
- Open the Serial Monitor and set it to 9600 baud
- Nothing on D0/D1 - they carry Serial
- Wire demo: scope probe on D1 (TX), ground clip on GND
Step 1: Is Serial working?
Download .inoWhat this sketch is for: Upload this first. It proves Serial works before you add any commands. Open the Serial Monitor at 9600 baud and watch the count go up once a second.
int count = 0;                      // how many messages we have sent

void setup() {
  Serial.begin(9600);               // start Serial at 9600 baud
  Serial.println("Hello from the Uno");
}

void loop() {
  Serial.print("count=");           // label, stay on this line
  Serial.println(count);            // value, then a new line
  count = count + 1;                // next number
  delay(1000);                      // one message per second
}
How the code works
- Hello from the Uno and a rising count mean the cable, port and baud are all right.
- Close and reopen the Monitor: the count starts at 0 again, because opening the Monitor restarts the Uno.
- Nonsense characters? Set the Monitor to 9600 baud. Nothing at all? Check the port.
Step 2: See every byte you send
Download .inoWhat this sketch is for: This prints the code number of every byte that arrives, so you can see what really reaches the Uno. Type 1 and press Enter, then change the line-ending drop-down and try again.
void setup() {
  Serial.begin(9600);                   // start Serial at 9600 baud
  Serial.println("Type something and press Enter");
}

void loop() {
  if (Serial.available() > 0) {         // is a byte waiting?
    char c = Serial.read();             // take it out of the buffer
    int code = c;                       // the same byte as a number

    Serial.print("code=");
    Serial.print(code);
    if (code == 10) {                   // new line
      Serial.println("  (new line)");
    } else if (code == 13) {            // carriage return
      Serial.println("  (carriage return)");
    } else {                            // a normal character
      Serial.print("  char=");
      Serial.println(c);
    }
  }
}
How the code works
- Typing 1 shows code=49 - the character '1', not the number 1.
- With New Line selected you also get code=10; with Both NL & CR you get 13 and then 10.
- Type hi: read() takes one byte per pass of loop(), so you get a line for h, one for i, and one for the line ending.
Worked sketch
Download .inoconst byte ledPin = LED_BUILTIN; // the onboard LED (pin 13)
void setup() {
pinMode(ledPin, OUTPUT); // the LED pin is an output
Serial.begin(9600); // start Serial at 9600 baud
Serial.println("Ready: type 1 for ON, 0 for OFF");
}
void loop() {
if (Serial.available() > 0) { // has a byte arrived?
char command = Serial.read(); // take one byte out of the buffer
if (command == '1') { // the character 1, not the number 1
digitalWrite(ledPin, HIGH); // LED on
Serial.println("LED ON"); // confirm what we did
} else if (command == '0') {
digitalWrite(ledPin, LOW); // LED off
Serial.println("LED OFF");
} else if (command == '\n' || command == '\r') {
// a line-ending byte from the Monitor: ignore it
} else {
Serial.print("Unknown command: ");
Serial.println(command);
}
}
}How the code works
- Serial.begin(9600) in setup() starts Serial; the Monitor must also be set to 9600 baud.
- Serial.available() > 0 means at least one byte is waiting; Serial.read() takes one.
- '1' and '0' are characters in single quotes; 1 and 0 without quotes are numbers.
- '\n' and '\r' are the line-ending bytes from the Monitor; their empty branch ignores them.
- Every command prints a confirmation, so you can see the branch ran even if the LED seems dead.
Test and record evidence
Practical evidence checklist
Common faults and checks
- Nonsense characters: the Monitor is not set to 9600 baud.
- Blank Monitor: check Serial.begin(9600) is in setup(), use a USB data cable and the right port, and open the Monitor after uploading.
- Upload fails because the port is busy: close the Serial Monitor and upload again.
- Every key also prints Unknown command: line-ending bytes are getting through - keep the '\n' / '\r' branch or set No Line Ending.
- Typing 1 does nothing: compare with '1' in single quotes, and press Enter to send.
- Prints work but the LED never changes: confirm LED_BUILTIN and that nothing else drives pin 13.
Check your understanding
Q1. Why must baud rates match?
Show answer
The receiver needs the same bit timing as the sender.
Q2. Which pin does the Uno send Serial data out on?
Show answer
D1 (TX); it receives on D0 (RX).
Q3. About how long does one character take at 9600 baud?
Show answer
About 1 ms - 10 bits of about 104 µs each.
Q4. What does Serial.available report?
Show answer
The number of bytes waiting to be read.
Q5. Why compare to '1' instead of 1?
Show answer
'1' is the character sent from the keyboard (code 49); 1 is the number one.
Q6. What does the line-ending drop-down add when set to New Line?
Show answer
A new-line byte, '\n' (code 10), after your text.
Q7. What is the risk of parseInt in loop?
Show answer
It can wait up to its 1 s timeout for more digits, and loop() is stuck meanwhile.
Q8. Name one good debug-print habit.
Show answer
Label values, print the input, decision and output, and avoid flooding every loop pass.