
02. Microcontrollers & the Arduino Uno
Meet the computer on the Uno: MCU vs PC, power pins, I/O groups and clone boards, with optional R4 and bare-chip extras.
Learning outcomes
- Distinguish a microcontroller from a microprocessor system
- Identify Uno R3 power pins, I/O and on-board LEDs
- Choose a safe power connection (USB, VIN / barrel)
- Explain digital, analogue, UART, I2C and SPI pin roles
- Optional appendix: compare key Uno R3 and R4 Minima specs
- Optional appendix: describe the minimum parts for an ATmega328P on a breadboard
Parts and preparation
Arduino Uno R3 (class boards are CH340 clones) and a USB data cable. Optional extension: ATmega328P (DIP), breadboard, 16 MHz crystal, 2 x 22 pF capacitors, 10 k ohm resistor, 10 uF capacitor and a regulated 5 V supply.
Before power: inspect wiring, confirm supply voltage and ensure all connected circuits share GND.
Microcontroller versus microprocessor
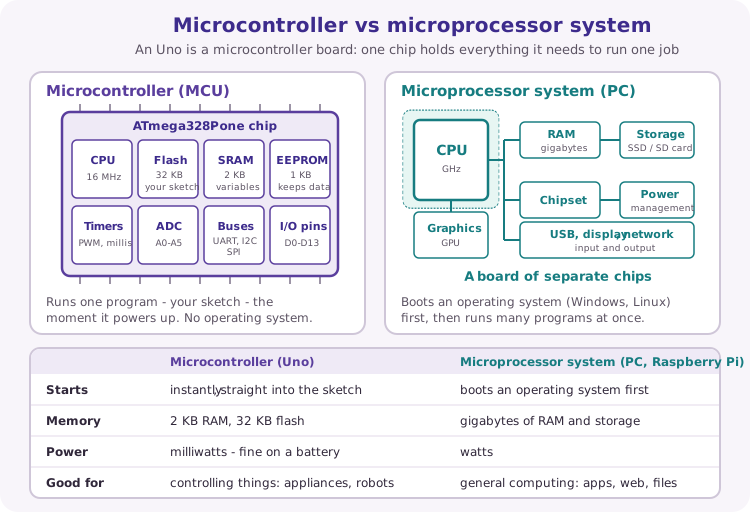
A microcontroller (MCU) combines a CPU, Flash program memory, SRAM, often EEPROM, and peripherals (timers, ADC, UART, and more) on one chip for a dedicated control job.
A microprocessor system (a typical PC) uses a CPU chip plus separate RAM, storage and chipsets - suited to general-purpose computing with an operating system and many programs.
An appliance controller, robot brain or Uno project usually wants an MCU: fewer chips, lower power, fixed task.
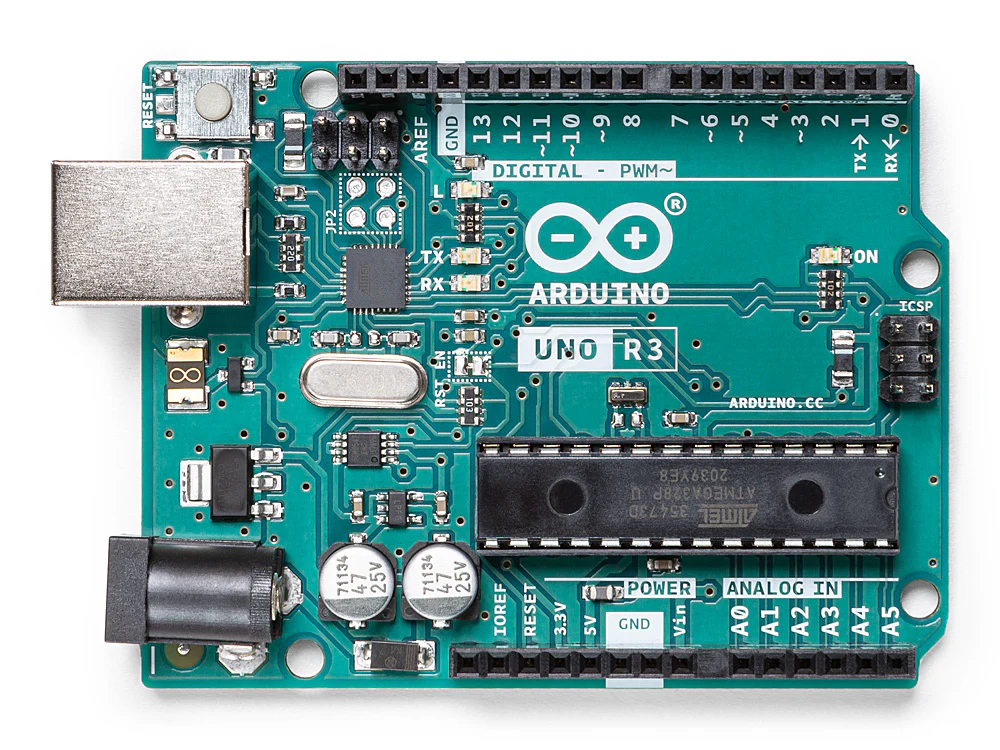
Arduino Uno R3 board guide
This course defaults to the classic Arduino Uno Rev3: ATmega328P, 5 V logic, USB-B, and the standard Uno shield layout.
| Item | Uno R3 |
|---|---|
| Microcontroller | ATmega328P @ 16 MHz |
| Flash / SRAM / EEPROM | 32 KB (about 0.5 KB bootloader) / 2 KB / 1 KB |
| Logic / USB | 5 V logic · USB-B |
| Digital I/O | D0-D13 · PWM on ~ pins 3, 5, 6, 9, 10, 11 |
| Analogue inputs | A0-A5 · 10-bit ADC (0-1023) by default |
| VIN / barrel | About 7-12 V recommended |
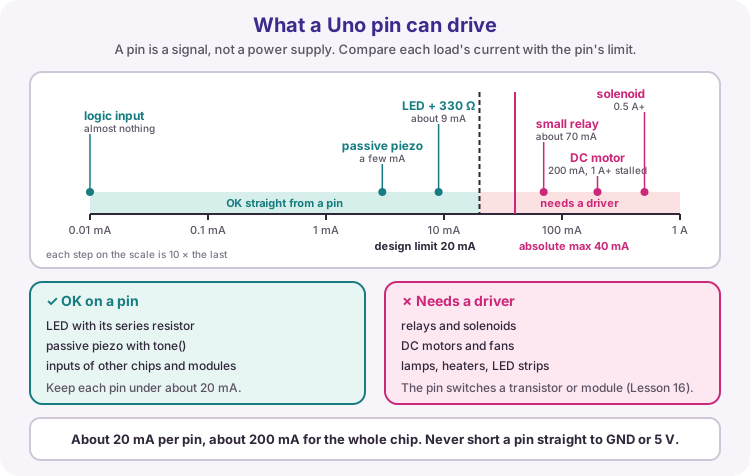
| I/O current (design) | About 20 mA per pin (40 mA absolute max) |
| Built-in LED (L) | Pin 13 · LED_BUILTIN |
| TX / RX LEDs | Flash on USB Serial Monitor traffic |
Clone Uno R3 boards (CH340)
The class boards are clone Uno R3s. They run the same sketches and use the same pins - select Arduino Uno in the IDE.
Two differences to know. The USB chip is usually a CH340, so Windows may need the CH340 driver (see Lesson 03). And some clones use a small square surface-mount ATmega328P instead of the long 28-pin chip in a socket - that chip cannot be removed, so the optional bare-chip build in the appendix does not apply to those boards.
Powering the board: USB vs VIN
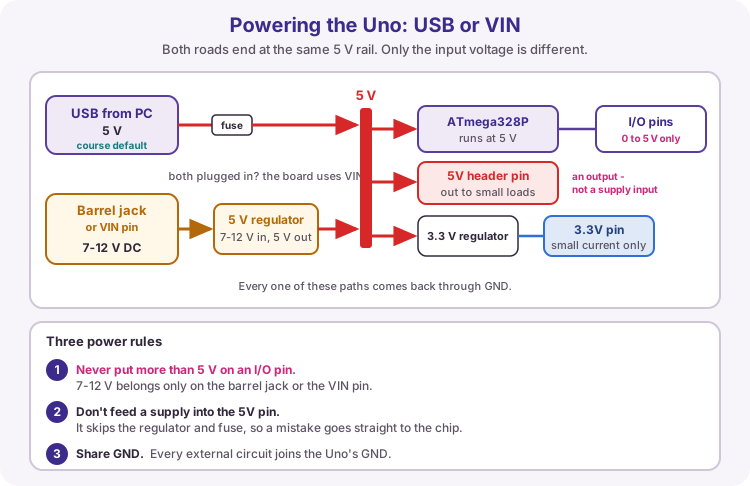
For almost every early lesson, power the Uno from USB with a data cable. That provides regulated 5 V for the MCU and small indicator circuits.
The barrel jack / VIN path feeds the onboard regulator from a higher DC voltage (R3 typically about 7-12 V recommended). Never put that higher voltage on a digital or analogue I/O pin. Treat the 5V header as an output for small loads - do not casually feed an external supply into it.
Power pins: 5V, 3.3V, VIN, AREF and GND
Treat these power-header pins carefully.
| Pin | Use |
|---|---|
| 5V | Regulated 5 V for the MCU and many sensors. Power via USB or VIN/barrel. |
| 3.3V / 3V3 | 3.3 V for suitable modules (limited current). Never put 5 V into a 3.3 V-only device. |
| GND | Common 0 V. Every external circuit must share GND with the Uno. |
| VIN | Raw board input (barrel). Not a sensor logic output. |
| AREF | ADC reference. Default analogue range about 0-5 V. Leave open until a lesson uses analogReference(). |
| IOREF | Tells shields the I/O voltage (5 V here). |
| RESET | Pull low to restart the sketch (reset button). |
Digital pins, analogue pins and buses
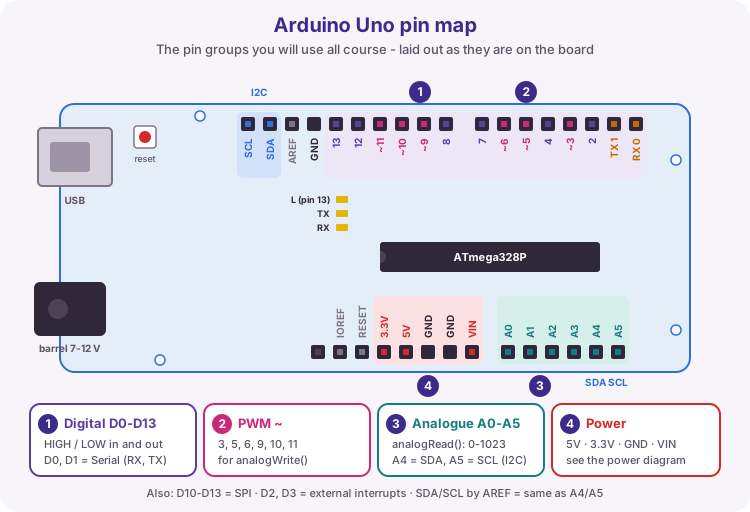
Header roles follow the standard Uno layout, so shields fit. Memorise UART, I2C and SPI early - they return often.
| Group | Pins / notes |
|---|---|
| Digital I/O | D0-D13 · pins marked ~ support PWM (analogWrite) |
| UART / USB Serial | D0 RX, D1 TX - avoid for buttons/LEDs while using Serial Monitor |
| Analogue in | A0-A5 · R3 default 10-bit (0-1023) |
| I2C | A4 SDA, A5 SCL |
| SPI | D13 SCK, D12 MISO, D11 MOSI, D10 SS |
| External interrupts | Commonly D2 and D3 on Uno-class boards |
Electrical limits
The Uno uses 5 V logic on I/O - never apply more than 5 V to a digital or analogue pin. Design for about 20 mA or less per pin (40 mA is an absolute maximum, not a target), and use drivers for heavier loads. Total chip current limits still apply.
Wiring and safe build sequence
- USB supplies regulated 5 V for the board and small test circuits
- Uno R3: use about 7-12 V only at the barrel jack / VIN as recommended
- Never apply voltage above 5 V to a digital or analogue I/O pin
- All connected external circuits need a common GND
Worked sketch
Download .inovoid setup() {
Serial.begin(9600);
Serial.println("Lesson 02: Arduino Uno ready");
}
void loop() {
Serial.print("Uptime (s): ");
Serial.println(millis() / 1000);
delay(1000);
}How the code works
- Serial uses the USB connection through the board USB-to-serial interface.
- millis returns time since reset, not calendar date/time.
- Watch the TX/RX LEDs while the Serial Monitor is open - they show USB serial activity.
- Match Monitor baud to Serial.begin(9600).
- To see the output, upload the sketch and open the Serial Monitor - both are shown in Lesson 03.
Test and record evidence
Practical evidence checklist
Common faults and checks
- Use a USB data cable, not a charging-only cable.
- Match the Serial Monitor baud rate to 9600.
- Wrong board selected in the IDE: choose Arduino Uno (clone R3 boards too).
- No port on a clone board: install the CH340 driver (Lesson 03).
- Optional bare chip dead: check 5 V on VCC and AVCC, both GNDs, crystal orientation and the 10 k ohm RESET pull-up to 5 V.
Check your understanding
Q1. Why is a microcontroller suitable for an appliance controller?
Show answer
It integrates processing, memory and I/O for a dedicated embedded task.
Q2. What do the TX and RX LEDs usually indicate on an Uno?
Show answer
USB serial communication activity with the computer (for example Serial Monitor traffic).
Q3. Why prefer USB power for early labs?
Show answer
It provides a convenient regulated 5 V supply and a programming/serial link without a separate barrel supply.
Q4. What USB chip do most clone Uno R3 boards use, and what might Windows need?
Show answer
A CH340 USB-to-serial chip; Windows may need the CH340 driver before a port appears.
Q5. Optional appendix: name one memory or clock difference between Uno R3 and Uno R4 Minima.
Show answer
Examples: R3 has 32 KB Flash / 2 KB SRAM at 16 MHz; R4 Minima has 256 KB Flash / 32 KB SRAM at 48 MHz.
Q6. Optional appendix: name four parts needed for an ATmega328P to run on a breadboard besides the chip and 5 V/GND.
Show answer
16 MHz crystal, two 22 pF capacitors, 10 k ohm RESET pull-up and a decoupling capacitor (for example 10 uF) across the supply rails.
Arduino Uno R4 Minima board guide
Same Uno form factor and 5 V class as R3, but a faster Renesas RA4M1 MCU, more memory, USB-C, and extras. Select UNO R4 Minima in the IDE if you use this board.
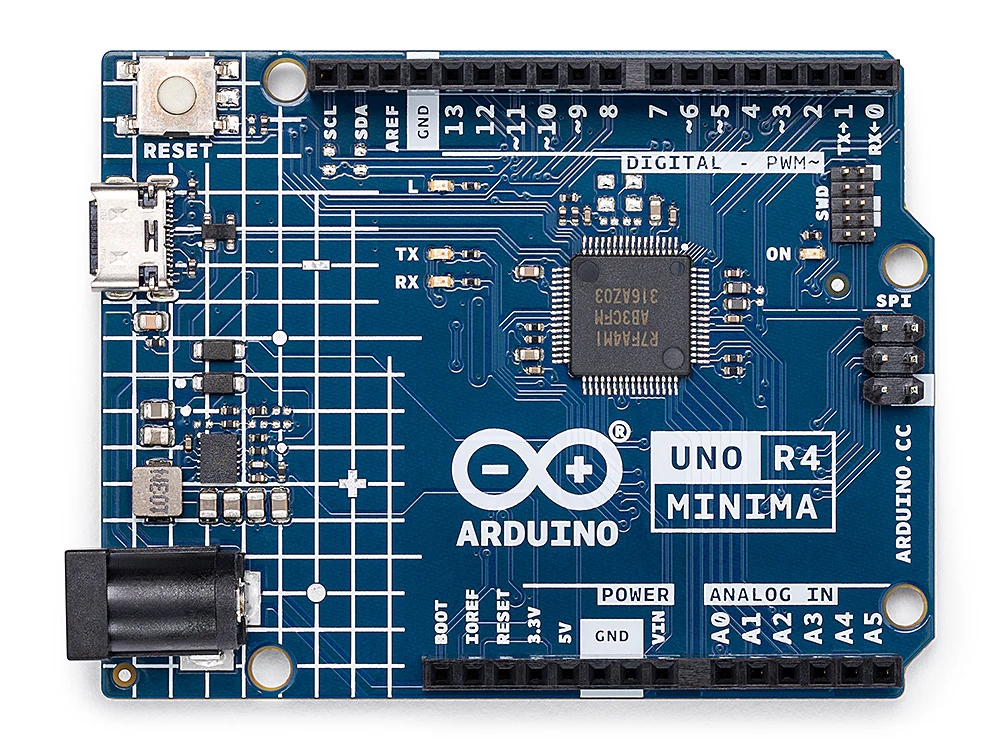
| Item | Uno R4 Minima |
|---|---|
| Microcontroller | RA4M1 (Arm Cortex-M4) @ 48 MHz |
| Flash / SRAM / EEPROM | 256 KB / 32 KB / 8 KB |
| Logic / USB | 5 V logic · USB-C |
| Digital I/O | 14 pins · 6 PWM |
| Analogue inputs | 6 inputs · up to 14-bit resolution available |
| VIN / barrel | About 6-24 V |
| I/O current (design) | About 8 mA per pin - do not assume R3 20 mA |
| Built-in LED (L) | Pin 13 · LED_BUILTIN |
| Extras | DAC, RTC, CAN (needs transceiver), HID, SWD |
| Sketches / libraries | Arduino API sketches often work; AVR-only code may need changes |
Uno R3 versus R4 Minima
Same family layout and 5 V class, different microcontroller and limits. This course targets Uno R3 unless a note says otherwise - if you use R4 Minima, select that board in the IDE and watch pin-current limits.
| Feature | Uno R3 | Uno R4 Minima |
|---|---|---|
| Microcontroller | ATmega328P (8-bit AVR) | Renesas RA4M1 (Arm Cortex-M4) |
| Clock | 16 MHz | 48 MHz |
| Flash / SRAM / EEPROM | 32 KB / 2 KB / 1 KB | 256 KB / 32 KB / 8 KB |
| Logic voltage | 5 V | 5 V |
| USB | USB-B | USB-C |
| I/O pin current (design) | About 20 mA (40 mA abs. max) | About 8 mA |
| Extras | ICSP, shield ecosystem | DAC, RTC, CAN, HID, SWD |
- Uno R4 Minima: VIN may accept about 6-24 V - still never put that voltage on an I/O pin
- Uno R4 Minima: assume about 8 mA per pin and use drivers for heavier loads
ATmega328P on a breadboard
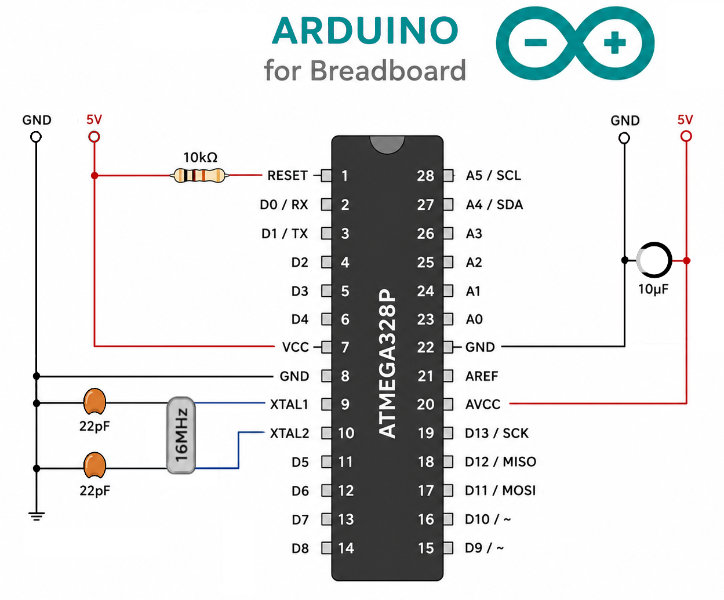
The Uno R3 board is mainly power regulation, USB-to-serial, a crystal clock, reset support and labelled headers around the ATmega328P chip. You can run that chip alone on a breadboard if you add the same essentials: a stable 5 V supply, ground, a 16 MHz crystal with load capacitors, a reset pull-up and decoupling.
Orient the DIP package so the notch (or pin-1 dot) is at the top. Pin 1 is RESET at top-left; pins then count down the left side (1-14) and up the right side (15-28).
Minimum wiring matching the diagram: 10 k ohm from RESET (pin 1) to 5 V; VCC (pin 7) and AVCC (pin 20) to 5 V; GND (pins 8 and 22) to GND; 16 MHz crystal between XTAL1 (pin 9) and XTAL2 (pin 10); 22 pF from each crystal pin to GND; 10 uF across the 5 V and GND rails close to the chip.
This section is for understanding and optional hardware builds. Day-to-day course work still uses a ready-made Uno. The R4 Minima and clone boards with a surface-mount chip do not have a removable DIP ATmega328P - you need a separate DIP chip for this build.
- Optional bare-chip build (DIP ATmega328P only): regulated 5 V; fit crystal, 22 pF caps, 10 k ohm RESET pull-up and 10 uF rail decoupling before powering