21. Buses on the Oscilloscope: UART, I2C & SPI
Compare UART, I2C and SPI by wiring and device selection, find their Uno pins, capture UART and I2C traffic on the oscilloscope and choose a bus for a module.
Learning outcomes
- Compare UART, I2C and SPI by wiring, speed and how devices are selected
- Identify Uno hardware pins for UART, I2C and SPI
- Explain I2C addresses and SPI chip-select
- Choose a suitable bus for GPS, RTC and SD-style modules
- Capture UART and I2C traffic on the oscilloscope and label start, address and ACK
Parts and preparation
Arduino Uno, the I2C LCD from Lesson 20, two-channel oscilloscope, jumpers. Any other I2C module (such as an RTC) is optional for a second scan.
Before power: inspect wiring, confirm supply voltage and ensure all connected circuits share GND.
Libraries for this lesson
In Arduino IDE 2 open Tools → Manage Libraries…. Search by the Library Manager name and install the package by the exact author below. Similar names from other authors can use different APIs and will break the example.
| Include | Library Manager name | Author | Install note |
|---|---|---|---|
Wire.h | Wire | Arduino | Built into the Arduino core. No Library Manager install required. |
SPI.h | SPI | Arduino | Built into the Arduino core. Used later with SD / RFID modules; not required for this lesson's sketch. |
Three buses at a glance
UART, I2C and SPI are the three buses you will meet most often in this course. They all need a common GND and matching logic voltage. They differ in how many devices share the wires, whether a clock line is shared, and how a device is selected.
This lesson is a reference: use it when wiring an unfamiliar module or when a project needs more than one device on the Uno.
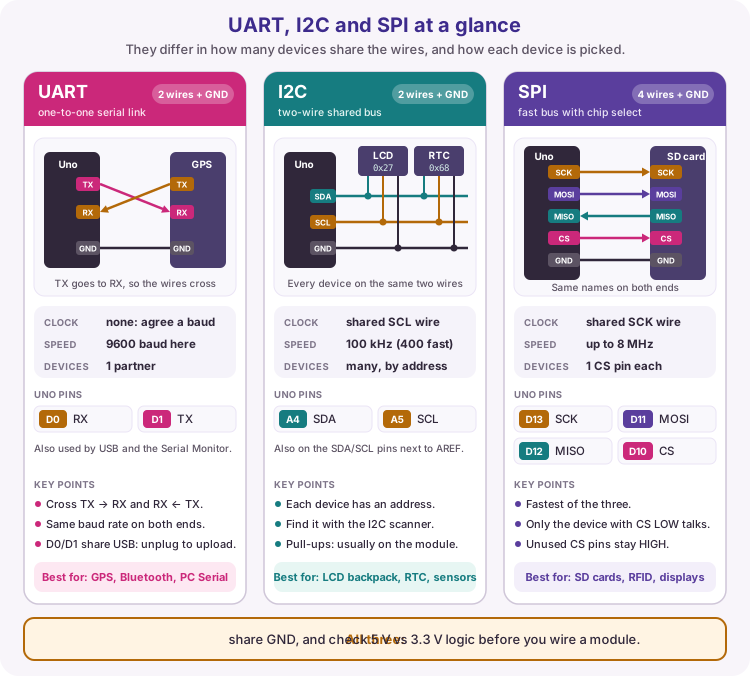
| Bus | Signal wires (typical) | How devices are chosen |
|---|---|---|
| UART | TX, RX (+ GND) | Usually one partner per UART |
| I2C | SDA, SCL (+ GND) | 7-bit address on the shared bus |
| SPI | SCK, MOSI, MISO, CS (+ GND) | Chip-select pin per device |
UART
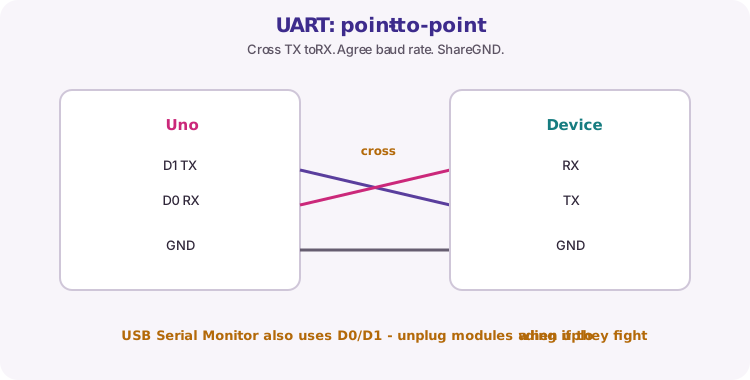
UART is asynchronous: both ends agree a baud rate (for example 9600) and send bytes without a shared clock wire. Wire TX of one device to RX of the other, RX to TX, and share GND. That crossover is easy to get wrong once.
On the Uno, hardware UART is D0 (RX) and D1 (TX). The USB Serial Monitor uses the same UART through the board USB bridge, so a GPS or other module on D0/D1 can block uploads or garble Serial output. SoftwareSerial on other pins is possible later; start by knowing D0/D1 are special.
I2C
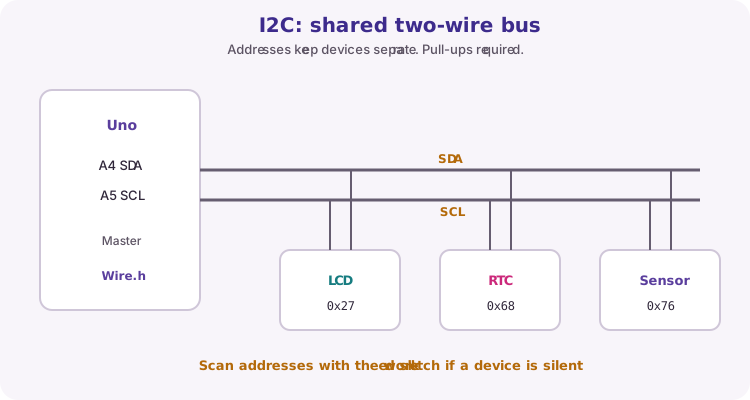
I2C is a two-wire shared bus: SDA carries data and SCL carries the clock. Several devices can share those wires because each has an address (for example LCD 0x27, RTC 0x68). Pull-up resistors hold idle lines HIGH; most modules include them (Lesson 20).
On the Uno, SDA is A4 and SCL is A5. Use Wire.h. If a device stays silent, run the I2C scanner sketch from Lesson 20 before rewriting application code.
SPI
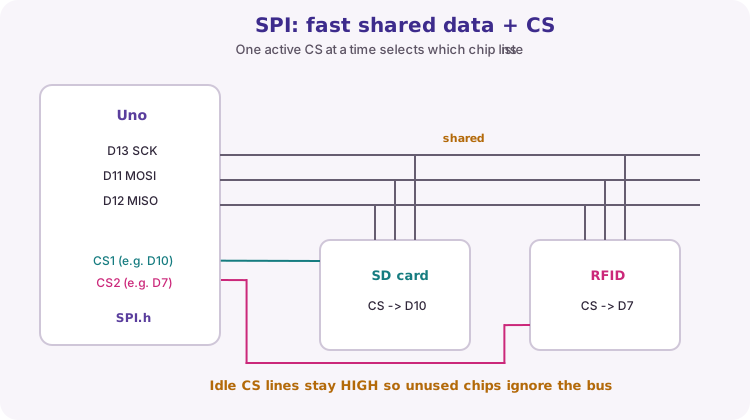
SPI is clocked and usually faster than I2C for bulk data. SCK is the clock, MOSI carries controller-to-device data, MISO returns device-to-controller data. Each device normally needs its own CS (chip select) pin. Only one CS is active (usually LOW) at a time; idle CS lines stay HIGH.
On the Uno, hardware SPI is D13 (SCK), D11 (MOSI), D12 (MISO). D10 is often used as SS / CS for the first device and also appears on the ICSP header. SD cards and RFID modules in later lessons use this pattern.
Uno pin map
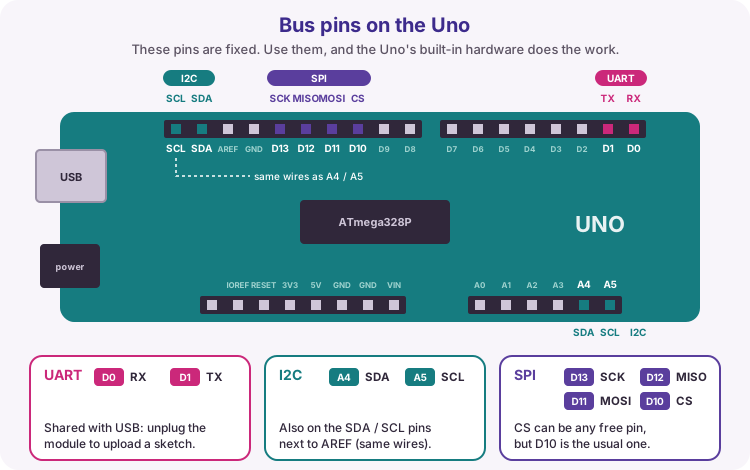
Memorize the hardware pins for this course. They are fixed on the Uno R3 - swapping them casually usually means you are no longer using the hardware peripheral.
| Bus | Uno R3 pins |
|---|---|
| UART | D0 RX, D1 TX |
| I2C | A4 SDA, A5 SCL |
| SPI | D13 SCK, D11 MOSI, D12 MISO, CS as chosen (often D10) |
| SPI alt | Same SPI signals on the ICSP header |
Choosing a bus
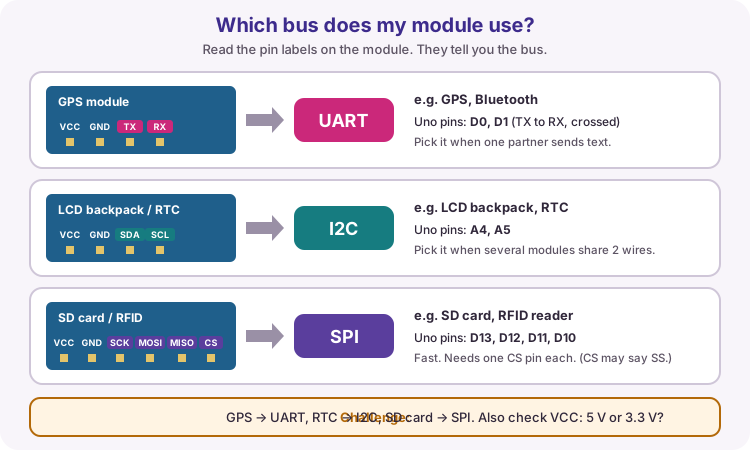
Match the module datasheet first - you rarely get to invent the bus. When you do choose: UART for one serial partner (GPS, PC text), I2C when several sensors/displays must share two wires, SPI when you need speed or the part is SPI-only (SD, many RFID readers).
Voltage matters: a 3.3 V SPI flash or sensor may not tolerate 5 V Uno pins. Always check logic levels before connecting.
Scanning the I2C bus
To list every address on the bus, use the I2C scanner sketch in Lesson 20. Run it again after adding a second device: each module should appear once (for example LCD 0x27 and RTC 0x68).
Capture it
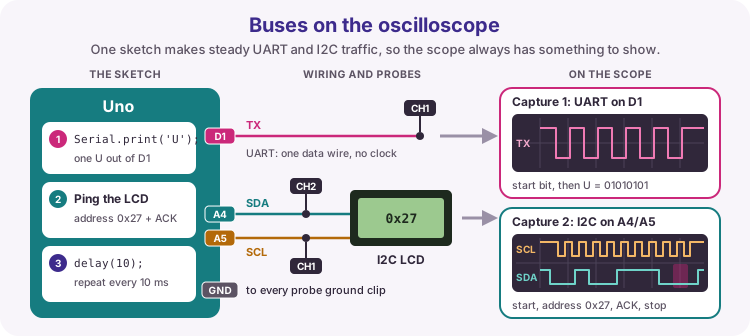
Upload the worked sketch below with your I2C LCD wired as in Lesson 20. It sends the letter U on the UART and a short I2C 'are you there?' to the LCD every 10 ms, so the scope always has something to trigger on. Clip every probe ground to Uno GND.
UART: the line idles HIGH (5 V). A start bit pulls it LOW for one bit time (about 104 µs at 9600 baud), then eight data bits follow, least significant first, then a HIGH stop bit. U is 01010101 in binary, so it shows as an even row of alternating bits - easy to measure one bit width.
I2C: both lines idle HIGH. The start condition is SDA falling while SCL is still HIGH. Then nine SCL clocks: seven address bits plus a read/write bit (0x27 + write = 0x4E), then the ACK - on the ninth clock the LCD pulls SDA LOW to say 'I am here'. SDA rising while SCL is HIGH is the stop condition. Label start, address, ACK and stop on your capture for the logbook.
| Capture | Probe | Suggested settings | Look for |
|---|---|---|---|
| UART TX | CH1 on D1 (TX) | 2 V/div, 200 µs/div, trigger CH1 falling edge at about 2.5 V, Normal or Single mode | Idle HIGH, start bit LOW, ten bits per character |
| I2C | CH1 on SCL (A5), CH2 on SDA (A4) | 2 V/div both, 20 µs/div, trigger CH2 (SDA) falling edge | Start (SDA falls, SCL HIGH), address byte, ACK LOW on 9th clock, stop |
Wiring and safe build sequence
- Always connect common GND
- Check module logic voltage before connection
- Keep bus wires short in breadboard prototypes
- Do not assume every module is 5 V tolerant
- Capture demo: I2C LCD VCC/GND/SDA/SCL to Uno 5 V, GND, A4, A5 (as in Lesson 20)
- Scope: probe grounds to Uno GND; probe tips on D1, A4 and A5 as in the Capture it table
Worked sketch
Download .inoWhat this sketch is for: Makes steady bus traffic for the oscilloscope: one UART character and one short I2C transfer every 10 ms.
#include <Wire.h>

const byte lcdAddress = 0x27;   // your LCD address from the I2C scanner

void setup() {
  Serial.begin(9600);
  Wire.begin();
}

void loop() {
  Serial.print('U');                   // one UART character on D1 (TX)
  Wire.beginTransmission(lcdAddress);  // I2C start + address byte on A4/A5
  Wire.endTransmission();              // LCD answers with ACK, then stop
  delay(10);
}
How the code works
- Serial.print('U') sends one character out of D1; U (01010101) gives an even pattern of bits.
- beginTransmission() plus endTransmission() with no data sends only the start, address byte and stop - the same check the I2C scanner uses.
- delay(10) repeats the traffic often, so a Normal-mode trigger shows a steady picture.
- The Serial Monitor fills with UUUU - that is expected.
Test and record evidence
Practical evidence checklist
Common faults and checks
- Scanner finds no addresses: check power, GND, SDA/SCL swapped, and pull-ups.
- Several unexpected addresses may indicate noise or voltage problems.
- Scope trace will not hold still: use Normal (not Auto) trigger, set the level to about 2.5 V, and check you trigger on the right channel.
- I2C has no ACK (SDA stays HIGH on the 9th clock): wrong address in the sketch - run the scanner.
- UART upload fails: disconnect anything wired to D0/D1, then try again.
- SPI device silent: confirm CS pin, idle HIGH on unused CS lines, and shared GND.
- Confirm 5 V vs 3.3 V module ratings before powering.
Check your understanding
Q1. Which bus uses a chip-select line per device?
Show answer
SPI.
Q2. Which bus uses device addresses on two shared wires?
Show answer
I2C.
Q3. Which Uno pins are hardware UART?
Show answer
D0 (RX) and D1 (TX).
Q4. Why cross TX to RX on UART?
Show answer
Each side transmits on TX and listens on RX - they must meet.