
26. DS1307 RTC & Formatted Text
Keep date and time through power loss with a DS1307, set it only when needed, and print it as fixed-width text with snprintf.
Learning outcomes
- Distinguish millis uptime from an RTC calendar clock
- Identify DS1307 module parts: chip, crystal, I2C and backup cell
- Wire a DS1307 on Uno I2C (A4/A5) and confirm begin succeeds
- Set time only when the clock stopped (isrunning) or lost power (lostPower)
- Format fixed-width date/time text with snprintf and %02d
Parts and preparation
Uno, DS1307 RTC module, suitable backup cell (CR2032, or LIR2032 on boards that charge the cell - see I2C wiring below), and RTClib by Adafruit (see Libraries box).
Before power: inspect wiring, confirm supply voltage and ensure all connected circuits share GND.
Libraries for this lesson
In Arduino IDE 2 open Tools → Manage Libraries…. Search by the Library Manager name and install the package by the exact author below. Similar names from other authors can use different APIs and will break the example.
| Include | Library Manager name | Author | Install note |
|---|---|---|---|
Wire.h | Wire | Arduino | Built into the Arduino core. No Library Manager install required. |
RTClib.h | RTClib | Adafruit | Install via Library Manager. Choose Adafruit, not similarly named RTC packages. |
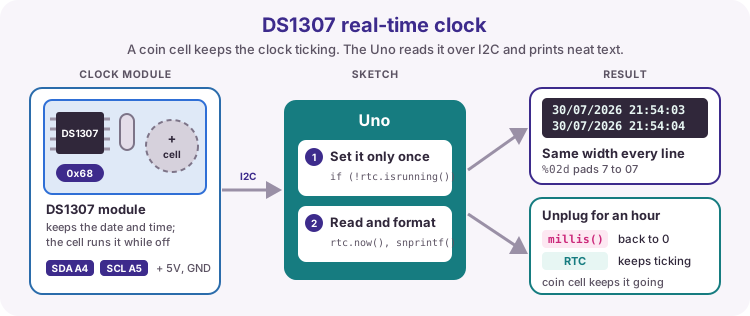
millis is not a wall clock
millis() counts milliseconds since the Uno last reset. It is excellent for non-blocking delays and multitasking (Lesson 11), but it is not a calendar clock. After power loss or reset it starts from zero again, with no idea of the real date or time of day.
A real-time clock (RTC) chip keeps year, month, day, hour, minute and second. A backup cell on the module keeps that calendar running while the Uno is unpowered.
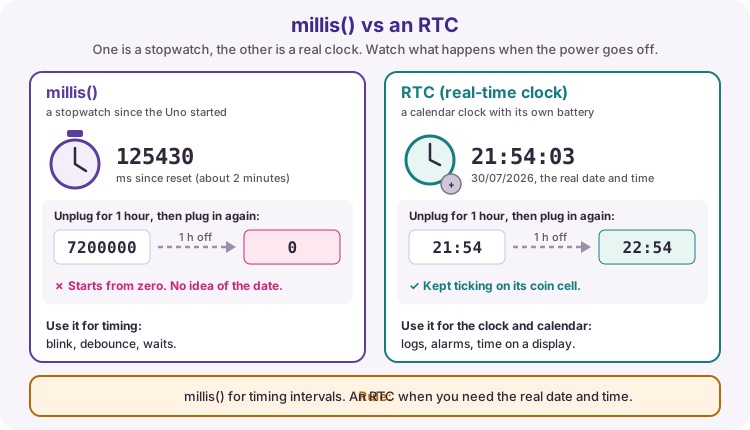
What is on a DS1307 module
Course modules usually include a DS1307 chip, a 32.768 kHz crystal, I2C pins and a coin-cell holder. The chip talks over I2C at address 0x68. The crystal is the time base; drift of seconds per day is normal for this part.
A DS3231 is a more accurate, temperature-compensated alternative. This lesson uses RTC_DS1307 from Adafruit RTClib. If your kit is a DS3231, keep the same wiring and swap the object type: comment out RTC_DS1307 and use RTC_DS3231 instead.
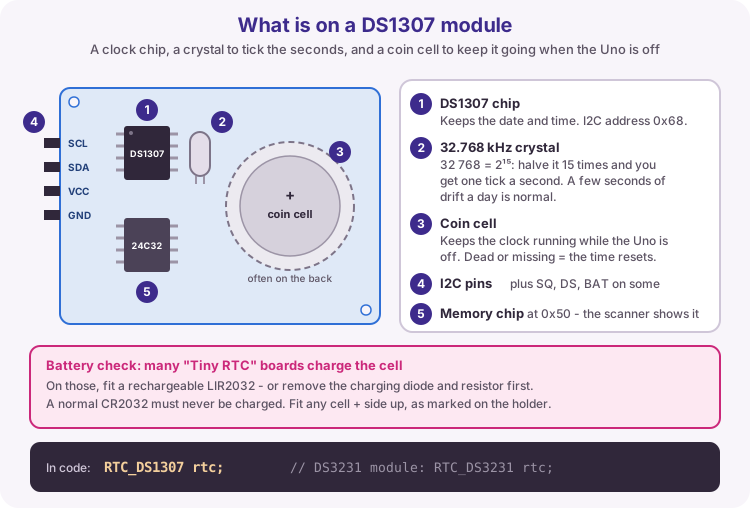
| Item | Course practice |
|---|---|
| Library | RTClib by Adafruit |
| Object (DS1307) | RTC_DS1307 rtc |
| Object (DS3231) | RTC_DS3231 rtc |
| I2C address | Usually 0x68 |
| Accuracy note | DS1307 drifts more than DS3231 |
I2C wiring on the Uno
Wire VCC to 5 V, GND to GND, SDA to A4 and SCL to A5 - the same bus pins as the I2C LCD in Lesson 20. Share GND with every device on the bus. Install the backup cell with the correct polarity before you rely on power-loss tests.
Battery check: many DS1307 'Tiny RTC' boards include a charging circuit for the cell. On those, fit a rechargeable LIR2032 - or remove the charging diode and resistor before fitting a normal CR2032, which must never be charged.
If rtc.begin() fails, check wiring first, then run the I2C scanner from Lesson 20. A missing address usually means a bad connection, wrong module, or power issue - not a Serial formatting bug.
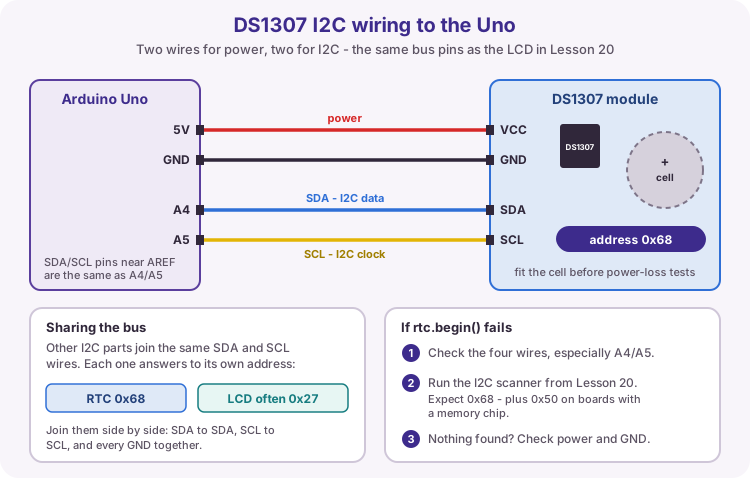
| Module pin | Uno |
|---|---|
| VCC | 5 V |
| GND | GND |
| SDA | A4 |
| SCL | A5 |
| Backup cell | Correct type and polarity |
Set time only when needed
rtc.adjust(DateTime(F(__DATE__), F(__TIME__))) writes the PC compile date and time into the RTC. __DATE__ and __TIME__ are fixed when the sketch compiles, not when it starts running, so the clock starts a few seconds behind (the upload time). If you call adjust on every boot, the clock jumps back to that compile moment after every reset.
Safer pattern: adjust only when the chip reports that it is not running or that it lost battery power. For RTC_DS1307 use !rtc.isrunning(). For RTC_DS3231 use rtc.lostPower() instead. Once the backup cell is good and the clock is running, later uploads leave the time alone.
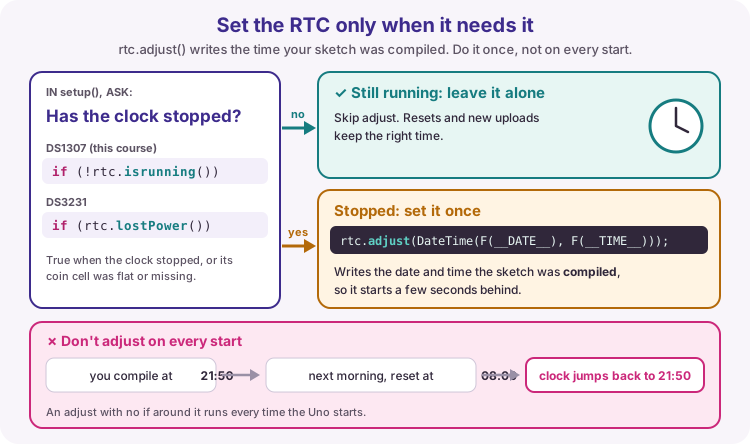
// Automatically sets time ONLY if the clock stopped or lost battery power
if (!rtc.isrunning()) {  // For DS3231, use: if (rtc.lostPower())
  rtc.adjust(DateTime(F(__DATE__), F(__TIME__)));
}
Fixed-width text with snprintf
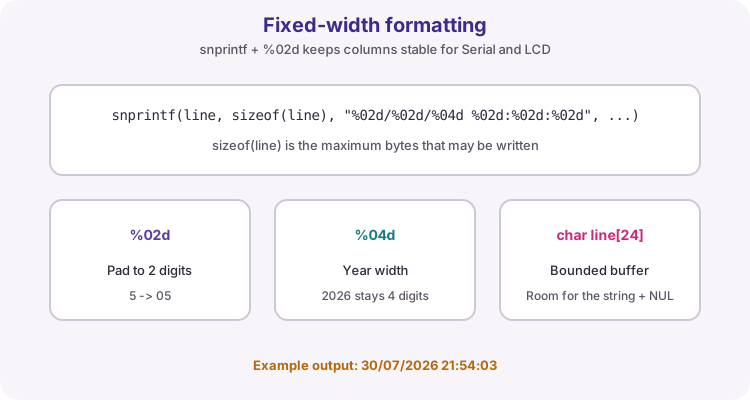
DateTime fields are integers. For Serial or an LCD you usually want a fixed-width string such as 30/07/2026 21:54:03 so columns do not jump when values are single-digit.
snprintf writes into a char buffer and takes the buffer size so it does not write past the end. %02d pads to two digits; %04d keeps a four-digit year. char line[24] is enough for this course format plus the terminating NUL.
DateTime now = rtc.now();
snprintf(line, sizeof(line), "%02d/%02d/%04d %02d:%02d:%02d",
         now.day(), now.month(), now.year(),
         now.hour(), now.minute(), now.second());
Serial.println(line);
Wiring and safe build sequence
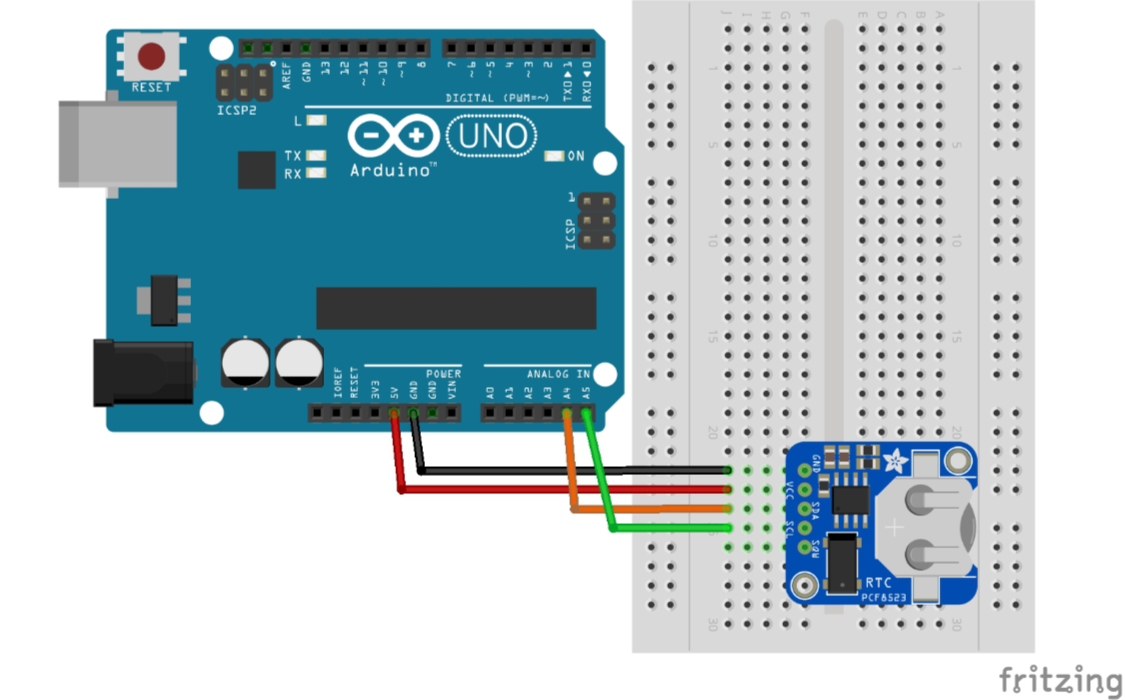
- RTC VCC -> 5 V
- RTC GND -> GND
- RTC SDA -> A4
- RTC SCL -> A5
- Install the correct backup cell with correct polarity
Worked sketch
Download .ino#include <Wire.h>
#include <RTClib.h>
RTC_DS1307 rtc;
// RTC_DS3231 rtc; // use this instead if your module is a DS3231
char line[24];
void setup() {
Serial.begin(9600);
if (!rtc.begin()) {
Serial.println("RTC not found");
while (true) { delay(100); }
}
// Automatically sets time ONLY if the clock stopped or lost battery power
if (!rtc.isrunning()) { // For DS3231, use: if (rtc.lostPower())
rtc.adjust(DateTime(F(__DATE__), F(__TIME__)));
}
}
void loop() {
DateTime now = rtc.now();
snprintf(line, sizeof(line), "%02d/%02d/%04d %02d:%02d:%02d",
now.day(), now.month(), now.year(),
now.hour(), now.minute(), now.second());
Serial.println(line);
delay(1000);
}How the code works
- sizeof(line) prevents snprintf from writing beyond the buffer.
- The RTC not found message points to wiring or address faults, not formatting.
- isrunning (DS1307) or lostPower (DS3231) gates adjust so a healthy clock is not overwritten.
- For a DS3231 module, comment RTC_DS1307, uncomment RTC_DS3231, and use lostPower().
Test and record evidence
Practical evidence checklist
Common faults and checks
- Use an I2C scanner to confirm the RTC address (usually 0x68).
- Replace or reseat the backup cell if time resets when the Uno loses power.
- If time jumps after every upload, check you are not calling adjust unconditionally.
- Confirm SDA is A4 and SCL is A5 on the Uno, with shared GND.
- Install Adafruit RTClib, not a differently named RTC package.
- Match the object type and check: RTC_DS1307 + isrunning, or RTC_DS3231 + lostPower.
Check your understanding
Q1. Why not use millis as a clock?
Show answer
It measures uptime only and resets after power loss/reset.
Q2. When should rtc.adjust run?
Show answer
Only when the clock stopped (isrunning) or lost power (lostPower).
Q3. Which Uno pins are SDA and SCL?
Show answer
A4 (SDA) and A5 (SCL).
Q4. What does %02d do in snprintf?
Show answer
It prints an integer padded to two digits.
Optional: practise in your browser
Write and test this lesson's code on a virtual Uno. Work through the 4 exercises in order. Press Test and each one checks itself. This practice is optional - do it if you have time.
Optional practice: a real-time clock on the virtual Uno
This practice is optional. Do it if you have time. Nothing in class depends on it. It uses snprintf and %02d from the Text & Time Formatting chapter.
The virtual board has a DS1307 clock module on the I2C pins. Its display shows the time the chip holds:
- when you press Run, the clock starts from your computer's time and keeps going
- when you press Test, it starts from a fixed time instead (the exercise says which), so everyone's expected output is the same
- tick Battery removed and the chip stops and forgets the time:
rtc.isrunning()becomesfalseandrtc.now()reads 01/01/2000 00:00:00
Every sketch here keeps the lesson's set-the-clock line, commented out: // rtc.adjust(DateTime(F(__DATE__), F(__TIME__))); - uncomment it on a real Uno to set the clock once. The simulator's clock already has the right time, so if you do uncomment it here it is ignored, with a note under the editor.
Get the time with DateTime now = rtc.now();, then read its parts with now.hour(), now.minute(), now.second(), now.day(), now.month() and now.year().
The lesson's sketch
Press Run: the Serial Monitor shows your computer's date and time, one line a second. The expected output below was made with the test clock, so its numbers are different. Then tick Battery removed while it runs.
14/03/2026 09:59:58
14/03/2026 09:59:59
14/03/2026 10:00:00
14/03/2026 10:00:01
DateTime now = rtc.now();copies the whole time out of the chip at once, so the parts always belong together.- With the battery removed the clock reads 01/01/2000 00:00:00 and stands still - that is what
isrunning()is there to catch.
Hour, minute and second
now already holds the time. Print the hour, a colon, the minute, a colon and the second, then end the line - once a second.
The test clock starts at 09:59:58. Look closely at the third line of the output: you will fix it in the next exercise.
9:59:58
9:59:59
10:0:0
HH:MM:SS with leading zeros
10:0:0 is not how a clock looks. Build the text with snprintf and %02d, which pads each number to two digits with a leading zero, so the output becomes 09:59:58, 09:59:59, 10:00:00.
text is already declared and printed - fill it in with one snprintf line.
09:59:58
09:59:59
10:00:00
Date and time on one line
Add the date in front of the time, like the lesson's sketch:
31/12/2026 23:59:58
Day and month get %02d; the year gets %04d. This test starts the clock two seconds before New Year, so you can watch every part roll over at once.
31/12/2026 23:59:58
31/12/2026 23:59:59
01/01/2027 00:00:00
Is the clock running?
A DS1307 that lost its battery stops, and reads 01/01/2000 00:00:00 until someone sets it. In setup(), print one line about the clock before the times start:
Clock stopped - set the timewhenrtc.isrunning()is falseClock OKwhen it is running
Try it: Run, then tick Battery removed and press ↻ Restart. The test does the same.
Clock OK
09:59:58
09:59:59
Try it on a real Uno
Wire the module as in Lesson 26: SDA to A4, SCL to A5, and a backup cell of the right type. Upload Is the clock running? with the rtc.adjust line uncommented, so a stopped clock gets set from your PC. Then unplug the Uno for a minute, plug it back in and check the time carried on.
The alarm is the start of the clock and alarm capstone (Lesson 28). Swap the LED for the buzzer and add a button to silence it.
Want more? Code Along chapter 18 has a Deeper exercise that goes further than this lesson. It is optional.