
20. I2C, Address Scanning & I2C LCD
Wire a 16x2 LCD with just SDA and SCL, find its I2C address with a scan, and print text and live values.
Learning outcomes
- Explain SDA, SCL, addresses and pull-ups on the Uno
- Compare parallel LCD wiring with an I2C backpack
- Scan or confirm a backpack address (often 0x27 or 0x3F)
- Drive a 16x2 I2C LCD with LiquidCrystal I2C by Frank de Brabander
Parts and preparation
Uno, I2C LCD backpack/display, 10 k ohm potentiometer (the one from Lesson 14) and jumper wires. Install LiquidCrystal I2C by Frank de Brabander (see Libraries box).
Before power: inspect wiring, confirm supply voltage and ensure all connected circuits share GND.
Libraries for this lesson
In Arduino IDE 2 open Tools → Manage Libraries…. Search by the Library Manager name and install the package by the exact author below. Similar names from other authors can use different APIs and will break the example.
| Include | Library Manager name | Author | Install note |
|---|---|---|---|
Wire.h | Wire | Arduino | Built into the Arduino core. No Library Manager install required. |
LiquidCrystal_I2C.h | LiquidCrystal I2C | Frank de Brabander | Install via Library Manager. Other LiquidCrystal_I2C packages use different APIs (init vs begin). |
What I2C adds
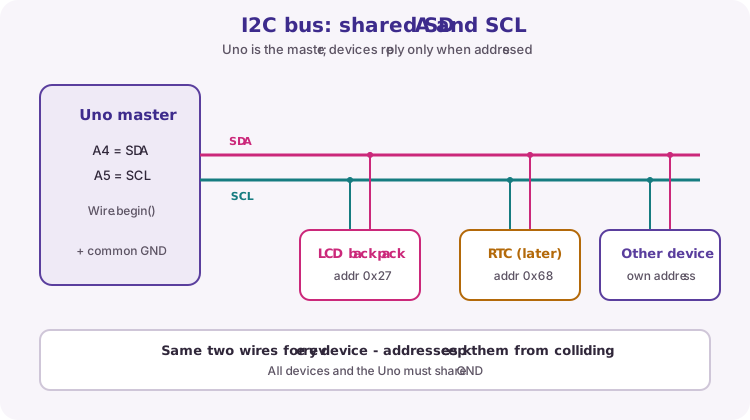
I2C is a two-wire serial bus: SDA carries data and SCL carries a shared clock. On the Uno, SDA is A4 and SCL is A5.
Several devices can share those same two wires because each device has its own address. The Uno (master) calls a device by address; only that device answers.
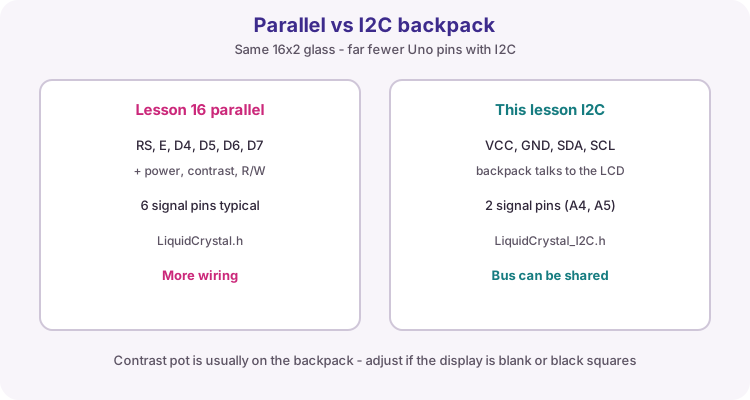
Parallel LCD vs I2C backpack
Almost every 16x2 character LCD uses the same controller chip, the HD44780 (the standard character-LCD driver). Wired directly, it needs RS, E and four data lines - six Uno pins plus power and contrast. An I2C backpack sits on the LCD and talks over SDA/SCL instead, so the Uno only needs VCC, GND, SDA and SCL. (The optional Lesson 34 shows the six-pin wiring if you are curious.)
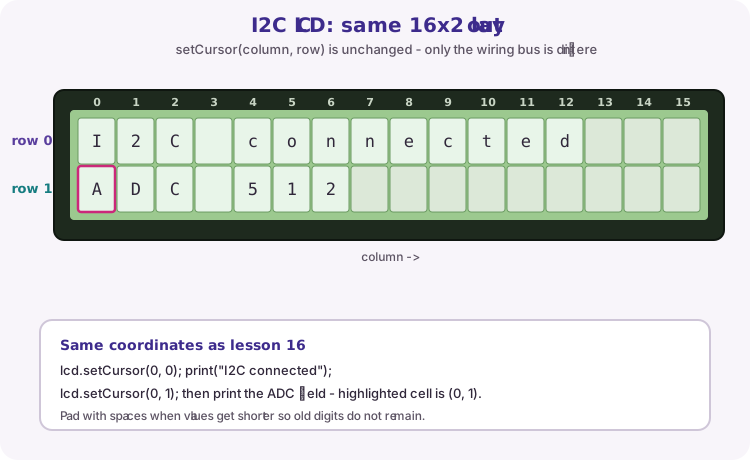
The character grid is still 16 columns by 2 rows. setCursor(column, row) works the same way.
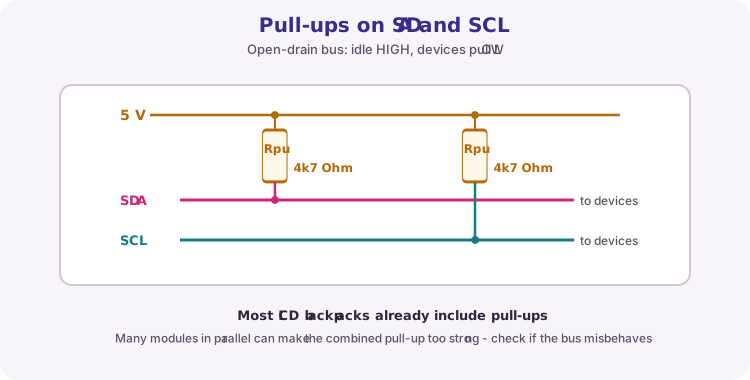
Pull-ups
SDA and SCL are open-drain: devices only pull a line LOW. Pull-up resistors to 5 V hold the idle state HIGH. Most LCD backpacks already include those resistors.
Many modules on one bus can make the combined pull-up too strong. If the bus becomes unreliable with several devices, check module documentation and pull-up strategy.
See I2C on the oscilloscope
You capture I2C on the scope in class in Lesson 21 - see its Capture it section. Try it here only if you have time.
Put channel 1 on SCL (A5) and channel 2 on SDA (A4), both at 2 V/div with the ground clip on GND. Trigger on a falling edge of SDA and set about 100 µs/div. Each time the sketch updates the display you will see a burst: SCL clocks at about 100 kHz (10 µs per bit), and SDA only changes while SCL is LOW - except at the start and stop conditions.
Both lines must idle at a clean 5 V. Slow, rounded rising edges mean weak pull-ups or long wires; a line stuck LOW means something is holding the bus. If your scope has serial decode, set it to I2C and read the address byte - 0x27 appears as the first byte of every transfer.
| What you see | What it means |
|---|---|
| Both lines steady at 5 V | Bus idle - healthy |
| Bursts of square clock pulses on SCL | The Uno is talking to a device |
| Rounded, slow rising edges | Pull-ups too weak or wiring too long |
| SDA or SCL stuck at 0 V | Short, wrong wiring, or a device holding the line |
Addresses and scanning
The constructor includes the backpack address, columns and rows: LiquidCrystal_I2C lcd(0x27, 16, 2). Common backpack addresses are 0x27 and 0x3F; solder pads on the backpack can change this.
If the screen stays blank, run the I2C scanner sketch further down this page, match the constructor to the reported address, and adjust the backpack contrast potentiometer.
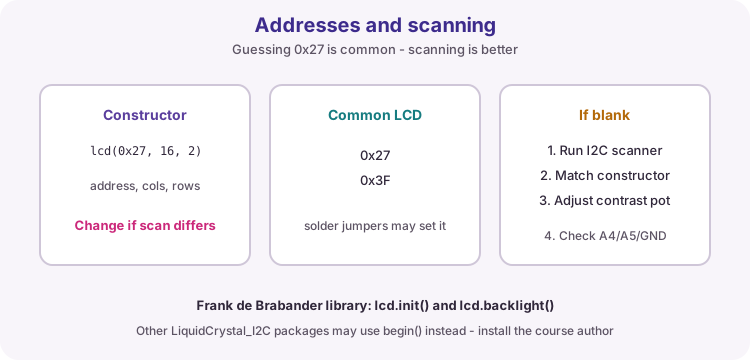
| Item | Course practice |
|---|---|
| Library | LiquidCrystal I2C by Frank de Brabander |
| Init API | lcd.init() and lcd.backlight() |
| Default try | 0x27, then 0x3F if needed |
| Uno pins | SDA A4, SCL A5, shared GND |
Same 16x2 coordinates
setCursor(column, row) is still zero-based: columns 0-15, rows 0-1. The worked sketch prints a heading on row 0, then updates an ADC field (the potentiometer on A0) on row 1. Pad with spaces when numbers get shorter so leftover digits do not remain.
Library variation
Several Library Manager packages use similar names. This course uses LiquidCrystal I2C by Frank de Brabander (init/backlight). A different author's package may expect begin() instead and will not compile or run with this sketch.
Wiring and safe build sequence
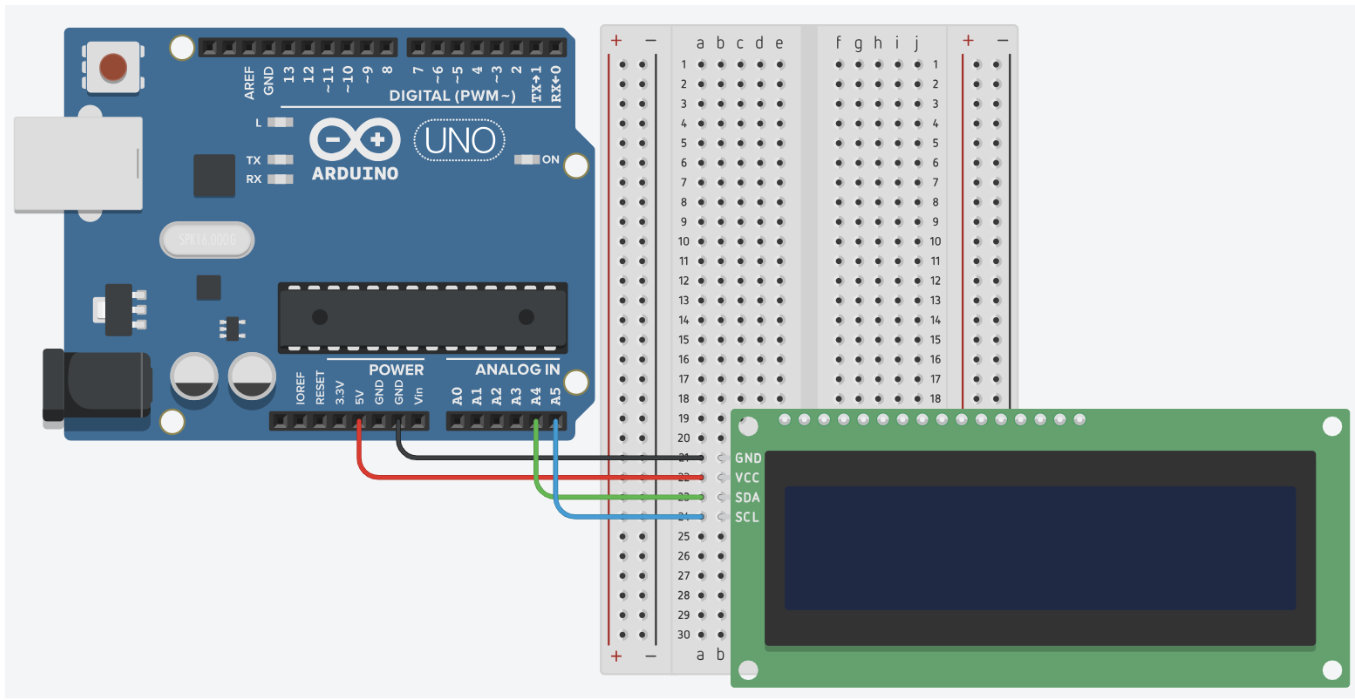
- LCD VCC -> 5 V
- LCD GND -> GND
- LCD SDA -> A4
- LCD SCL -> A5
- 10 k ohm pot: outer legs -> 5 V and GND, middle leg (wiper) -> A0 - the same pot circuit as Lesson 14
I2C scanner: find the address
Download .inoWhat this sketch is for: Run this first if you do not know your backpack's address, or whenever an I2C device stays silent. It asks every address once and prints the ones that answer in the Serial Monitor (9600 baud). Same wiring as below.
#include <Wire.h>

void setup() {
  Serial.begin(9600);
  Wire.begin();
  Serial.println("I2C addresses:");
  for (byte address = 1; address < 127; address++) {
    Wire.beginTransmission(address);
    if (Wire.endTransmission() == 0) {
      Serial.print("0x");
      if (address < 16) Serial.print('0');
      Serial.println(address, HEX);
    }
  }
}

void loop() {}
How the code works
- Wire.begin() starts the bus with the Uno as master.
- The for loop tries every valid 7-bit address (1-126) once in setup.
- endTransmission() returning 0 means a device answered (acknowledged) at that address.
- No addresses printed usually means wiring, power or SDA/SCL swapped.
Worked sketch
Download .ino#include <Wire.h>
#include <LiquidCrystal_I2C.h>
LiquidCrystal_I2C lcd(0x27, 16, 2);
void setup() {
Wire.begin();
lcd.init();
lcd.backlight();
lcd.setCursor(0, 0);
lcd.print("I2C connected");
}
void loop() {
lcd.setCursor(0, 1);
lcd.print("ADC ");
lcd.print(analogRead(A0));
lcd.print(" ");
delay(250);
}How the code works
- Change 0x27 only if the scanner sketch above reports another address.
- All devices on the bus share SDA, SCL and GND.
- analogRead(A0) reads the potentiometer (0-1023).
- Trailing spaces clear leftover ADC digits when the value gets shorter.
Test and record evidence
Practical evidence checklist
Common faults and checks
- Run the I2C scanner sketch on this page if the display is blank.
- Adjust the backpack contrast potentiometer.
- Confirm the installed library's initialization API (init vs begin).
- Check A4/A5 are not swapped and GND is common.
Check your understanding
Q1. Why can devices share SDA and SCL?
Show answer
Each device responds to its own I2C address.
Q2. Which Uno pins are SDA and SCL?
Show answer
A4 is SDA and A5 is SCL.
Q3. What should you do if 0x27 shows nothing?
Show answer
Scan the bus, try the reported address, and adjust contrast.
Q4. Does I2C change the 16x2 cursor rules?
Show answer
No - columns are still 0-15 and rows 0-1.
Practise in your browser
Write and test this lesson's code on a virtual Uno. Work through the 5 exercises in order. Press Test and each one checks itself.
Four wires and a library
A bare 16x2 LCD needs six data pins. The little I2C backpack soldered to the back of yours replaces them with four wires: 5 V, GND, SDA (A4 on the Uno) and SCL (A5).
In code the display is an object you create once, above setup():
LiquidCrystal_I2C lcd(0x27, 16, 2);- address, columns, rowslcd.init();andlcd.backlight();insetup()to wake it uplcd.print(...)writes at the cursor,lcd.setCursor(column, row)moves it
The address is the backpack's identity on the I2C bus - usually 0x27, sometimes 0x3F. The board in this chapter answers at 0x27.

Text on the screen
Press Run and watch the display on the virtual board. setCursor(0, 1) means column 0 of the second row - both count from 0.
Hello on the screen
Wake the display up and print Hello, Uno! on the top line.
Three lines in setup(): lcd.init();, lcd.backlight();, then the print.
Both lines
Print Wilteq on the top line and Code Along on the bottom one. The cursor does not move down on its own - send it there with lcd.setCursor(0, 1).
Sixteen columns, and what falls off the edge
Each row shows 16 characters, numbered 0 to 15. Text longer than that does not continue on the next line - it runs off into memory you cannot see. That is the display behaving exactly as the real one does, and it surprises everybody once.
Characters also stay where they are until something overwrites them. Print 12, then print 9 in the same place, and the screen reads 92 - the old 2 is still there. Clear it with lcd.clear(), or print a space or two after the number.
Put it in the right place
Print Temp: at the start of the top line, and 21 C starting at column 8 of the same line, so the display reads exactly as in the test.
The counter that leaves crumbs
This countdown prints 11, 10, 9... in the same spot. Watch it run: when it reaches 9 the screen reads 90, because the old 0 was never cleared.
Fix it so each number appears on its own. Do not use lcd.clear() on every pass - it makes the display flicker on real hardware.
A live reading
Show the potentiometer as a percentage on the bottom line, updating five times a second. The starter already reads the knob into percent (0 to 100), so only the display part is new.
The line must read exactly Level: then the number then % - for example Level: 50%. The test turns the knob from full, to half, to zero - and the display must not leave digits behind when the number gets shorter.
Try it on a real Uno
Wire the backpack: VCC to 5 V, GND to GND, SDA to A4, SCL to A5. Install LiquidCrystal I2C in the Library Manager, then upload A live reading.
If the screen stays blank or shows only boxes, work through it in order: is the backlight on, is the contrast pot on the back turned up, and is the address right? Lesson 20's I2C scanner sketch prints the address of whatever is on the bus - run it once and write the answer on the module with a marker.
Practical Task B puts this display in front of an alarm, where a stale character is a marked fault. Exercises 16.5 to 16.8 in Assessment Practice rehearse it.
Want more? Code Along chapter 14 has a Deeper exercise that goes further than this lesson. It is optional.