
16. Driving Loads: Transistors, MOSFETs & Relays
Apply transistor and MOSFET switching to Uno outputs: size the drive, protect against inductive spikes, and verify the switch with meter and oscilloscope.
Learning outcomes
- Explain why loads need drivers
- Compare an NPN low-side switch with a logic-level N-MOSFET
- Wire a logic-level N-MOSFET low-side switch with gate resistors
- Place a flyback diode correctly across an inductive load
- Describe relay coil versus contacts and keep to ELV DC only
Parts and preparation
Uno, logic-level N-MOSFET (IRLZ44N), 220 ohm gate resistor, 10 k ohm gate pull-down, 1N4007 (or 1N5819) flyback diode, 5-12 V DC fan or lamp and a matching 5-12 V external supply. Optional: NPN (e.g. 2N2222), base resistor and 5 V relay module for comparison.
Before power: inspect wiring, confirm supply voltage and ensure all connected circuits share GND.
Why loads need a driver
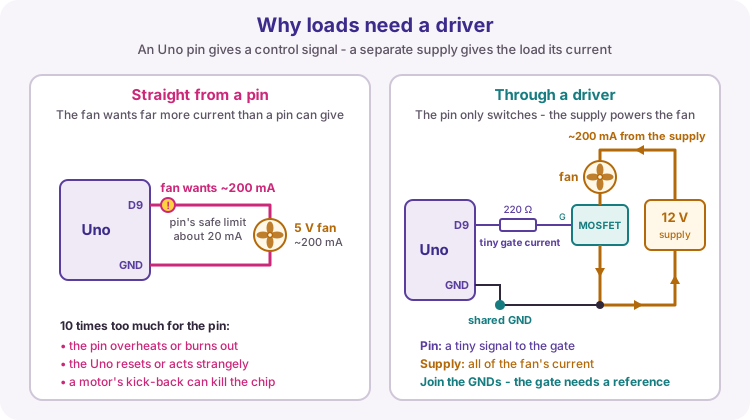
Your electronics modules covered how transistors and MOSFETs work. This lesson is about applying them to a microcontroller output. An Arduino Uno I/O pin is a logic control line, typically safe around 20 mA continuous. Fans, lamps, motors and relay coils often need far more current, and motors/relays are inductive.
A driver (NPN transistor, MOSFET, or a module) lets the pin switch a small control signal while an external supply provides the load current. Always join the external supply GND to the Uno GND so the control voltage has a common reference.
NPN transistor as a low-side switch
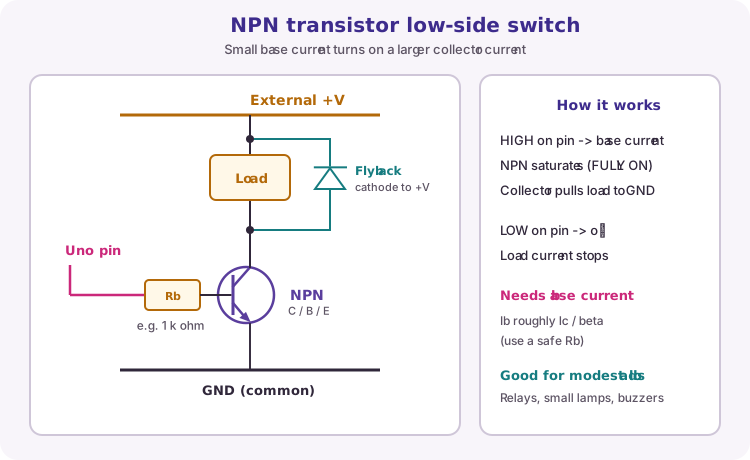
An NPN bipolar transistor can switch a load on the low side: load from external +V to the collector, emitter to GND. A base resistor (often about 1 k ohm) limits base current from the Arduino pin.
When the pin is HIGH, base current turns the NPN on and collector current flows through the load. When the pin is LOW, the transistor is off. NPNs are current-driven: you must budget base current (roughly collector current divided by beta, with a safety margin). They suit modest loads such as relay coils, buzzers and small lamps.
| Terminal | Connects to |
|---|---|
| Collector (C) | Load return (switched node) |
| Base (B) | Arduino pin via Rb |
| Emitter (E) | Common GND |
| Load + | External +V (not the Uno pin) |
Logic-level N-channel MOSFET
An N-channel enhancement MOSFET is also used as a low-side switch: load from +V to drain, source to GND. The gate is driven by voltage, so steady gate current is tiny compared with an NPN base.
Logic-level means the datasheet shows a useful low RDS(on) at about 4.5 V gate (or lower) - not merely that the threshold voltage Vth is under 5 V. A non-logic-level part may stay partly on, run hot, and fail.
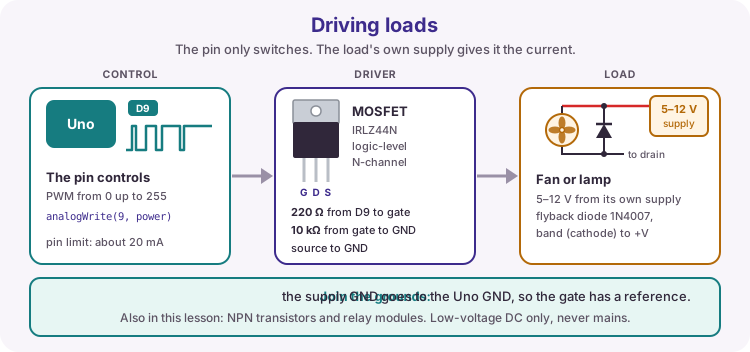
Course gate network: series ~220 ohm from the pin to the gate (limits peak charge current), and ~10 k ohm from gate to GND (keeps the MOSFET off if the pin floats). This lesson's practical build uses the MOSFET with PWM on D9.

| Item | Course practice |
|---|---|
| Device | Logic-level N-ch MOSFET (check datasheet) |
| Series gate R | About 220 ohm |
| Gate pull-down | About 10 k ohm to GND |
| Control | digitalWrite or analogWrite (PWM) |
NPN vs N-MOSFET
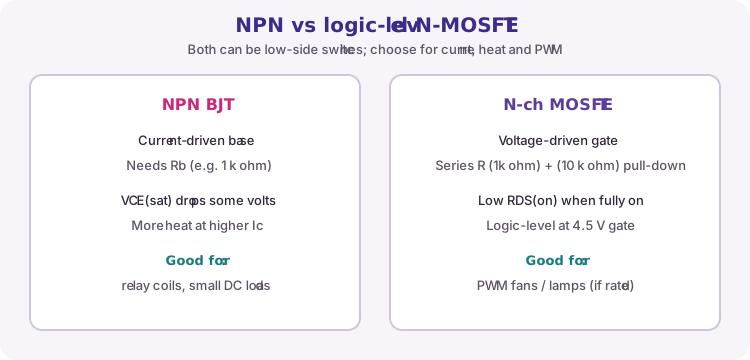
Both can switch a load to GND. Prefer an NPN for simple modest DC loads and many relay-coil drivers. Prefer a logic-level N-MOSFET when you want efficient PWM into a fan or lamp and the part is rated for the current.
Always check package pin order - TO-92, TO-220 and SMD packages are not interchangeable by guesswork.
Suggested parts (South Africa)
These are practical examples often stocked by South African distributors such as Mantech Electronics (mantech.co.za). Search the part number on the site and always confirm the datasheet, pinout and current rating for your load. Stock changes - treat this as a shopping starting point, not a guarantee.
| Type | Package | Example part | Typical course use |
|---|---|---|---|
| NPN | SMD (SOT-23) | MMBT2222A / MMBT3904 | Small PCB loads, LED strips (check Ic) |
| NPN | TO-92 | BC337 / 2N2222A | Breadboard: relays, buzzers, small lamps |
| NPN power | TO-220 | TIP31C (or TIP120 Darlington) | Higher current DC switching (watch heat / VCE sat) |
| N-MOSFET logic | SMD (SOT-23) | 2N7002 | Small PWM / signal switching only |
| N-MOSFET logic | TO-92 | 2N7000 | Breadboard demos; low current loads |
| N-MOSFET logic power | TO-220 | IRLZ44N | Fans / lamps with PWM (course-style low-side) |
Flyback diode
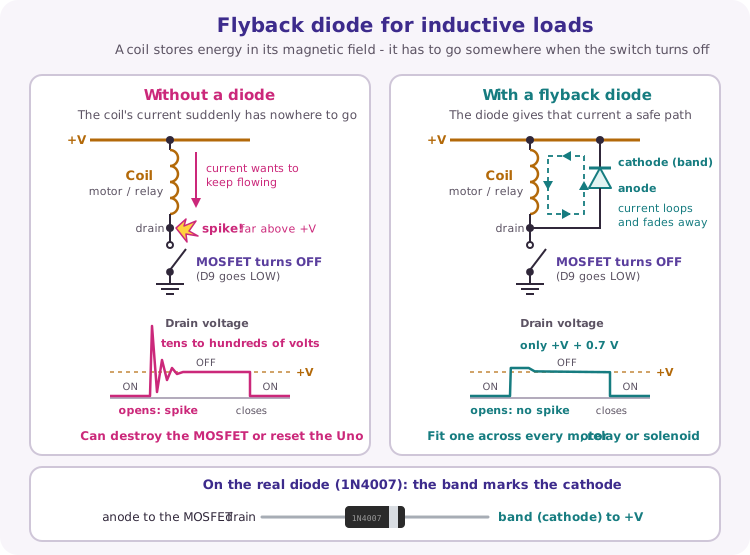
Inductive loads (motors, relay coils, solenoids) store energy in a magnetic field. When you switch the current off, that energy tries to keep the current flowing and can produce a high voltage spike that damages the transistor, MOSFET or nearby electronics.
Place a diode reverse-biased across the coil during normal on-state: cathode toward the positive supply, anode toward the switched (transistor/MOSFET) side. When the switch opens, the diode gives the current a safe path.
Verify the switch with meter and scope
With the load on at full power, measure VDS across the MOSFET with the multimeter. A logic-level part that is fully on shows a small voltage - ID × RDS(on), usually well under 0.2 V for a small fan. A reading of a volt or more means the gate is not fully driven and the part will run hot.
On the scope, put channel 1 on the gate and channel 2 on the drain while PWM runs. The drain is inverted relative to the gate: LOW when the MOSFET is on. With the flyback diode fitted, each turn-off is clamped to about one diode drop above +V - capture this trace for your logbook.
Keep the diode fitted at all times on your own build. The 'no diode' spike is a facilitator demo only: it can be tens of volts and can damage the MOSFET or the scope input. Watch the demo and sketch that trace beside yours.
| Measurement | Healthy result | If not |
|---|---|---|
| Gate voltage (pin HIGH) | About 5 V | Check the 220 Ω series resistor and the pin |
| VDS, load fully on | Well under 0.2 V | Non-logic-level part or poor gate drive |
| Drain at turn-off, inductive load | Clamped near +V + 0.7 V | Flyback diode missing or reversed |
| MOSFET body after 1 minute | Barely warm | Too much current or not fully switched on |
Relays and module limits
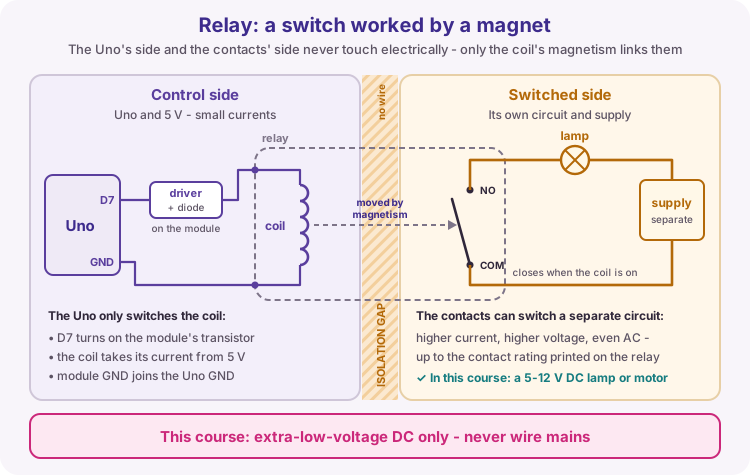
A relay uses a coil (inductive) to move mechanical contacts. The coil side and the contact side can be electrically isolated, which is useful for separating circuits - but contact voltage and current ratings still apply.
Many Arduino relay modules include their own driver transistor and flyback diode; you drive an IN pin and supply VCC/GND. This course switches only extra-low-voltage DC loads. Do not wire mains electricity. If you ever drive a bare relay coil from a discrete NPN, treat the coil as an inductive load with a flyback diode.
Wiring and safe build sequence
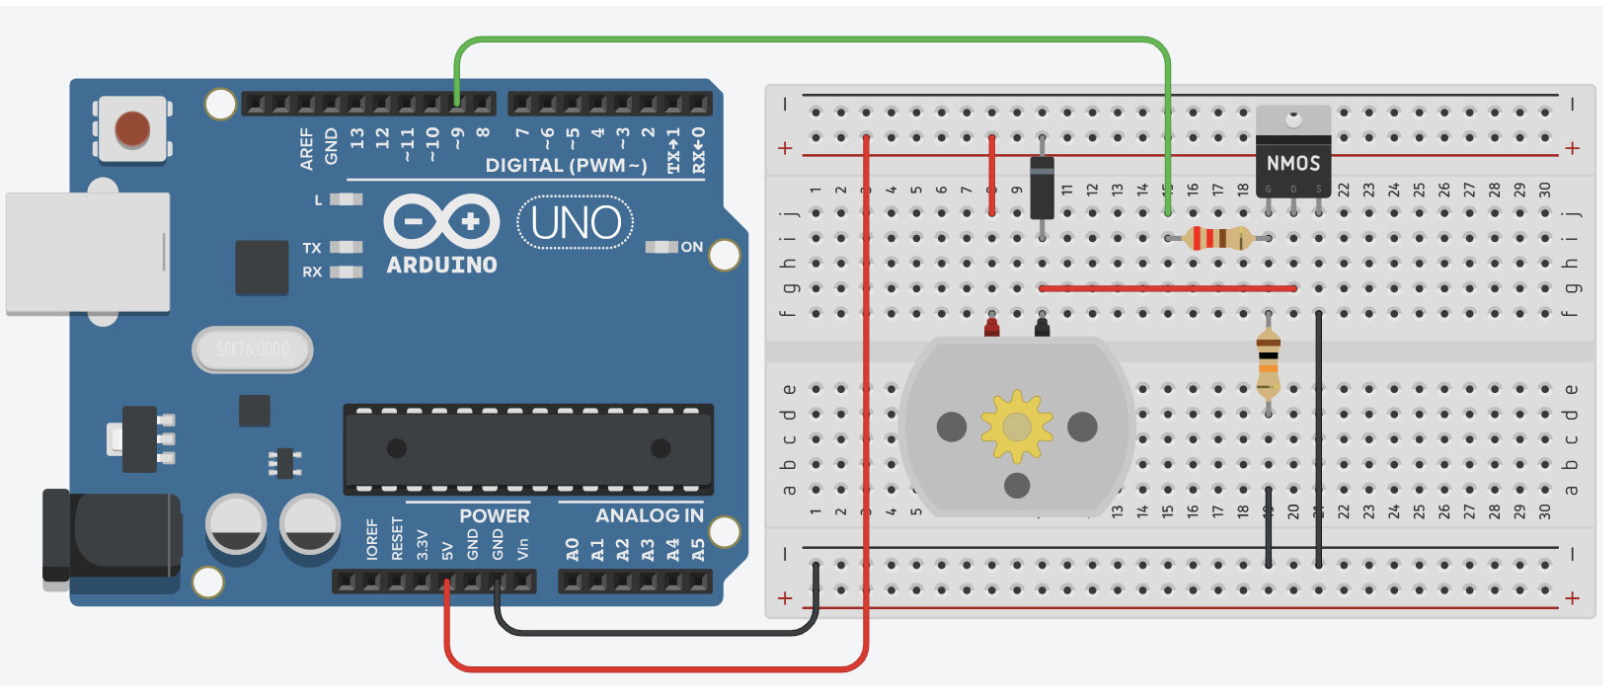
- IRLZ44N pins, looking at the printed front with the legs down: G (gate) left, D (drain) middle, S (source) right - the metal tab is also D
- D9 -> 220 ohm -> MOSFET gate
- 10 k ohm from gate -> GND
- MOSFET source -> common GND
- Load between external +V (5-12 V, to suit the fan) and drain
- 1N4007 or 1N5819 across the fan or any inductive load: cathode (band) to +V, anode to drain
- External supply GND -> Uno GND
Worked sketch
Download .inoconst byte loadPin = 9;
void setup() {
pinMode(loadPin, OUTPUT);
}
void loop() {
for (int power = 0; power <= 255; power++) {
analogWrite(loadPin, power);
delay(10);
}
analogWrite(loadPin, 0);
delay(1000);
}How the code works
- The Arduino drives only the gate; the external supply provides load current.
- PWM can control a DC fan or lamp when the driver and load support it.
- If you substitute an NPN for on/off tests, use digitalWrite and a suitable base resistor - do not assume the same PWM thermal behaviour.
Test and record evidence
Practical evidence checklist
Common faults and checks
- Confirm MOSFET pin order from its datasheet.
- A non-logic-level MOSFET may overheat at 5 V gate drive.
- Common GND is essential.
- Missing flyback diode on motors/relays can cause random resets or damaged drivers.
Check your understanding
Q1. Why not power a fan from an I/O pin?
Show answer
Its current and inductive behavior exceed the pin's safe capability.
Q2. What makes a MOSFET 'logic-level' for 5 V Arduino use?
Show answer
Useful low RDS(on) at about 4.5 V gate (or lower), not only a low Vth.
Q3. How is a flyback diode oriented?
Show answer
Reverse-biased during normal operation: cathode to positive, anode to the switched side.
Q4. What must you never switch with a course relay build?
Show answer
Mains electricity - use extra-low-voltage DC only.
Q5. VDS reads 1.5 V with the fan fully on. What does that suggest?
Show answer
The MOSFET is not fully switched on - not logic-level or poorly driven - and will overheat.
Optional: practise in your browser
Write and test this lesson's code on a virtual Uno. Work through the 4 exercises in order. Press Test and each one checks itself. This practice is optional - do it if you have time.
Optional practice: a fan on the virtual Uno
This practice is optional. Do it if you have time. Nothing in class depends on it.
The virtual board has a DC fan switched by a logic-level MOSFET on D9, wired like the lesson. The pin only drives the MOSFET's gate - the fan's current comes from its own supply. So the code is exactly what you would write for an LED on D9:
digitalWrite(fanPin, HIGH)turns the fan on at full power,LOWturns it offanalogWrite(fanPin, 0 to 255)sets the speed with PWM, as in Lesson 15
What the simulator does not model: the external supply, the gate resistors, the flyback diode, a MOSFET getting hot, or a fan that will not start at low PWM. Those are what the bench is for.
The lesson's sketch
Press Run and watch the fan speed up from off to full, stop for a second, then start again.
- Each step of the loop raises the power by 1 and waits 10 ms, so the ramp takes about 2.5 s.
- A real fan may not start turning until the PWM value is quite high. That is normal.
Fan on, fan off
Turn the fan on for 2 seconds, then off for 1 second, over and over.
Use digitalWrite - on is HIGH, off is LOW.
Half speed, then full speed
Now set the speed with analogWrite. Each time round loop():
- run the fan at half power (128) for 2 seconds
- then at full power (255) for 2 seconds
- then off (0) for 1 second
Soft start, then hold
Starting a fan at full power all at once pulls a big surge of current. A soft start brings the power up in small steps instead.
Each time round loop():
- use a
forloop to raise the power from 0 to 255, one step at a time, waiting 10 ms after each step - hold full power for 2 seconds
- then turn the fan off for 1 second
It is the lesson's sketch with a 2 second hold added.
A thermostat that does not flicker
The board now has a temperature sensor on A0 (move its slider while the sketch runs). Switch the fan on when the room is hot.
A single switch point causes trouble: if the fan turns on above 600 and off below 600, a reading that wobbles around 600 switches the fan on and off many times a second. The fix is a gap between the two switch points, called hysteresis:
- reading above 600: fan on (
HIGH) - reading below 500: fan off (
LOW) - in between: do nothing - the fan stays as it was
Read the sensor every 50 ms. The test warms the room up, lets it cool a little, cools it right down, then warms it again - and checks the fan only changes at the right points.
Try it on a real Uno
Build the MOSFET fan circuit from Lesson 16 - gate resistor, pull-down, flyback diode and common GND - and upload Half speed, then full speed. Measure VDS at full power: well under 1 V means the MOSFET is fully on.
For the thermostat, a potentiometer on A0 stands in for the temperature sensor, as in the lesson's challenge.