
32. Build Your Own Library
Worked example: package thermistor maths as a reusable Arduino library. Best after Lesson 20.
Project: Creating the SimpleThermistor Library
Prerequisites: Basic Arduino C • analogRead() • Serial.print()
This tutorial will guide you through creating a library that calculates temperature from a thermistor using a voltage divider circuit.
You already write Arduino sketches in C - analogRead(), Serial.print(), delay(). None of that knowledge disappears. A C++ library is simply a way of wrapping your code into a reusable, self-contained tool that any sketch can use in one line.
Everything new in this exercise comes from one concept - a class. A class is a template that bundles related data and functions together. You have already used classes every time you wrote:
Serial.begin(9600);   // Serial is an object - an instance of HardwareSerial
Serial.println("hi"); // .println() is a member function of that object
Your SimpleThermistor class will work the same way. The sketch will create an object and call its functions with the dot operator:
SimpleThermistor mySensor(A0, 10000, 10000);
float t = mySensor.getCelsius();
Overall workflow: design each file as a skeleton first, then fill in the logic.
| Phase | File | What you do | The analogy |
|---|---|---|---|
| 1 | All three files | Create empty files in the right folders | Lay the foundations before building |
| 2 | SimpleThermistor.h |
Skeleton, then add the class block | Draw the blueprint |
| 3 | SimpleThermistor.cpp |
Skeleton, then add each function | Wire up the machinery |
| 4 | Test .ino sketch |
Write the sketch that uses the library | Flip the switch |
// <-- goes here --> = placeholders to replace later
Phase 1: Creating the Folder Structure
Before writing any code, we must set up the environment so the Arduino IDE can "see" your new library.
- Locate your Arduino Libraries folder. This is usually found in
Documents > Arduino > libraries. - Create a new folder named exactly
SimpleThermistor. - Inside that folder, create two empty text files. Rename them exactly as follows:
SimpleThermistor.h(This is the Header file - the "Table of Contents").SimpleThermistor.cpp(This is the Source file - the "Story").
Arduino IDE looks for libraries in a specific location. The folder name must match the class name exactly.
| Operating system | Libraries folder |
|---|---|
| Windows | Documents\Arduino\libraries\ |
| macOS | ~/Documents/Arduino/libraries/ |
| Linux | ~/Arduino/libraries/ |
After creating the library folder, you should have:
Arduino/libraries/SimpleThermistor/SimpleThermistor.h- declares the class shapeArduino/libraries/SimpleThermistor/SimpleThermistor.cpp- contains all the logic
Sketches live separately from the library. In your Arduino sketchbook folder, also create:
Arduino/SimpleThermistorTest/SimpleThermistorTest.ino- the test sketch that will prove the library works
SimpleThermistor.h, not SimpleThermistor.h.txt.
Phase 2: Defining the Header (.h)
The header file tells the Arduino IDE what functions and variables exist in your library. We start here to define our "contract."
The header file (.h) is the contract. It tells the Arduino IDE - and any sketch that includes it - exactly what the library provides: what data it needs, and what functions it offers. There is no working code here yet, only declarations.
We build this file in two steps: skeleton first, class block second.
Step 1: Open SimpleThermistor.h and add the "include guards."
These prevent the library from being loaded twice.
#ifndef SimpleThermistor_h
#define SimpleThermistor_h

#include "Arduino.h"

// The class definition will go here

#endif
#ifndef / #define / #endif - These three lines form an include guard. They prevent the file from being processed twice if multiple files happen to include it. Always start and end every .h file this way. The name after #ifndef must be unique - by convention it mirrors the filename.
#include "Arduino.h" - This gives the library access to Arduino-specific types and functions (int, float, pinMode, analogRead, and the pin constant A0). Use double quotes for your own files; angle brackets < > are for system libraries.
Step 2: Define the Class.
We need to store the pin, the resistor value, and the thermistor's nominal resistance.
class SimpleThermistor {
  public:
    // Constructor: This runs when the user creates the object
    SimpleThermistor(int pin, long seriesResistor, long thermistorNominal);

    // Functions to get temperature
    float getCelsius();
    float getFahrenheit();

  private:
    int _pin;
    long _seriesResistor;
    long _thermistorNominal;
};
public: Everything listed here is accessible from the sketch. This is your library's visible interface - the buttons on the front panel.
private: Everything here is hidden from the sketch. The sketch cannot read or change these directly. The underscore prefix on _pin, _seriesResistor, and _thermistorNominal is a convention - it signals that these are private member variables.
getCelsius() or getFahrenheit() yet - only their signatures. A declaration tells the compiler the function exists and what types it accepts and returns. The actual logic comes in Phase 3.
};
SimpleThermistor.h. If you restart Arduino IDE it will detect the library in its list - although it will not yet compile because the .cpp is still empty.
Phase 3: Writing the Logic (.cpp)
Now we fill in the "how" for the functions we defined in the header.
The .cpp file contains the actual working code for every function you declared in the header. The pattern for each function is:
ReturnType ClassName::functionName(parameters) {
  // code here
}
The double-colon :: is the scope resolution operator - it tells the compiler which class this function belongs to. Every function definition in this file must have it.
Again we build skeleton first, then fill in each function one at a time so you can focus on one idea at a time. A useful starting skeleton is:
#include "SimpleThermistor.h"
#include <math.h> // needed for log() in the Beta equation

// <-- Constructor goes here in Step 1 -->

// <-- getCelsius() goes here in Step 2 -->

// <-- getFahrenheit() goes here in Step 3 -->
Why #include "SimpleThermistor.h" with double quotes? Because it is your own file sitting in the same folder. Double quotes tell the compiler to search the local folder first. Angle brackets < > are for system libraries on the IDE's search path.
Step 1: Link the header and write the Constructor.
This maps the user's inputs to our internal private variables.
#include "SimpleThermistor.h"
#include <math.h> // Needed for logarithmic calculations

SimpleThermistor::SimpleThermistor(int pin, long seriesResistor, long thermistorNominal) {
  _pin = pin;
  _seriesResistor = seriesResistor;
  _thermistorNominal = thermistorNominal;
}
The constructor runs once, automatically, the moment the sketch creates the object. Its job is simple: store the three values the sketch passes in so the other functions can use them later.
Each line copies one argument into its matching private member variable. The argument names (pin, seriesResistor, thermistorNominal) live only inside this constructor. The _pin, _seriesResistor, _thermistorNominal versions survive for the lifetime of the object and are accessible by getCelsius() and getFahrenheit().
Step 2: Write the getCelsius logic.
We will use a simplified calculation in three clear steps: read the pin, find resistance, then convert to temperature.
float SimpleThermistor::getCelsius() {
  int analogVal = analogRead(_pin);

  // Step 1: resistance of the thermistor (voltage divider)
  float resistance = _seriesResistor / (1023.0 / analogVal - 1.0);

  // Step 2: beta equation → temperature in Kelvin
  // (25 C = 298.15 K, B = 3950)
  float tempK = 1.0 / (1.0 / 298.15 + log(resistance / _thermistorNominal) / 3950.0);

  // Step 3: Kelvin → Celsius
  return tempK - 273.15;
}
This is the heart of the library. It performs three calculations in sequence:
Step A - Read the pin. analogRead() returns a value from 0 to 1023 that represents the voltage at the pin (0 V = 0, 5 V = 1023). You have used this exact function before.
Step B - Voltage divider algebra. The circuit places the series resistor and the thermistor in series across 5 V. The pin reads the junction voltage. Rearranging the voltage divider formula gives:
R_therm = R_series / (1023 / adcVal − 1)
The 1023.0 (with a decimal) forces floating-point division so no precision is lost.
Step C - The Beta equation. This is a simplified form of the Steinhart-Hart equation that is accurate enough for classroom use. One line converts resistance to Kelvin (25 °C = 298.15 K, B = 3950); the next subtracts 273.15 to arrive at Celsius. The constant 3950.0 is the Beta value - a property of the thermistor that should match its datasheet.
3950.0 with the correct number.
Step 3: Write the getFahrenheit logic.
Instead of re-calculating everything, we simply call our existing Celsius function!
float SimpleThermistor::getFahrenheit() {
  return (getCelsius() * 9.0 / 5.0) + 32.0;
}
Here is where C++ starts to pay off. Instead of re-doing all the mathematics, you call the member function you just wrote and convert the result. One line - no repeated maths.
SimpleThermistor.cpp. The library is now complete and will compile. The last remaining file is the test sketch.
Checkpoint Summary - Full Library Files
Before moving on, pause and make sure your two library files match the complete versions below. These are what Phases 2 and 3 built, piece by piece.
Full file: SimpleThermistor.h
#ifndef SimpleThermistor_h
#define SimpleThermistor_h

#include "Arduino.h"

class SimpleThermistor {
  public:
    // Constructor: This runs when the user creates the object
    SimpleThermistor(int pin, long seriesResistor, long thermistorNominal);

    // Functions to get temperature
    float getCelsius();
    float getFahrenheit();

  private:
    int _pin;
    long _seriesResistor;
    long _thermistorNominal;
};

#endif
Full file: SimpleThermistor.cpp
#include "SimpleThermistor.h"
#include <math.h> // Needed for logarithmic calculations

SimpleThermistor::SimpleThermistor(int pin, long seriesResistor, long thermistorNominal) {
  _pin = pin;
  _seriesResistor = seriesResistor;
  _thermistorNominal = thermistorNominal;
}

float SimpleThermistor::getCelsius() {
  int analogVal = analogRead(_pin);

  // Step 1: resistance of the thermistor (voltage divider)
  float resistance = _seriesResistor / (1023.0 / analogVal - 1.0);

  // Step 2: beta equation → temperature in Kelvin
  // (25 C = 298.15 K, B = 3950)
  float tempK = 1.0 / (1.0 / 298.15 + log(resistance / _thermistorNominal) / 3950.0);

  // Step 3: Kelvin → Celsius
  return tempK - 273.15;
}

float SimpleThermistor::getFahrenheit() {
  return (getCelsius() * 9.0 / 5.0) + 32.0;
}
Phase 4: Using the Library
Now, create a new Arduino Sketch (.ino) to test your work.
- Restart the Arduino IDE so it scans the new library folder.
- Write the following sketch:
#include <SimpleThermistor.h>

// Setup: Pin A0, 10k ohm series resistor, 10k ohm thermistor
SimpleThermistor mySensor(A0, 10000, 10000);

void setup() {
  Serial.begin(9600);
}

void loop() {
  Serial.print("Celsius: ");
  Serial.println(mySensor.getCelsius());

  Serial.print("Fahrenheit: ");
  Serial.println(mySensor.getFahrenheit());

  delay(1000);
}
The sketch is written last because it consumes the library - you cannot use a tool that does not exist yet. Apart from the #include line and the object creation line, this file contains nothing new.
Before uploading, restart Arduino IDE so it rescans the libraries folder and picks up SimpleThermistor.
The new lines explained:
#include <SimpleThermistor.h>- Loads your library. Angle brackets tell the IDE to search the libraries folder.SimpleThermistor mySensor(A0, 10000, 10000);- Creates an object calledmySensor. This calls the constructor with three arguments: the pin, the series resistor value (10 000 Ω), and the thermistor's nominal resistance (10 000 Ω). Adjust these numbers to match your actual components.mySensor.getCelsius()- Calls the member function you wrote in Phase 3. The dot operator is the same one you already use onSerial.
Upload and test:
- Verify (✓) first - fix any compile errors before uploading
- Upload (→) to your board
- Open Serial Monitor - Tools → Serial Monitor - baud rate 9600
- You should see Celsius and Fahrenheit readings update every second
Troubleshooting
Restart the IDE. Confirm the folder is exactly
Documents/Arduino/libraries/SimpleThermistor/ and the file is named SimpleThermistor.h (not .h.txt). Folder name spelling must match.
Usually a wiring problem: open connection, thermistor/resistor swapped, or
A0 not connected to the junction. Recheck: 5V → resistor → junction (to A0) → thermistor → GND. Also avoid dividing by zero if the ADC reading is stuck at 0.
Check that constructor values match your real parts (
10000, 10000 for two 10k components). If still off, update the Beta constant 3950.0 from your thermistor datasheet (B25/85).
Summary of Workflow for Students:
- Structure: Create the folder and empty files so the IDE recognizes the library.
- Header (.h): Define the "Shape" of your tool (What inputs does it need? What outputs does it give?).
- Source (.cpp): Define the "Brain" (How does it math?).
- Sketch (.ino): Use the tool in a real project.
Every Arduino library you ever write will follow the same four-phase pattern:
| Phase | File | The question you answer | The analogy |
|---|---|---|---|
| 1 | All files | Where do the files live and what are they called? | Lay the foundations |
| 2 | .h header |
What inputs does my tool need? What outputs does it give? | Draw the blueprint |
| 3 | .cpp source |
How does the maths actually work? | Wire up the machinery |
| 4 | .ino sketch |
Does the tool work in a real sketch? | Flip the switch |
And within the header/source phases, the micro-pattern is always:
- Write the skeleton with placeholder comments first
- Replace placeholders one at a time, reading the explanation before typing the code
- Save and check at each step rather than writing everything and debugging at the end
C++ Concepts Introduced
| Concept | Syntax | Plain-English meaning |
|---|---|---|
| Include guard | #ifndef / #define / #endif |
Prevent a header being loaded twice |
| Class declaration | class SimpleThermistor { }; |
Blueprint for a new type of object |
| Constructor | SimpleThermistor::SimpleThermistor() |
Runs once when the object is created |
| Member variables | int _pin; |
Data stored privately inside the object |
| public / private | public: ... private: ... |
Controls what the sketch can and cannot see |
| Scope resolution | SimpleThermistor::getCelsius() |
Links a function definition to its class |
| Object creation | SimpleThermistor mySensor(...); |
Makes a live instance of the class |
| Member function call | mySensor.getCelsius() |
Runs a function that belongs to an object |
Extension Challenges
Once your library is working, try these to go further:
- Add a
getKelvin()function that returns the raw Kelvin value - no conversion needed - Add a constructor parameter for a custom Beta value instead of hard-coding
3950.0 - Create a second object on pin
A1- you get a second independent sensor for free - Add a function
bool isAbove(float threshold)that returns true if the temperature exceeds the given value
End of guide - good luck with your first C++ library!
Hardware Setup: Connection Diagram
Wire a voltage divider so the Arduino can measure the thermistor. Use a 10kΩ series resistor and a 10kΩ NTC thermistor - matching the sketch arguments (A0, 10000, 10000).
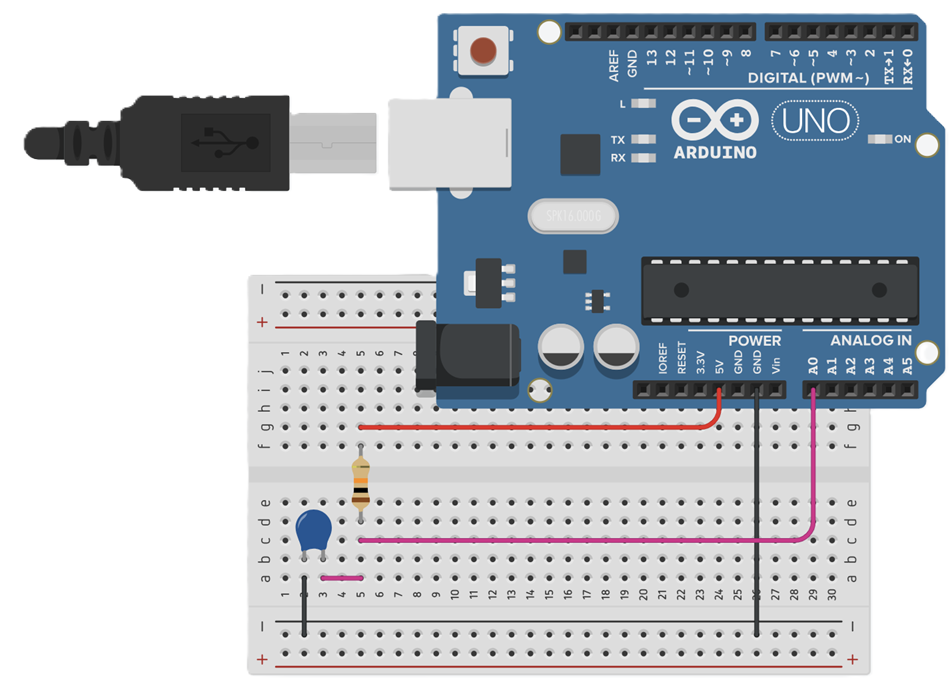
How to connect it
- 5V (red) - Arduino
5Vto one end of the 10kΩ series resistor. - Series resistor - Other end of the resistor becomes the junction (middle of the divider).
- Thermistor - One leg to that same junction; the other leg to GND (black wire / blue rail).
- Signal (pink) - From the junction to Arduino analog pin
A0. - GND (black) - Arduino
GNDto the breadboard ground rail.
Circuit path: 5V → 10k resistor → junction (to A0) → thermistor → GND
As temperature changes, the thermistor’s resistance changes, so the voltage at A0 changes. That ADC reading is what getCelsius() converts into temperature.
5 V → [series resistor R] → (analog pin) → [thermistor NTC] → GND. The analog pin reads the voltage at the junction between the two components. This matches the resistance formula used in getCelsius():
resistance = _seriesResistor / (1023.0 / analogVal - 1.0)