
39. Addressable RGB LEDs: NeoPixel / WS2812 Strips
Power a short NeoPixel strip safely, then build a shelf mood strip with calm / work / alert colours.
Learning outcomes
- Explain addressable LEDs on one data line and why show() matters
- Power a strip from external 5 V with common GND and a data resistor
- Estimate current and keep Colour values modest
- Run a fill-then-chase discovery pattern
- Build a shelf mood strip with Serial-selected moods
Parts and preparation
ESP32 DevKit, 8-LED WS2812 / NeoPixel strip or stick, external 5 V supply, ~330-470 ohm data resistor, optional bulk capacitor, jumper wires. Library: Adafruit NeoPixel by Adafruit.
Before power: inspect wiring, confirm supply voltage and ensure all connected circuits share GND.
Libraries for this lesson
In Arduino IDE 2 open Tools → Manage Libraries…. Search by the Library Manager name and install the package by the exact author below. Similar names from other authors can use different APIs and will break the example.
| Include | Library Manager name | Author | Install note |
|---|---|---|---|
Adafruit_NeoPixel.h | Adafruit NeoPixel | Adafruit | Install via Library Manager. Choose Adafruit NeoPixel by Adafruit. |
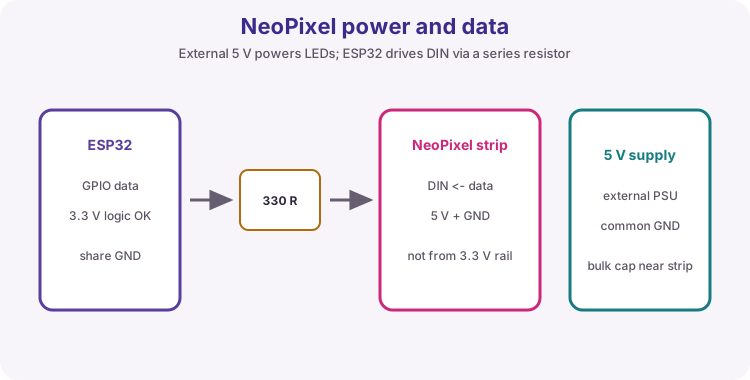
Project: Shelf mood strip
Build a short accent strip for a shelf or bench edge: calm blue, work amber, or alert red. Power and show() habits matter more than fancy animations on day one.
Sketch 1 discovers fill, chase and show(). Sketch 2 is the useful mood strip - type C/W/A in Serial (hands-on bridge to the lesson 40 status tile).
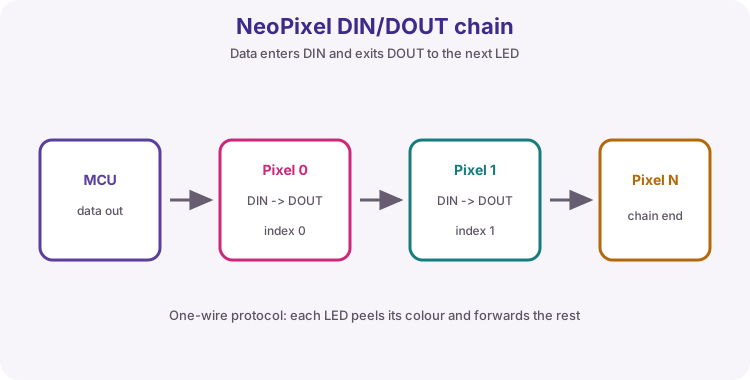
One data wire, many LEDs
WS2812 / NeoPixel LEDs keep their own colour and forward the stream. Change a RAM buffer, then call show() - without show(), nothing updates.
Power first: 5 V, GND and current
Do not power an 8-LED strip from ESP32 3V3. Use external 5 V and common GND. Budget ~60 mA per LED at full white. Keep Colour values modest (about 80) in class.
| Connection | Course practice |
|---|---|
| Strip 5 V / VCC | External 5 V (not ESP32 3V3) |
| Strip GND | Supply GND + ESP32 GND |
| Strip DIN | GPIO 5 via ~330-470 ohm |
| Current guide | ~60 mA per LED at full white |
Data resistor, direction and colour order
Follow the strip arrow DIN -> DOUT. Wrong colours often mean NEO_GRB vs NEO_RGB. Weak supply causes resets on bright white.
Library choice
Adafruit NeoPixel only for this lesson. FastLED can wait.
Wiring and safe build sequence
- Power off before connecting the strip
- External 5 V+ -> strip 5 V; GND common with ESP32
- ESP32 GPIO 5 -> 330-470 ohm -> strip DIN
- USB powers ESP32 only
Worked sketch 1: Fill then chase
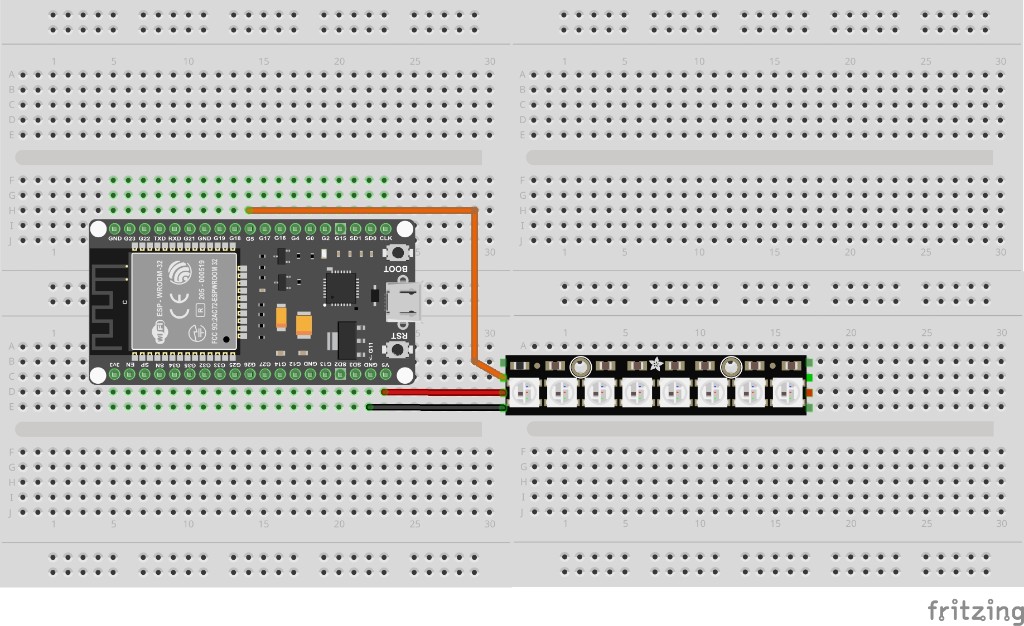
Download .ino sketchWhat this sketch is for: Discovery: solid dim red, then a green chase proves power, DIN direction and show(). Match the breadboard layout below before upload (short 8-LED stick only).
#include <Adafruit_NeoPixel.h>

const int pin = 5;
const int n = 8;
Adafruit_NeoPixel strip(n, pin, NEO_GRB + NEO_KHZ800);

void setup() {
  strip.begin();
  strip.clear();
  strip.show();
}

void loop() {
  strip.fill(strip.Color(80, 0, 0));
  strip.show();
  delay(500);

  strip.clear();
  strip.show();
  for (int i = 0; i < n; i++) {
    strip.setPixelColor(i, strip.Color(0, 80, 0));
    strip.show();
    delay(80);
    strip.setPixelColor(i, 0);
  }
}
How the code works
- begin/clear/show start from all off.
- Colour channels stay at 80 to limit current and glare.
- Build from the breadboard photo: data on GPIO 5; short stick may use VIN 5 V.
Worked sketch 2: Shelf mood strip
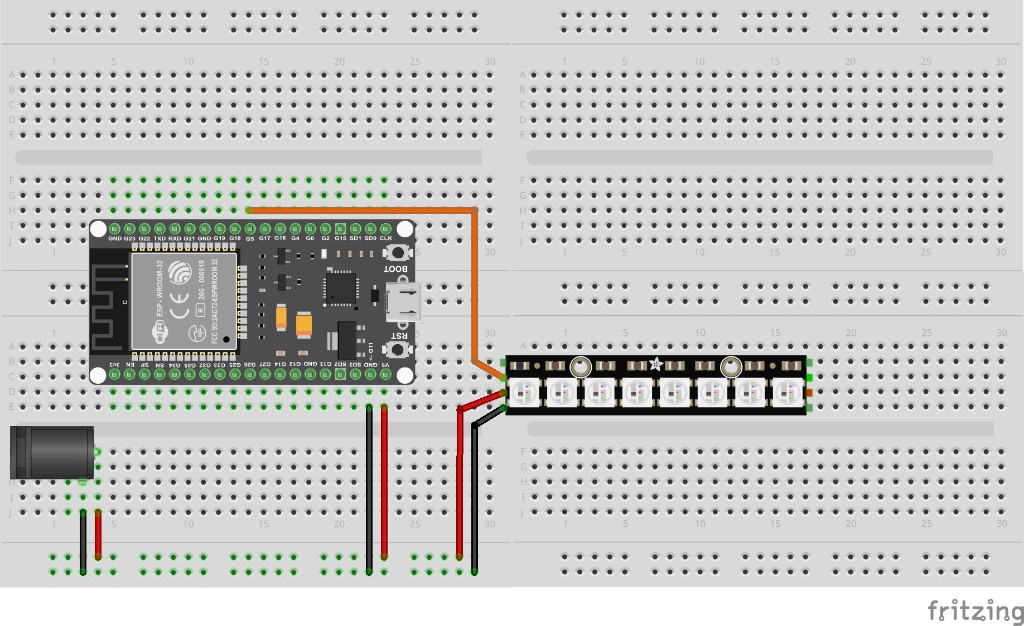
Download .ino sketchWhat this sketch is for: Useful accent light: type C (calm), W (work) or A (alert) in Serial to fill the strip. Same three moods return as a matrix status tile in lesson 40. Match the dedicated 5 V breadboard below before upload.
#include <Adafruit_NeoPixel.h>

const int pin = 5;
const int n = 8;
Adafruit_NeoPixel strip(n, pin, NEO_GRB + NEO_KHZ800);

void fillMood(uint8_t r, uint8_t g, uint8_t b, const char* name) {
  strip.fill(strip.Color(r, g, b));
  strip.show();
  Serial.print("Mood: ");
  Serial.println(name);
}

void setup() {
  Serial.begin(115200);
  strip.begin();
  strip.clear();
  strip.show();
  fillMood(0, 0, 60, "CALM");
  Serial.println("Shelf mood strip - type C, W or A");
}

void loop() {
  if (!Serial.available()) return;
  char c = Serial.read();
  if (c == 'C' || c == 'c') fillMood(0, 0, 60, "CALM");
  if (c == 'W' || c == 'w') fillMood(50, 30, 0, "WORK");
  if (c == 'A' || c == 'a') fillMood(60, 0, 0, "ALERT");
}
How the code works
- fill() paints all pixels; show() pushes the frame.
- Keep values modest - eight LEDs still add up.
- Lesson 40 maps the same moods onto an XY matrix tile.
- Powering a long strip needs a dedicated 5 V supply as indicated in the breadboard.
Test and record evidence
Practical evidence checklist
Common faults and checks
- No light: external 5 V, common GND, DIN direction, Adafruit NeoPixel install.
- Wrong colours: try NEO_RGB instead of NEO_GRB.
- Board resets when bright: weaken Colour values or strengthen 5 V supply.
Check your understanding
Q1. What project is sketch 2?
Show answer
A shelf mood strip with calm / work / alert colours.
Q2. Why call show()?
Show answer
Colour updates stay in RAM until show() sends the stream.
Q3. About how much current can one LED draw at full white?
Show answer
About 60 mA.
Q4. Where should strip 5 V come from?
Show answer
An external 5 V supply - not ESP32 3V3.
Q5. What must be common?
Show answer
GND between ESP32 and strip supply.
Q6. Which library?
Show answer
Adafruit NeoPixel by Adafruit.
Q7. Which GPIO for data in this course?
Show answer
GPIO 5.
Q8. How does this prepare lesson 40?
Show answer
Same mood language moves onto a matrix status tile.