
40. NeoPixel Matrices and XY Mapping
Map an 8x8 matrix with serpentine XY(), then build a desk status tile with free / busy / alert colours.
Learning outcomes
- Explain that a matrix is still one linear NeoPixel chain
- Write a serpentine XY(x, y) helper
- Prove mapping with a centred test block
- Build a desk status tile with free / busy / alert colours
- Cycle status with millis (or Serial) without blocking forever on show()
Parts and preparation
ESP32 DevKit, 8x8 WS2812 / NeoPixel matrix (serpentine), external 5 V supply, ~330-470 ohm data resistor, jumper wires. Library: Adafruit NeoPixel by Adafruit.
Before power: inspect wiring, confirm supply voltage and ensure all connected circuits share GND.
Libraries for this lesson
In Arduino IDE 2 open Tools → Manage Libraries…. Search by the Library Manager name and install the package by the exact author below. Similar names from other authors can use different APIs and will break the example.
| Include | Library Manager name | Author | Install note |
|---|---|---|---|
Adafruit_NeoPixel.h | Adafruit NeoPixel | Adafruit | Install via Library Manager. Same package as lesson 39. |
Project: Desk status tile
Build a small desk tile people can read at a glance: green = free, amber = busy, red = alert. An 8x8 NeoPixel matrix is the display; serpentine XY() mapping is the skill that makes shapes possible.
Sketch 1 proves XY() with a centred test block. Sketch 2 is the useful tile: three named status colours cycled with millis (Serial can force a status too).
A matrix is still a strip
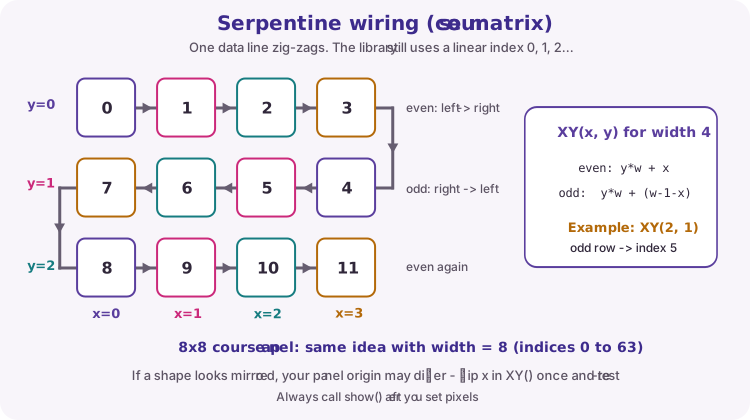
An 8x8 panel is 64 LEDs on one data line with linear indices 0..63. XY(x, y) converts grid coordinates into that index.
| Idea | Meaning |
|---|---|
| (x, y) | Column and row on the panel |
| index | Position on the data chain |
| XY(x, y) | Helper that computes index |
| show() | Push the buffer to the LEDs |
Serpentine (zig-zag) - the course layout
Even rows left to right; odd rows right to left. even y: index = y * w + x odd y: index = y * w + (w - 1 - x)
int XY(int x, int y) {
  const int w = 8;
  if (y % 2 == 0) return y * w + x;
  return y * w + (w - 1 - x);
}
Power reminder
External 5 V, common GND, series data resistor. Keep Color() modest - 64 LEDs at full white need a strong supply.
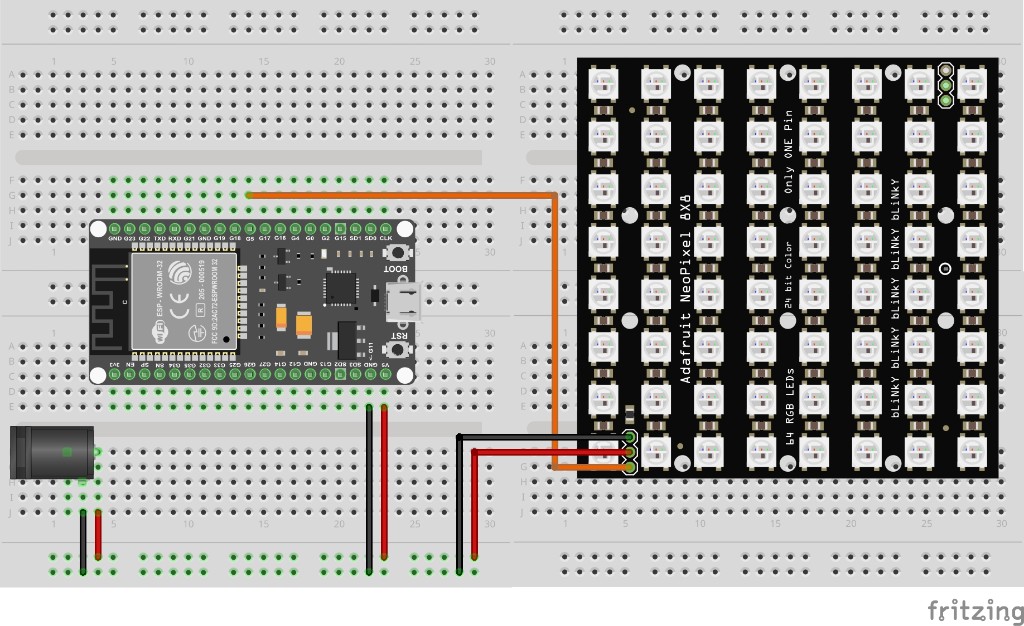
Wiring and safe build sequence
- Power off before connecting the matrix
- External 5 V+ -> matrix 5 V
- External 5 V GND -> matrix GND and ESP32 GND
- ESP32 GPIO 5 -> 330-470 ohm -> matrix DIN
- USB powers ESP32 only
Worked sketch 1: Prove XY with a centred block
Download .ino sketchWhat this sketch is for: Discovery: fill a centred 4x4 blue square using serpentine XY(). If the block looks mirrored, fix XY() once before the status tile.
#include <Adafruit_NeoPixel.h>

const int pin = 5;
const int w = 8;
const int h = 8;
Adafruit_NeoPixel matrix(w * h, pin, NEO_GRB + NEO_KHZ800);

int XY(int x, int y) {
  if (y % 2 == 0) return y * w + x;
  return y * w + (w - 1 - x);
}

void setup() {
  matrix.begin();
  matrix.clear();
  matrix.show();
}

void loop() {
  matrix.clear();
  for (int y = 2; y <= 5; y++) {
    for (int x = 2; x <= 5; x++) {
      matrix.setPixelColor(XY(x, y), matrix.Color(0, 0, 60));
    }
  }
  matrix.show();
  delay(1000);
}
How the code works
- XY() encodes serpentine layout for width 8.
- Nested loops fill x,y from 2 to 5 (centred 4x4).
- If mirrored, adjust XY() for your panel origin.
Worked sketch 2: Desk status tile
Download .ino sketchWhat this sketch is for: Useful tile: whole matrix shows free (green), busy (amber) or alert (red). Status auto-cycles every 4 s; type F, B or A in Serial to force a mode. Match the dedicated 5 V breadboard below before upload.
#include <Adafruit_NeoPixel.h>

const int pin = 5;
const int w = 8;
const int h = 8;
Adafruit_NeoPixel matrix(w * h, pin, NEO_GRB + NEO_KHZ800);

enum Status { ST_FREE = 0, ST_BUSY = 1, ST_ALERT = 2 };
Status statusMode = ST_FREE;
unsigned long lastChange = 0;

int XY(int x, int y) {
  if (y % 2 == 0) return y * w + x;
  return y * w + (w - 1 - x);
}

void fillStatus(uint8_t r, uint8_t g, uint8_t b) {
  for (int y = 0; y < h; y++) {
    for (int x = 0; x < w; x++) {
      matrix.setPixelColor(XY(x, y), matrix.Color(r, g, b));
    }
  }
  matrix.show();
}

void showStatus(Status s) {
  statusMode = s;
  if (s == ST_FREE) {
    fillStatus(0, 50, 0);
    Serial.println("Status: FREE");
  } else if (s == ST_BUSY) {
    fillStatus(50, 30, 0);
    Serial.println("Status: BUSY");
  } else {
    fillStatus(60, 0, 0);
    Serial.println("Status: ALERT");
  }
}

void setup() {
  Serial.begin(115200);
  matrix.begin();
  matrix.clear();
  matrix.show();
  showStatus(ST_FREE);
  lastChange = millis();
  Serial.println("Desk status tile - type F, B or A");
}

void loop() {
  if (Serial.available()) {
    char c = Serial.read();
    if (c == 'F' || c == 'f') showStatus(ST_FREE);
    if (c == 'B' || c == 'b') showStatus(ST_BUSY);
    if (c == 'A' || c == 'a') showStatus(ST_ALERT);
    lastChange = millis();
  }

  if (millis() - lastChange >= 4000) {
    lastChange = millis();
    Status next = (Status)((statusMode + 1) % 3);
    showStatus(next);
  }
}
How the code works
- Modest Colour values keep current and glare down.
- millis cycles status without a long blocking delay before Serial checks.
- Replace the auto-cycle later with a button or MQTT command.
- Build from the breadboard photo: 8x8 matrix on dedicated 5 V, data on GPIO 5.
Test and record evidence
Practical evidence checklist
Common faults and checks
- Blank matrix: 5 V, common GND, DIN, Adafruit NeoPixel.
- Mirrored shape: fix XY() for your panel.
- Brown-out: lower Color() values or strengthen 5 V.
Check your understanding
Q1. What project is sketch 2?
Show answer
A desk status tile with free / busy / alert colours.
Q2. How many indices on 8x8?
Show answer
64 (0 to 63).
Q3. What is serpentine wiring?
Show answer
Even rows L->R; odd rows R->L.
Q4. Why write XY()?
Show answer
Convert grid (x, y) to linear strip index.
Q5. What does show() do?
Show answer
Push the RAM buffer to the LEDs.
Q6. Why keep colours modest?
Show answer
64 LEDs can draw large current at full white.
Q7. How do you force BUSY in sketch 2?
Show answer
Type B in Serial Monitor.
Q8. What must sketch 1 prove first?
Show answer
That XY() maps a centred block correctly.