
42. Local Web Server: Control from a Browser
Build a room light remote: a phone on the same WiFi toggles a named lamp and sees when it last changed.
Learning outcomes
- Explain HTTP GET, routing and 303 redirects
- Serve HTML with WebServer.h and raw strings
- Ship a room light remote with ON/OFF and last-changed text
- Keep handleClient() responsive in loop
- Drive GPIO 2 as a lamp appliance from the browser
Parts and preparation
ESP32 DevKit, USB, LED + 220-330 ohm on GPIO 2 (room lamp stand-in), same WiFi as phone/PC.
Before power: inspect wiring, confirm supply voltage and ensure all connected circuits share GND.
Libraries for this lesson
In Arduino IDE 2 open Tools → Manage Libraries…. Search by the Library Manager name and install the package by the exact author below. Similar names from other authors can use different APIs and will break the example.
| Include | Library Manager name | Author | Install note |
|---|---|---|---|
WiFi.h | WiFi | Espressif | Built into the esp32 Arduino core. |
WebServer.h | WebServer | Espressif | Built into the esp32 Arduino core. |
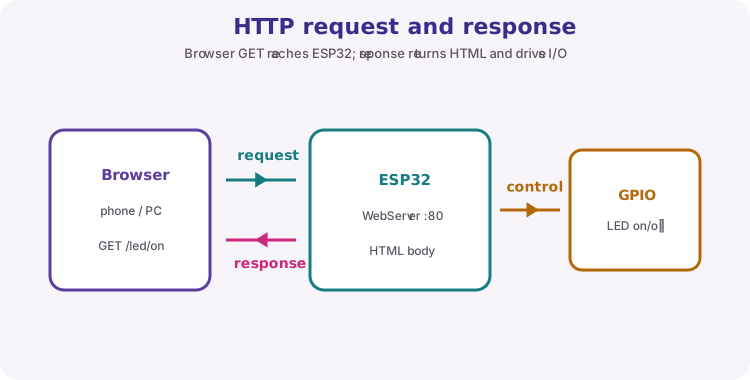
Project: Room light remote
Build a LAN remote for a room lamp (LED stand-in on GPIO 2). Anyone on the same WiFi opens the board IP and switches the light without a cloud account.
Sketch 1 discovers routing and 303 redirects. Sketch 2 is the product page: room name, ON/OFF, and last-changed note.
HTTP enough to debug
GET asks for a path. Status 200 returns the page. Status 303 with Location: / reloads the safe dashboard after an action so refresh does not re-toggle.
| Path | Role |
|---|---|
| / | Dashboard (200 + HTML) |
| /led/on | Lamp on, 303 to / |
| /led/off | Lamp off, 303 to / |
Why handleClient matters
loop must call server.handleClient() often. A long delay freezes the page even if WiFi stays up.
Raw string HTML
R"=====( ... )=====" embeds HTML without escaping every quote. Concatenate short String pieces for dynamic text.
Wiring and safe build sequence
- GPIO 2 -> resistor -> LED anode; cathode -> GND (simple lamp stand-in)
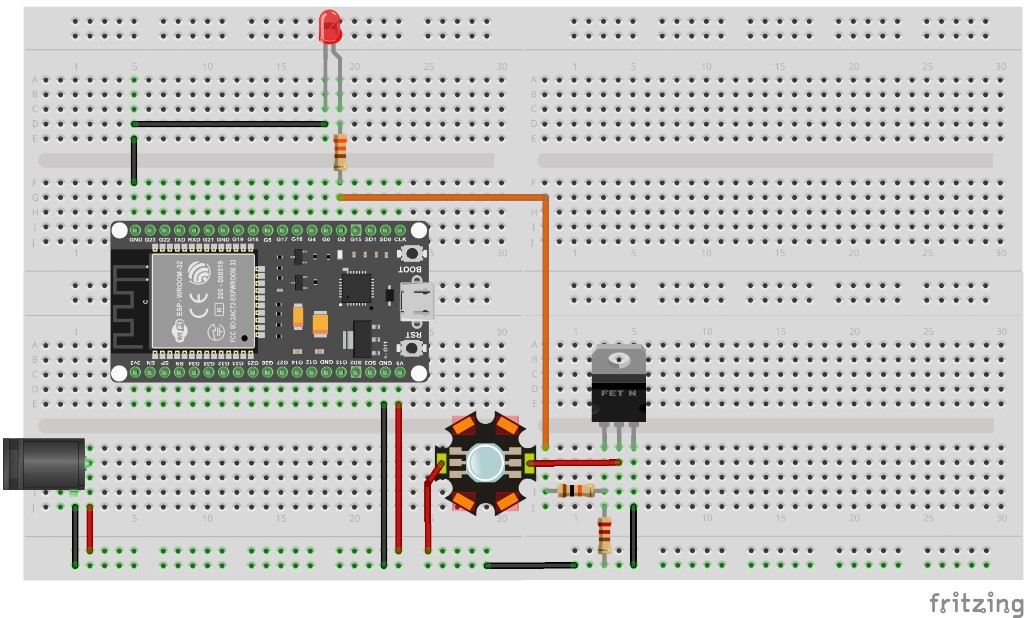
- Or GPIO 2 -> gate resistor -> N-MOSFET gate (pull-down to GND); external 5 V high-power LED via drain; common GND
- Same WiFi SSID as phone/PC; replace credential placeholders
Worked sketch 1: Basic ON/OFF remote
Download .ino sketchWhat this sketch is for: Discover WebServer routing: / shows state, /led/on and /led/off change GPIO 2 and redirect with 303.
#include <WiFi.h>
#include <WebServer.h>

const char* ssid = "YOUR_WIFI_SSID";
const char* password = "YOUR_WIFI_PASSWORD";

WebServer server(80);
const int ledPin = 2;
bool ledState = LOW;

String getHTML() {
  String html = R"=====(
<!DOCTYPE html>
<html>
<head>
  <title>ESP32 LED</title>
  <meta name="viewport" content="width=device-width, initial-scale=1">
  <style>
    body { font-family: sans-serif; text-align: center; margin-top: 40px; }
    a { display: inline-block; margin: 8px; padding: 12px 24px;
        color: white; text-decoration: none; border-radius: 4px; }
    .on { background: #2e7d32; }
    .off { background: #c62828; }
  </style>
</head>
<body>
  <h1>Basic lamp remote</h1>
  <p>Lamp is )=====";
  html += ledState ? "ON" : "OFF";
  html += R"=====(</p>
  <a class="on" href="/led/on">Turn ON</a>
  <a class="off" href="/led/off">Turn OFF</a>
</body>
</html>
)=====";
  return html;
}

void handleRoot() {
  server.send(200, "text/html", getHTML());
}

void handleLedOn() {
  ledState = HIGH;
  digitalWrite(ledPin, ledState);
  server.sendHeader("Location", "/");
  server.send(303);
}

void handleLedOff() {
  ledState = LOW;
  digitalWrite(ledPin, ledState);
  server.sendHeader("Location", "/");
  server.send(303);
}

void setup() {
  Serial.begin(115200);
  pinMode(ledPin, OUTPUT);
  digitalWrite(ledPin, ledState);

  WiFi.mode(WIFI_STA);
  WiFi.begin(ssid, password);
  Serial.print("Connecting");
  while (WiFi.status() != WL_CONNECTED) {
    delay(500);
    Serial.print(".");
  }
  Serial.println();
  Serial.print("Open http://");
  Serial.println(WiFi.localIP());

  server.on("/", handleRoot);
  server.on("/led/on", handleLedOn);
  server.on("/led/off", handleLedOff);
  server.begin();
}

void loop() {
  server.handleClient();
}
How the code works
- 303 + Location keeps the address bar on / after an action.
- Only handleClient() in loop.
Worked sketch 2: Room light remote
Download .ino sketchWhat this sketch is for: Product page for Lab room: named lamp, ON/OFF controls, and a last-changed line so you can see that the remote actually did something. Match the breadboard layout below before upload (GPIO 2 is the lamp output).
#include <WiFi.h>
#include <WebServer.h>

const char* ssid = "YOUR_WIFI_SSID";
const char* password = "YOUR_WIFI_PASSWORD";
const char* roomName = "Lab room";

WebServer server(80);
const int lampPin = 2;
bool lampOn = false;
String lastChange = "never";

String getHTML() {
  String html = R"=====(
<!DOCTYPE html>
<html>
<head>
  <title>Room light</title>
  <meta name="viewport" content="width=device-width, initial-scale=1">
  <style>
    body { font-family: sans-serif; text-align: center; margin-top: 40px; }
    a { display: inline-block; margin: 8px; padding: 12px 24px;
        color: white; text-decoration: none; border-radius: 4px; }
    .on { background: #2e7d32; }
    .off { background: #c62828; }
  </style>
</head>
<body>
  <h1>)=====";
  html += roomName;
  html += R"=====( light</h1>
  <p>Lamp is <strong>)=====";
  html += lampOn ? "ON" : "OFF";
  html += R"=====(</strong></p>
  <p>Last change: )=====";
  html += lastChange;
  html += R"=====(</p>
  <a class="on" href="/led/on">Turn ON</a>
  <a class="off" href="/led/off">Turn OFF</a>
</body>
</html>
)=====";
  return html;
}

void stampChange(const char* action) {
  lastChange = String(action) + " at ms " + String(millis());
}

void handleRoot() {
  server.send(200, "text/html", getHTML());
}

void handleOn() {
  lampOn = true;
  digitalWrite(lampPin, HIGH);
  stampChange("ON");
  server.sendHeader("Location", "/");
  server.send(303);
}

void handleOff() {
  lampOn = false;
  digitalWrite(lampPin, LOW);
  stampChange("OFF");
  server.sendHeader("Location", "/");
  server.send(303);
}

void setup() {
  Serial.begin(115200);
  pinMode(lampPin, OUTPUT);
  digitalWrite(lampPin, LOW);

  WiFi.mode(WIFI_STA);
  WiFi.begin(ssid, password);
  while (WiFi.status() != WL_CONNECTED) {
    delay(500);
    Serial.print(".");
  }
  Serial.println();
  Serial.print("Room light - http://");
  Serial.println(WiFi.localIP());

  server.on("/", handleRoot);
  server.on("/led/on", handleOn);
  server.on("/led/off", handleOff);
  server.begin();
}

void loop() {
  server.handleClient();
}
How the code works
- Change roomName for your lab label.
- lastChange uses millis as a simple timestamp stand-in.
- Same 303 pattern as sketch 1 - refresh stays safe.
- Build from the breadboard photo: lamp control is GPIO 2 (direct LED or MOSFET stage).
Test and record evidence
Practical evidence checklist
Common faults and checks
- Page never loads: same SSID; exact IP; not isolated guest WiFi.
- Server freezes: remove delay() from loop.
- LED dark: GPIO 2 wiring, MOSFET gate/common GND, or on-board LED mapping.
Check your understanding
Q1. What are you building?
Show answer
A room light remote on the LAN.
Q2. Why use 303 after ON/OFF?
Show answer
Reload / so refresh does not re-run the action.
Q3. Why call handleClient in loop?
Show answer
Process browser requests.
Q4. Must the phone share WiFi?
Show answer
Yes - otherwise it cannot reach the LAN IP.
Q5. What does sketch 2 add beyond basic ON/OFF?
Show answer
Room name and last-changed text.
Q6. What happens if loop uses delay(10000)?
Show answer
The page stops responding.
Q7. What WiFi mode?
Show answer
Station (STA).
Q8. Why raw string HTML?
Show answer
Avoid escaping every quote in markup.