
43. HTTP Client, JSON and Cloud APIs
Parse JSON as a client, then build an outdoor condition lamp driven by a live temperature field.
Learning outcomes
- Contrast HTTP client vs server roles
- Read JSON types, nesting and arrays
- Parse httpbin for discovery, then a live temperature field
- Drive an LED from a numeric JSON value
- Check HTTP status and DeserializationError before acting
Parts and preparation
ESP32 DevKit, USB, LED on GPIO 2, ArduinoJson by Benoit Blanchon, internet-capable 2.4 GHz WiFi.
Before power: inspect wiring, confirm supply voltage and ensure all connected circuits share GND.
Libraries for this lesson
In Arduino IDE 2 open Tools → Manage Libraries…. Search by the Library Manager name and install the package by the exact author below. Similar names from other authors can use different APIs and will break the example.
| Include | Library Manager name | Author | Install note |
|---|---|---|---|
WiFi.h | WiFi | Espressif | Built into the esp32 Arduino core. |
HTTPClient.h | HTTPClient | Espressif | Built into the esp32 Arduino core. |
ArduinoJson.h | ArduinoJson | Benoit Blanchon | Install ArduinoJson by Benoit Blanchon via Library Manager. |
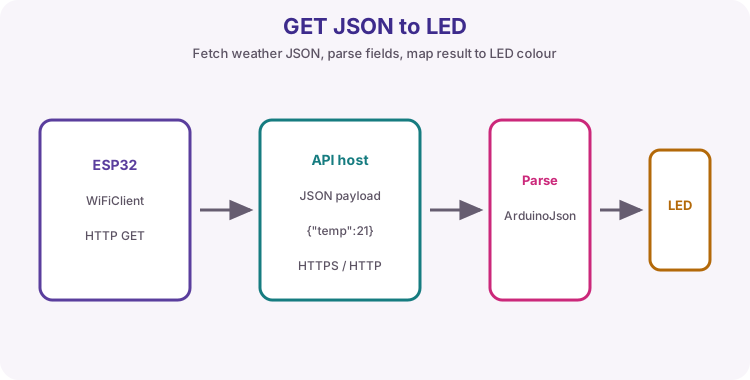
Project: Outdoor condition lamp
Build a lamp that reflects outdoor temperature from a free weather API (Open-Meteo over plain HTTP). LED on means milder than your threshold; off means cooler - a simple outdoor condition indicator.
Sketch 1 discovers nested JSON on httpbin (no API key). Sketch 2 fetches current.temperature_2m and drives the lamp.
Client versus server
Lesson 42 was server (browsers call you). Here the ESP32 is the client calling a remote host.
GET, POST and status codes
GET reads a resource. Always require status 200 before parsing - error pages are often HTML, not JSON.
| Code | Lab meaning |
|---|---|
| 200 | OK - parse the body |
| 404 | Wrong URL |
| -1 | Transport fail (DNS/WiFi/blocked) |
What JSON is
JSON uses objects { }, arrays [ ], double-quoted strings, numbers, true/false/null. Nested paths: doc["slideshow"]["author"]. Arrays: doc["slides"][0]["title"].
| Type | Example |
|---|---|
| string | "Yours Truly" |
| number | 21.5 |
| object | { "temp": 21.5 } |
| array | [1, 2, 3] |
ArduinoJson workflow
HTTP 200 -> getString -> deserializeJson -> check error -> read fields with | defaults -> act. ArduinoJson 7 uses JsonDocument.
HTTPS note
Many APIs are HTTPS-only. This course stays on plain HTTP (httpbin + Open-Meteo HTTP) so certificates do not hide the JSON lesson.
Wiring and safe build sequence
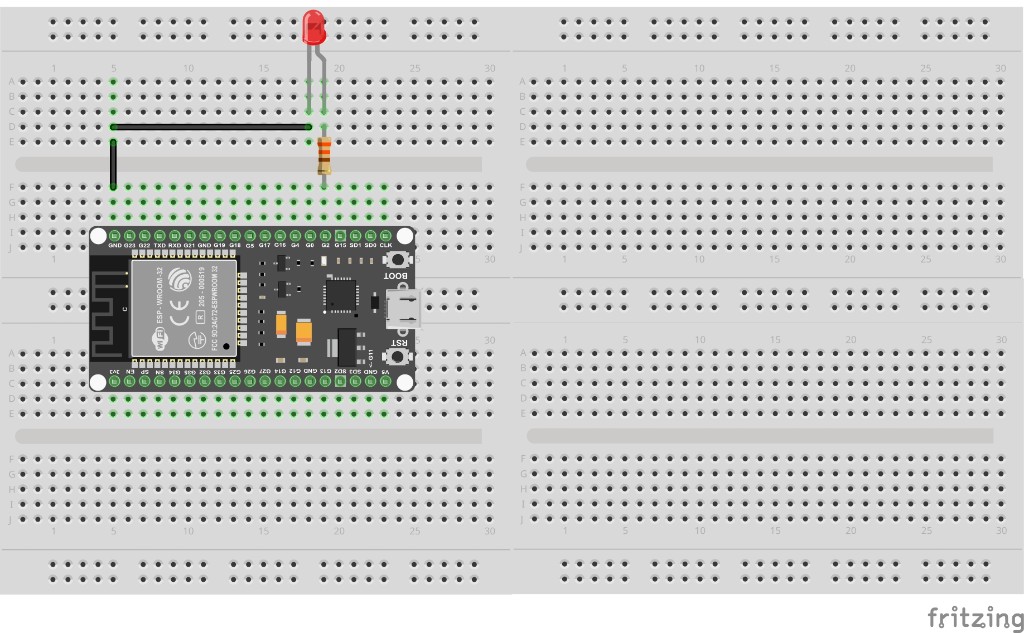
- GPIO 2 -> resistor -> LED; cathode -> GND
- USB power; WiFi credentials in sketch
Worked sketch 1: Learn JSON paths on httpbin
Download .ino sketchWhat this sketch is for: Discovery: GET httpbin.org/json, parse nested author and slides[0].title, LED on means parse OK.
#include <WiFi.h>
#include <HTTPClient.h>
#include <ArduinoJson.h>

const char* ssid = "YOUR_WIFI_SSID";
const char* password = "YOUR_WIFI_PASSWORD";
const char* url = "http://httpbin.org/json";
const int ledPin = 2;

void setup() {
  Serial.begin(115200);
  pinMode(ledPin, OUTPUT);
  digitalWrite(ledPin, LOW);

  WiFi.mode(WIFI_STA);
  WiFi.begin(ssid, password);
  Serial.print("Connecting");
  while (WiFi.status() != WL_CONNECTED) {
    delay(500);
    Serial.print(".");
  }
  Serial.println(" connected");
}

void loop() {
  if (WiFi.status() != WL_CONNECTED) {
    digitalWrite(ledPin, LOW);
    delay(2000);
    return;
  }

  HTTPClient http;
  http.begin(url);
  int code = http.GET();
  Serial.printf("HTTP %d\n", code);

  bool ok = false;
  if (code == 200) {
    String body = http.getString();
    JsonDocument doc;
    DeserializationError err = deserializeJson(doc, body);
    if (!err) {
      const char* author = doc["slideshow"]["author"] | "unknown";
      const char* slide0 = doc["slideshow"]["slides"][0]["title"] | "?";
      Serial.print("author: ");
      Serial.println(author);
      Serial.print("slide[0]: ");
      Serial.println(slide0);
      ok = true;
    } else {
      Serial.println(err.c_str());
    }
  }

  digitalWrite(ledPin, ok ? HIGH : LOW);
  http.end();
  delay(15000);
}
How the code works
- httpbin needs no API key - good for path practice.
- LED HIGH means parse success, not weather yet.
Worked sketch 2: Outdoor condition lamp
Download .ino sketchWhat this sketch is for: Fetch Open-Meteo current temperature over HTTP, print it, and light the lamp when temperature_2m is at or above 15 C. Change lat/lon for your site. If the URL is blocked, keep sketch 1 skills and swap host when your network allows. Match the breadboard layout below before upload.
#include <WiFi.h>
#include <HTTPClient.h>
#include <ArduinoJson.h>
const char* ssid = "YOUR_WIFI_SSID";
const char* password = "YOUR_WIFI_PASSWORD";
// Plain HTTP Open-Meteo sample (London). Edit latitude/longitude for your location.
const char* url =
"http://api.open-meteo.com/v1/forecast?latitude=51.5&longitude=-0.12¤t=temperature_2m";
const int ledPin = 2;
const float mildC = 15.0;
void setup() {
Serial.begin(115200);
pinMode(ledPin, OUTPUT);
WiFi.mode(WIFI_STA);
WiFi.begin(ssid, password);
while (WiFi.status() != WL_CONNECTED) {
delay(500);
Serial.print(".");
}
Serial.println(" connected");
}
void loop() {
if (WiFi.status() != WL_CONNECTED) {
digitalWrite(ledPin, LOW);
delay(2000);
return;
}
HTTPClient http;
http.begin(url);
int code = http.GET();
Serial.printf("HTTP %d\n", code);
bool lamp = false;
if (code == 200) {
String body = http.getString();
JsonDocument doc;
if (!deserializeJson(doc, body)) {
float t = doc["current"]["temperature_2m"] | -100.0;
Serial.print("Outdoor C: ");
Serial.println(t);
lamp = (t >= mildC);
} else {
Serial.println("JSON parse failed");
}
}
digitalWrite(ledPin, lamp ? HIGH : LOW);
Serial.println(lamp ? "Condition lamp ON (mild+)" : "Condition lamp OFF");
http.end();
delay(20000);
}How the code works
- Path current.temperature_2m is a nested number field.
- mildC threshold is a teaching default - adjust for your climate demo.
- Prefer HTTP for this lab; many other weather APIs need HTTPS + keys.
- Build from the breadboard photo: condition lamp LED on GPIO 2.
Test and record evidence
Practical evidence checklist
Common faults and checks
- HTTP -1: DNS, captive portal, or blocked outbound HTTP.
- JsonDocument errors: install current ArduinoJson by Benoit Blanchon.
- Open-Meteo blocked: try another network or fall back to sketch 1 paths.
Check your understanding
Q1. What product is sketch 2?
Show answer
An outdoor condition lamp driven by live temperature JSON.
Q2. Client or server here?
Show answer
Client - ESP32 calls a remote host.
Q3. Name three JSON types
Show answer
string, number, object (or array/bool/null).
Q4. How to read nested temperature_2m?
Show answer
doc["current"]["temperature_2m"].
Q5. Why check HTTP status first?
Show answer
Error pages may not be JSON.
Q6. What library parses JSON?
Show answer
ArduinoJson by Benoit Blanchon.
Q7. Why stay on HTTP in this lab?
Show answer
Avoid certificate setup while learning JSON.
Q8. What does LED mean in sketch 2?
Show answer
Temperature at or above the mild threshold.